False Positive: Third-Party Encryption Detected
Using Ignore3rdPartyEncryption=1 to resolve false positive blocking in SecureDoc 9.2 and above
Overview
SecureDoc 9.2 introduced a new pre-installation check for the Windows client. Before encrypting a drive, the client now scans for third-party disk encryption software to prevent double encryption. This check runs on new installs of the SecureDoc Client for Windows only and does not apply to macOS, Linux, or upgrade scenarios.
In some environments, this check produces a false positive. Security tools such as SentinelDeviceControl, Carbon Black, Trellix, and similar EDR and endpoint protection products register disk filter drivers and service entries that the detection logic incorrectly classifies as third-party encryption software. The drive is not encrypted by these tools. The check is working as designed; it is the classification of the detected driver that is incorrect.
When a false positive is detected, SecureDoc displays an error and halts the deployment until the profile is updated with the Ignore3rdPartyEncryption=1 parameter.
Example Error Messages
The following errors are typical false positives triggered by filter driver detection. The software named in the error is a security or EDR tool, not a disk encryption product.
|
|
|
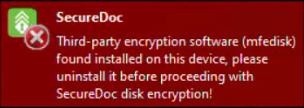
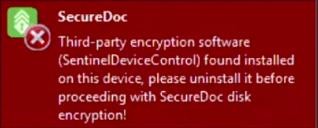
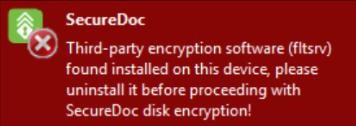
Figure 1: False positive errors triggered by mfedisk (Trellix), SentinelDeviceControl, and fltsrv (Carbon Black)
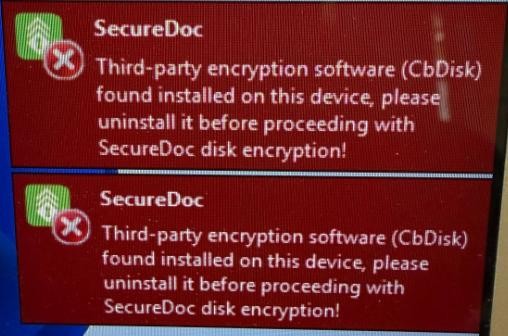
Figure 2: CbDisk false positive — two simultaneous alerts from Carbon Black disk filter driver
Root Cause
SecureDoc 9.2 added a pre-installation check to the Windows client new-install flow. The check exists to prevent double encryption. It is specific to new installs of the SecureDoc Client for Windows. Upgrades from earlier SecureDoc versions and non-Windows platforms are not affected.
The check works by scanning for disk filter drivers, registry entries, and service records that are characteristic of encryption software. Several modern EDR and endpoint protection products use the same low-level disk filter driver mechanism to intercept I/O operations for threat detection and device control, not for encryption. Because these products match the same structural signatures (filter driver present, service registered, registry entries visible), the pre-check flags them and blocks deployment even though the drive has no encryption applied. This behavior is intended to prevent double encryption.
Applies to: SecureDoc Client for Windows — new installs, version 9.2 and later Security tools known to trigger this false positive (not exhaustive):
If SecureDoc flags a product not listed here, verify it is a security/EDR tool before proceeding. |
Before You Proceed
The parameter Ignore3rdPartyEncryption=1 tells SecureDoc to skip the third-party encryption check and proceed with deployment. This is correct when the detected product is a false positive. It carries serious risk if the drive is already encrypted by another product.
WARNING: Verify Before Applying Risk of double encryption. If Ignore3rdPartyEncryption=1 is applied to a drive that is already encrypted by another product, SecureDoc will attempt to encrypt it a second time. Double encryption can render the drive inaccessible, cause a bluescreen on the next boot, and leave the data permanently unrecoverable. Before making any changes, confirm all three of the following:
By applying this flag, you confirm: You have verified that no third-party disk encryption is present on the endpoint, and you accept responsibility for the outcome if that verification is incorrect. |
Solution
Add the parameter Ignore3rdPartyEncryption=1 to the [General] section of the SecureDoc profile. Two methods are available depending on whether you are deploying via SES Console or remediating an already-installed endpoint locally.
Option 1: Update via SES Console (Recommended for New Deployments)
Use this method when deploying to endpoints that have not yet had SecureDoc installed.
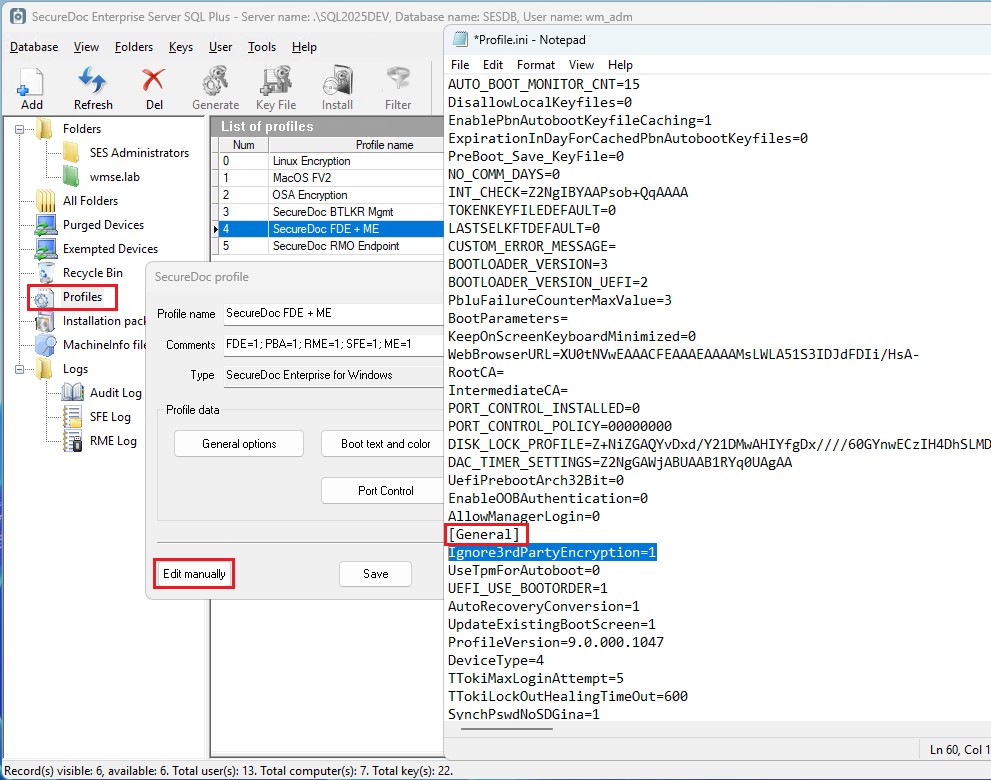
1 | Open the Profile in SES Console In the SES Console, navigate to Profiles and open the target profile. |
2 | Open Profile in Notepad Click Edit manually to open the profile file in Notepad. |
3 | Add the parameter Scroll to the[General] section and add the following line on its own row:
Save and close the file.
Figure 3: SES Console profile open in Notepad with Ignore3rdPartyEncryption=1 added under [General] |
4 | Publish and Package Publish the Profile, then recreate the Installation Package. |
5 | Deploy to Endpoint Install the updated package on the target endpoint. SecureDoc will bypass the false positive check and proceed with disk encryption. |
Option 2: Modify Locally on the Affected System
Use this method for endpoints that already have SecureDoc installed and are blocked from encrypting.
1 | Open the SecureDoc Install Directory Open File Explorer and navigate to: |
C:\Program Files\WinMagic\SecureDoc-NT
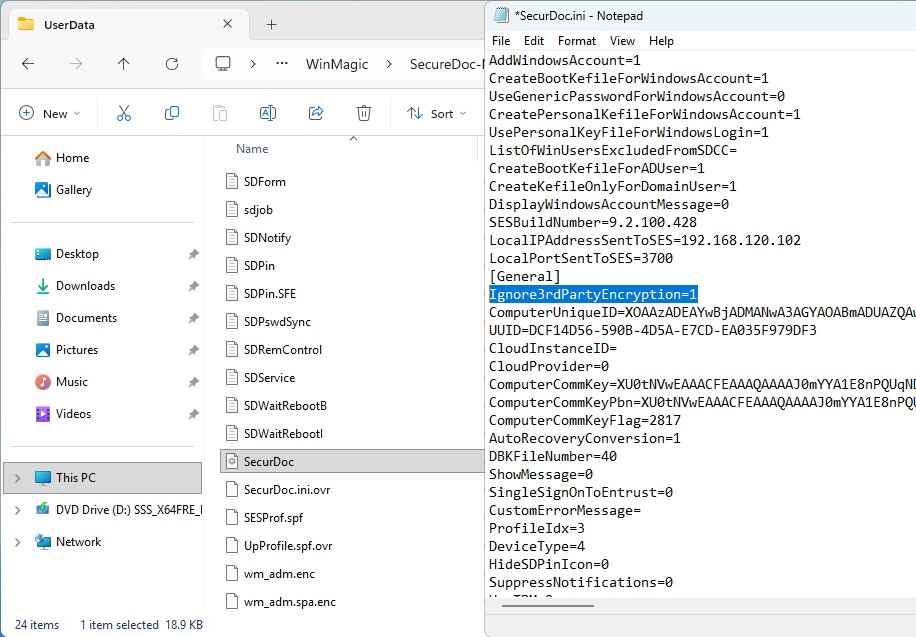
2 | Access the UserData Folder In the address bar, append \userdata to the path and press Enter. This opens the hidden operating system folder where SecurDoc.ini is stored. |
3 | Open SecurDoc.ini Locate and open SecurDoc.ini in a text editor. |
4 | Add the parameter Scroll to the [General] section. Add the following line: Ignore3rdPartyEncryption=1 Save the file to a temporary location (e.g. Desktop) first.
Figure 4: SecurDoc.ini open in Notepad with Ignore3rdPartyEncryption=1 highlighted under [General] |
5 | Back Up and Replace the Config File Back up the existing SecurDoc.ini in the \userdata folder. Copy your updated file from the temporary location into \userdata, overwriting the original. |
6 | Sign Out and Back In Sign out of Windows and sign back in. SecureDoc will reevaluate the profile, skip the false positive check, and begin the disk encryption process. |
Verification
After completing either option, confirm encryption has started:
The SecureDoc pre-boot screen should appear on next login.
In the SES Console, the endpoint's encryption status should change from "Not Encrypted" to "Encrypting" or "Encrypted."
No further third-party encryption error dialogs should appear.
Field | Detail |
Article ID | 2088 |
Product | SecureDoc for Windows |
Version Affected | 9.2 and later |
Applies To | SecureDoc Client for Windows — new installs only |
Environment | SecureDoc Windows Clients |
Severity | Medium — Deployment Blocker |
Last Updated | September 2026 |
Author: | Michael Reid |
For technical support, contact WinMagic Support
support.winmagic.com | [email protected] | +1-519-953-6000
© 2026 WinMagic Inc. All rights reserved. This document is provided for informational purposes and is subject to change without notice.