Overview
Permanent Auto-Boot is a SecureDoc configuration that bypasses the pre-boot authentication (Boot Logon) screen on every device startup. A dedicated Auto-Boot key file silently self-authenticates at pre-boot, and users authenticate only at the Windows login screen.
The drive remains fully encrypted. The Auto-Boot key file is a randomly generated key — it is not the user's personal key — and it is bound to the device profile that enables it.
⚠️ Security Note WinMagic does not recommend Permanent Auto-Boot for most enterprise environments. Pre-boot authentication is removed, shifting the security boundary entirely to the Windows login. Only deploy in environments with compensating controls — such as server rooms, kiosks, or headless devices — and document the risk acceptance. As noted in the SES 9.2 SR1 Administrator Manual: "Customized logos will not appear on devices using Permanent AutoBoot, which do not show the Boot Logon screen." |
Prerequisites
Before starting, confirm the following:
Target device is registered with SecureDoc Enterprise Server (SES)
You have SES admin rights to create users, modify profiles, and push commands
The endpoint is booted into Windows (not sitting at Boot Logon) when you push the profile
SecureDoc client is installed and communicating with SES
Step 1 — Create the Auto-Boot User Account in SES
In SES 9.2, the Auto-Boot account is created by setting the user Type to "Auto Boot" in the Add User dialog. This is a dedicated system account — not a personal user — that holds the key file used to silently self-authenticate at pre-boot.
From the SES 9.2 SR1 Administrator Manual: "The Type drop-list permits defining what type of user. Aside from regular users (the default), a user can be defined as an Auto-Boot user..." and "ensure that the user Type field has been set to 'Auto Boot'."
Step 1: Create the Auto-Boot User Account 1. In the SES Console, click the Users tab. 2. Right-click anywhere in the user list and select Add User. 3. In the Type dropdown, select Auto Boot. 4. Complete the user details (name, optional description). 5. Set privileges as appropriate. 6. Click Save.
SES 9.2 SR1 — Add User dialog (Users tab → right-click → Add User). Set Type to "Auto Boot". |
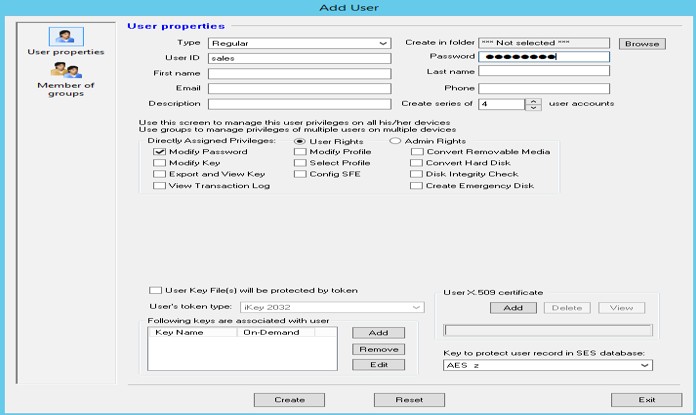
📝 Note from SES 9.2 SR1 Manual The ability to define the User Type remains available only until the user record is saved. A user cannot be changed from one type to another once the user record has been saved to the database. Create the Auto Boot account as a new dedicated account — do not try to convert an existing user. |
Step 2 — Create or Configure the Profile for Permanent Auto-Boot
You need a Device Profile with "Force permanent Auto-Boot" enabled under Boot Configuration. WinMagic recommends a dedicated profile for auto-boot devices rather than modifying an existing one.
2a — Create a New Profile
Step 2: Create the Auto-Boot Device Profile 1. In the SES Console, click Profiles in the navigation pane. 2. Right-click in the profile panel and choose Add Profile. 3. Select Endpoint as the Device Category. 4. Select SecureDoc Enterprise for Windows from the profile type dropdown. 5. Click OK. The Profile screen appears. 6. Enter a descriptive name (e.g. "Perm-AutoBoot-Servers") and optional notes.
SES 9.2 SR1 — Profile screen after selecting Add Profile → SecureDoc Enterprise for Windows. |
.jpg)
2b — Enable Permanent Auto-Boot in Boot Configuration
With the profile open, navigate to Boot Configuration and enable the permanent auto-boot option. This is the core setting that removes the Boot Logon screen from devices receiving this profile.
Step 3: Configure Boot Configuration General Options 1. In the open Profile screen, click Boot Configuration. 2. In the Boot Configuration General Options panel, locate: • Force permanent Auto-Boot (never display boot logon) → Check this 3. The "Select Auto-Boot Account" field becomes active. 4. Click Browse next to "Select Auto-Boot Account". 5. Select the Auto Boot user account created in Step 1. (Only users with Type = Auto Boot will appear in this list.) 6. Optionally check: • Protect Auto-Boot with TPM — binds the auto-boot key file to the device TPM, preventing it from auto-booting if the drive is transplanted to another device. • Disable auto boot after maximum failed logins at Windows — sets a Windows login lockout threshold (set the count below this option). 7. Click OK.
SES 9.2 SR1 — Boot Configuration General Options. Enable "Force permanent Auto-Boot" and select the Auto-Boot account. |
.jpg)
💡 TPM Protection Recommended The SES 9.2 SR1 Administrator Manual states: "Protect Auto-Boot with TPM — ensures that the device's drive cannot be auto-booted if an attacker were to transplant the drive into another device since no two TPM devices will ever render the same protection cipher." Enable this for servers and unattended devices. |
2c — Review Profile General Options
Before saving, review the Profile General Options tab to confirm password sync and RMO auto-login settings match your deployment needs.
.jpg)
SES 9.2 SR1 — Profile General Options tab. Review synchronization and auto-boot key login settings before saving.
"Users of RMO Packages will be automatically logged-in to the boot key file" — enable only if needed for RMO scenarios; not required for standard Permanent Auto-Boot.
"Synchronize SecureDoc with Windows password (bi-directional)" — disable on permanent auto-boot devices to avoid credential conflicts at Windows login.
When all settings are confirmed, click Save to save the profile.
Step 3 — Assign the Profile to the Device
With the Auto-Boot profile saved, assign it to the target device(s) in SES. The endpoint must be in Windows when the profile assignment is pushed.
Step 4: Assign the Auto-Boot Profile to the Device 1. In the SES Console, click the Devices tab. 2. Locate the target device in the device list. 3. Right-click the device and select Assign Profile. 4. Select the Auto-Boot profile created in Step 2. 5. Click OK or Apply to queue the profile assignment command. |
⚠️ Important The SES 9.2 SR1 Administrator Manual notes: "The ideal time to make profile changes that will affect a large number of devices is... after the normal periods of high SES communication load." Ensure devices are online and in Windows when the profile is pushed. Devices at Boot Logon cannot receive profile updates. |
Step 4 — Sync the Endpoint
After the profile is assigned, trigger a manual sync on the client device to pull down the new profile and auto-boot key file. After the next restart, Boot Logon will not appear.
Step 5: Trigger Sync and Verify 1. On the endpoint, locate the SecureDoc icon in the Windows system tray (padlock icon). 2. Right-click the icon. 3. Select Communicate with the server. 4. Wait for the sync confirmation. 5. Restart the device. 6. Confirm: after restart, the device skips Boot Logon and goes directly to Windows login.
SecureDoc system tray — right-click → "Communicate with the server" to pull the new Auto-Boot profile. |
.jpg)
Recommended Post-Setup Settings
After enabling Permanent Auto-Boot, configure the Credential Provider to prevent unexpected behavior at Windows login.
.jpg)
SecureDoc Credential Provider options — review after enabling Permanent Auto-Boot.
Disable Password Synchronization
In SecureDoc Control Center → Options → General
Uncheck "Synchronize SecureDoc with Windows password"
Click OK
Password sync is not needed when Boot Logon is bypassed ,the pre-boot password is a randomly generated auto-boot key, not the user's password.
Windows Login Lockout
From the SES 9.2 SR1 Administrator Manual, in Boot Configuration General Options: "Disable auto boot (activate Boot Logon) after maximum number of permitted failed logins reached. This option causes the SecureDoc client to monitor and count the number of failed login attempts to the Windows account if permanent Auto-Boot is being used. When the maximum number of failed login attempts is reached, the client device will be rebooted."
Set this threshold in the Boot Configuration General Options panel when creating the profile (Step 2b above). This compensates for the absence of pre-boot authentication.
Verification
After restart, the device goes directly to the Windows login screen — no Boot Logon appears
In SES Console → Devices tab: the device's Deployed State should show "Perm Autoboot"
Confirm the auto-boot key file is listed on the device in the device's key file grid in SES
Verify Windows login lockout threshold is functioning by checking the profile setting
Troubleshooting
Symptom | Action |
|---|---|
Boot Logon still appears after restart | Confirm the device synced (Step 4). Check Deployed State in SES Devices tab. Re-trigger Communicate with the server and restart. |
Auto-Boot account not visible when browsing in Boot Config | Confirm the user account Type is set to "Auto Boot" — only accounts with this type appear in the Select Auto-Boot Account browser (per SES 9.2 SR1 manual). |
Auto-boot fails after SD client upgrade | Known issue resolved in v9.0+. If on an earlier version, re-push the auto-boot profile post-upgrade to reissue the auto-boot key file. |
Device stuck in Temp AutoBoot state | See KB 2051 — Fix Device Stuck in Temp AutoBoot. Temp AutoBoot is a provisioning state; Permanent AutoBoot is a different deployed state. |
Windows lockout not working as expected | Confirm "Disable auto boot after maximum failed logins" is set in the Boot Configuration panel of the profile, not just in the client-side Control Center. |
Related Knowledge Base Articles
KB 1064 — How to Enable Auto-Boot on a Stand-Alone Device
KB 1392 — Unauthenticated Local Auto-Boot
KB 1445 — Manual Instructions for Setting Up Auto-Boot on an Encrypted Device
KB 1490 — How to Configure PBConnex Auto-Boot
KB 1868 — Changes to Failed Logins at Windows vs Pre-Boot Settings (v8.6+)
KB 1972 — Administrator Triggered Remote Auto-Boot
KB 1976 — Auto-Boot Logic Flow for Token-Protected Key Files
KB 2051 — Fix Device Stuck in Temp Auto-Boot
Product | SecureDoc Enterprise Server (SES) / SecureDoc Windows Client |
Version Covered | SecureDoc 9.0 and later |
Operating System | All Windows versions |
KB Number | 1309 |
Source Manual | 9.2 SR1 SES Administrator Manual — documentation.winmagic.com |
Last Updated | August 2026 |
© 2026 WinMagic Corp. All Rights Reserved.
Reference Manual: 9.2 SR1 SES Administrator Manual — documentation.winmagic.com/docs/ses-administrator-manual-d360-ready-1
WinMagic Technical Support
[email protected] | 1-888-879-5879 | winmagic.com/support
For documentation: documentation.winmagic.com
Screenshots sourced from the WinMagic SES 9.2 SR1 Administrator Manual. © 2026 WinMagic Corp. All Rights Reserved.
© 2026 WinMagic Corp. All Rights Reserved.