How to Reformat a Partially Encrypted USB Drive
Summary: This article provides two ways in which you can reformat a partially encrypted USB drive. This helps a user who encountered a scenario in which a disk had accidentally been removed/unplugged during the encryption process, resulting in partial conversion.
Topic: This provides instructions and steps on two methods that you can try to reformat a partially encrypted USB drive:
- Using the Diskpart command line utility
- Enabling the "Reset Disk" option in SD Control Center
Cause: The disk may have been accidentally removed/unplugged during the encryption process, leading to a partial conversion.
Steps to follow:
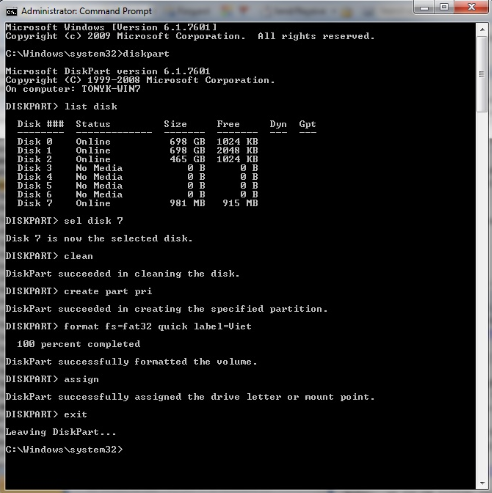
Method A: Using Diskpart Utility
Launch Command Prompt:
• Click on Start then in the run field, type cmd or command prompt
• Select application listed for command prompt by right clicking and select run as administrator
At the prompt, you will need to individually type the following commands:
1. Diskpart -> to launch the Diskpart utility
2. list disk -> to display the detected drives connected to the device
3. sel disk 7 -> to select the target drive i.e. dish #7
4. clean -> to wipe clean the disk
5. create part pri -> to create a primary partition on the disk
6. format fs=fat32 quick label=Viet -> This will format disk using Fat32 file system, a quick format, and label the disk as 'viet'
7. assign -> to assign a drive letter to the drive
8. exit ->to exist Diskpart utility
Method B: Resetting Disk
You can reformat a partially encrypted USB drive, by initiating the process to reset the disk.
This can be completed through the SecureDoc Control Center:
Steps:
From client machine:
- Go to the directory where SecureDoc is installed (default path should be: C:\Program Files\WinMagic\SecureDoc-NT\UserData.)
- Open the "SecurDoc.ini file using Notepad
- Look under the [General] section:
- Add the following line: ResetDisk=1 (must be on a separate line as shown in example).
example
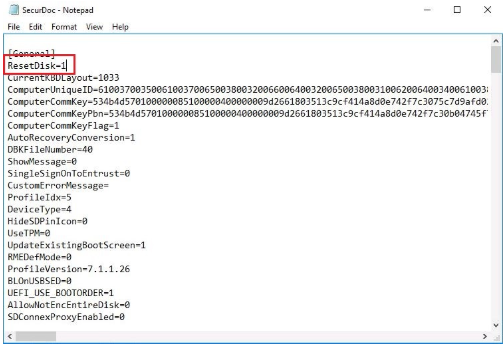
- Once entry has been added to the file, Save the file and then exit Notepad.
- Now launch SecureDoc Control Center
- Go to Encryption Management and select Encryption Management.
- The Reset Disk option should be located at the bottom right-hand section as shown in the example.
- Make sure to choose the correct USB drive in the drop-down "Drive" box.
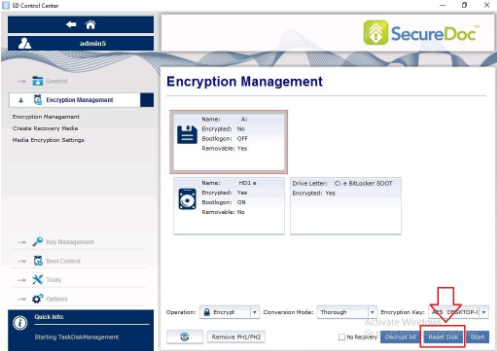
IMPORTANT: DO NOT RESET HD1 (or main drive) or you will effectively "wipe" your computer.
9. Remove the ResetDisk=1 option from SecurDoc.ini file once the USB drive has been successfully reset. (refer to previous step 2 and 3)