Installing OSA
Creating SecureDoc OSA Installation Packages
Overview of Steps for Creating SecureDoc OSA Packages
This chapter explains how to create the installation packages you can use to install SecureDoc independently of the host operating system. This feature can be used to protect Linux, Solaris, and Windows machines. Since the install is done at pre-boot, OS updates and upgrades can be run without needing to remove SecureDoc first.
The steps involved in creating a SecureDoc OSA installation package are as follows:
Create a location for the package files
Create a profile
Set installation package options
Create installation package files
Install SecureDoc using a USB or PXE server
Creating a SecureDoc OSA Profile
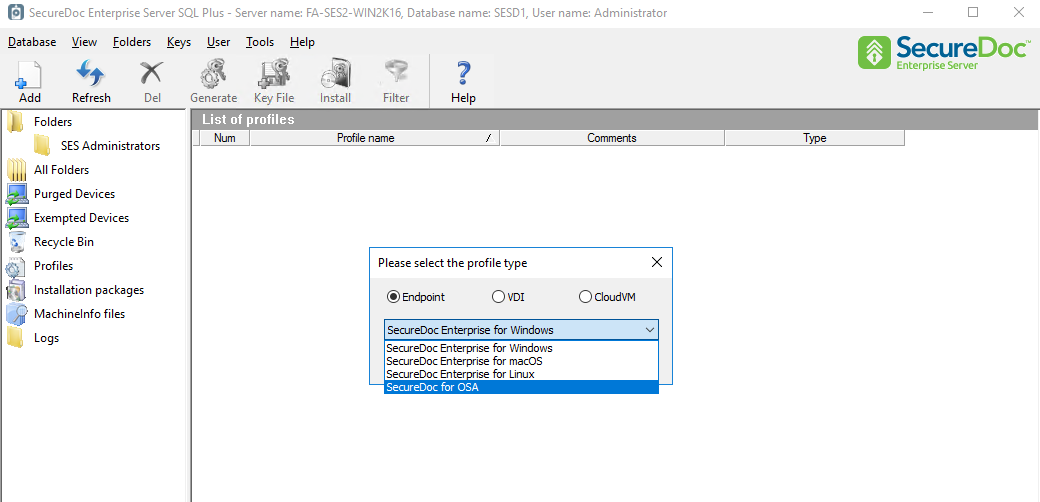
On SES, click Profiles in the navigation pane.
Right-click on the information pane, and choose Add profile. When prompted for a profile type, choose “SecureDoc for OSA” and click OK.
Enter a name and optional comments.
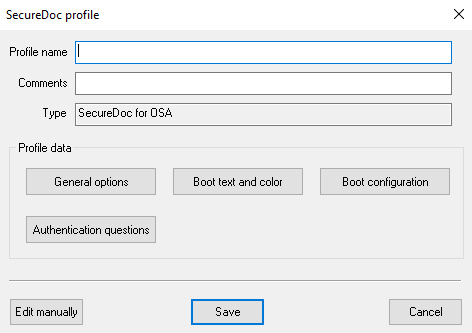
Click General options.
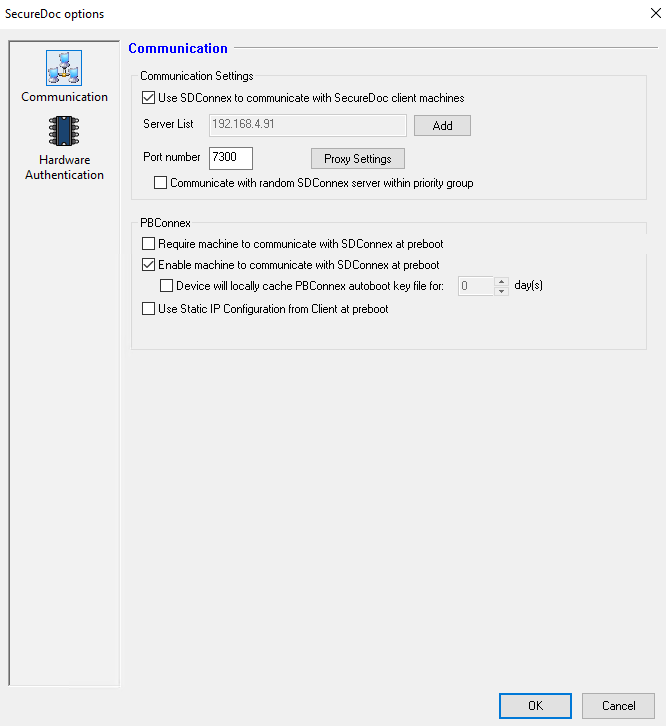
Specify the server’s IP address or network name and port number. User/computer information will be returned via SDConnex communication.
If more than one SDConnex connection has been defined, click Add and enter additional IP addresses or server names. For each server, set the priority it has for devices receiving this installation package. More than one server can have the same priority. The client devices configured with this profile will choose one of these connections, starting with those that have priority 1.
The client device configured with this profile will choose one of these connections. By default,
SDConnex connections are chosen starting with the first one and continuing to the next only if the
first connection is not available. To have client devices randomly choose one of the available
connections, check Communicate with random SDConnex server from list.
8. Click OK, then Save
Configuring an OSA Installation Package Settings
Once you have created an Installation Package (which is essentially a set of parameters in the SES database), you will use it to create the actual Installation Package files that are distributed to client devices.
Installation packages must be associated with a specific profile. The same profile can be associated with any number of installation packages.
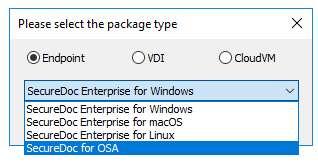
Click Installation packages in the navigation pane.
Right-click on the information pane and choose Add Package. When prompted for a package type, choose “SecureDoc for OSA” and click OK.
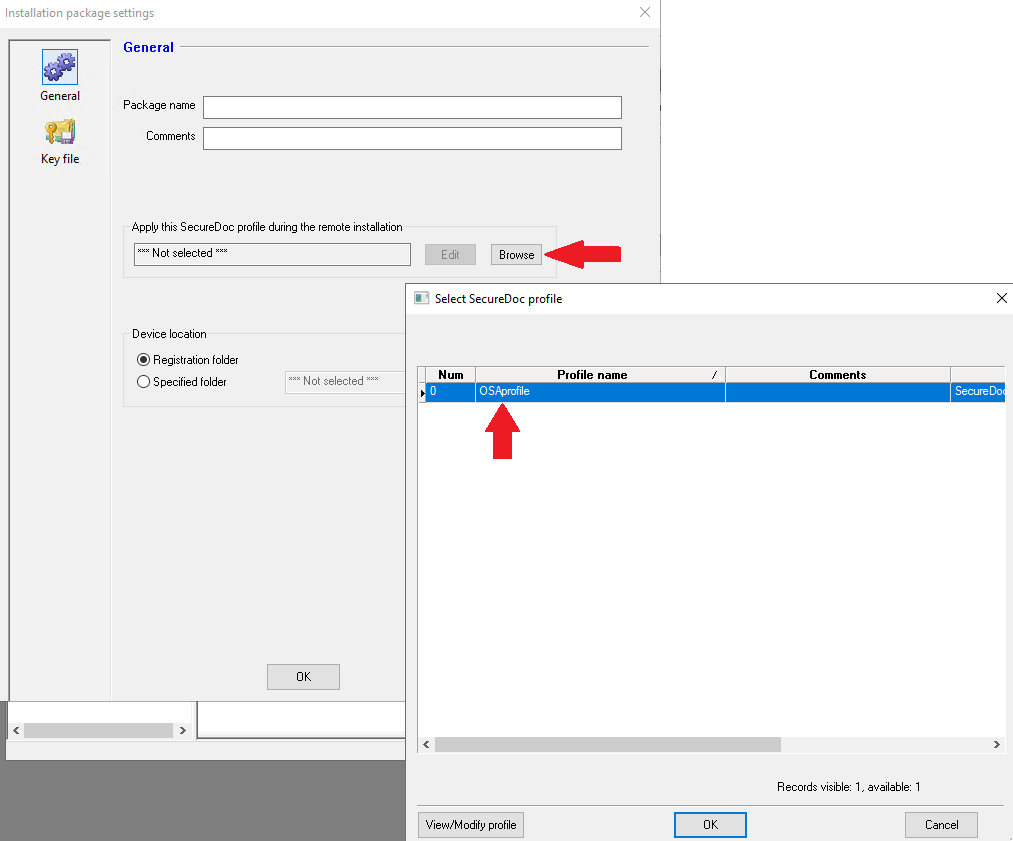
Click General.
Enter a package name and optional comments.
Click Browse and navigate to the location of the SecureDoc OSA profile to be used with this package.
Click Key file.
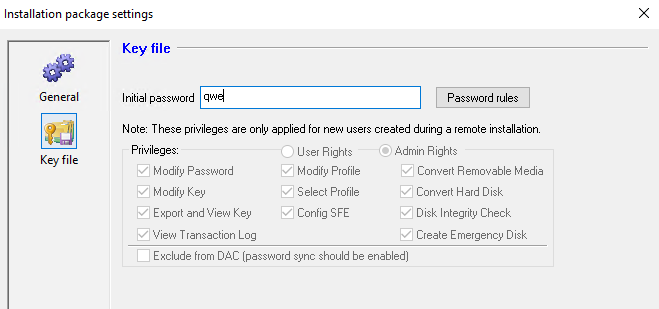
Enter the initial SecureDoc password to be used for all client devices on which this installation package will run. Users are prompted to change this password just before the SecureDoc OSA installation but after registering with SES. This password does not need to conform to Unicode standards but must conform to the global SES password rules. If no password is specified, the user receiving this package must already exist in SES, and their password will be required to complete the installation of SecureDoc using this package.
Set the password rules for the password of the key file created for client devices on which this installation package will run. See Appendix A: Password Rules for details on how to set these rules.
Set the privileges for the user key file created for client devices on which this installation package is run: users using SecureDoc OSA need admin privileges (click Admin Rights).
10. Browse to and select the default User ID (keyfile) to be available at Boot Logon.
11. Click OK, then Save.
Creating Installation Package Files
Once the installation package settings are configured, the installation package files can be created:
Right-click on the Installation Package in the information pane and choose “Create package files”.

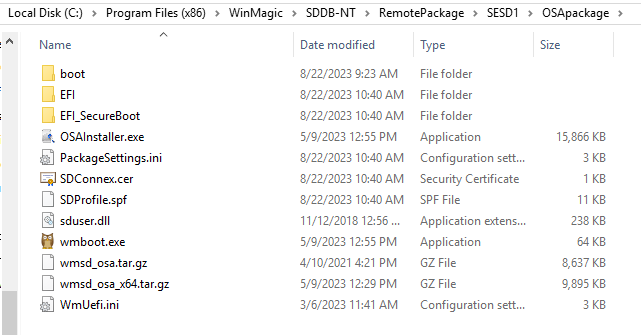
The files necessary for the installation package are created in the RemotePackage folder created by SES installation, in a subfolder given the package name.
To access this folder, right-click on the Installation Package once more and this time choose “Browse package files”.
Installing OSA on Linux using CLI
Preparing the Linux system for installation
On the Linux client, Open grub file with the editor of your choice.
Example:
nano /etc/default/grub
or
vi /etc/default/grub
Add libata.allow_tpm=1 to GRUB_CMDLINE_LINUX_DEFAULT to enable security ATA commands.
Example:
GRUB_CMDLINE_LINUX_DEFAULT="quiet splash libata.allow_tpm=1"
Note: if GRUB_CMDLINE_LINUX_DEFAULT parameter is not present on the grub menu, add the entire line to the file.
Save the changes you have made.
Update the system grub by running the respective commands
For Ubuntu
update-grub
For RedHat
grub2-mkconfig -o /boot/grub2/grub.cfg
or
grub2-mkconfig -o /boot/efi/EFI/redhat/grub.cfg
(for UEFI based RHEL)
Then reboot client machine
Create an osa directory on Linux client to copy the OSA package files.
Example:
mkdir /usr/local/osa
Copy the following files from the OSA package created earlier (see Creating Installation Package Files) to the osa folder created from step#5:
PackageSettings.ini
SDConnex.cer
SDProfile.spf
wmsd_osa.tar.gz
wmsd_osa_x64.tar.gz
boot
WmUefi.ini
If copying files from a usb to the Linux system
Assuming you have copied all the files from step#7 to a usb drive and plugged it in to your Linux system:
Run “lsblk” command to display where your usb is mounted
Example:
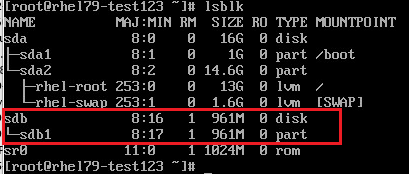
Mount the usb to your system
Example:
mount /dev/sdb1 /mnt

Copy the files from the /mnt folder to the /usr/local/osa
Example:
cp -rf /mnt/* /usr/local/osa
Copying files using an SFTP client
If you are copying files from Windows (i.e. or SES Server) to your Linux client you can use an SFTP client like WinSCP or FileZilla to do so.
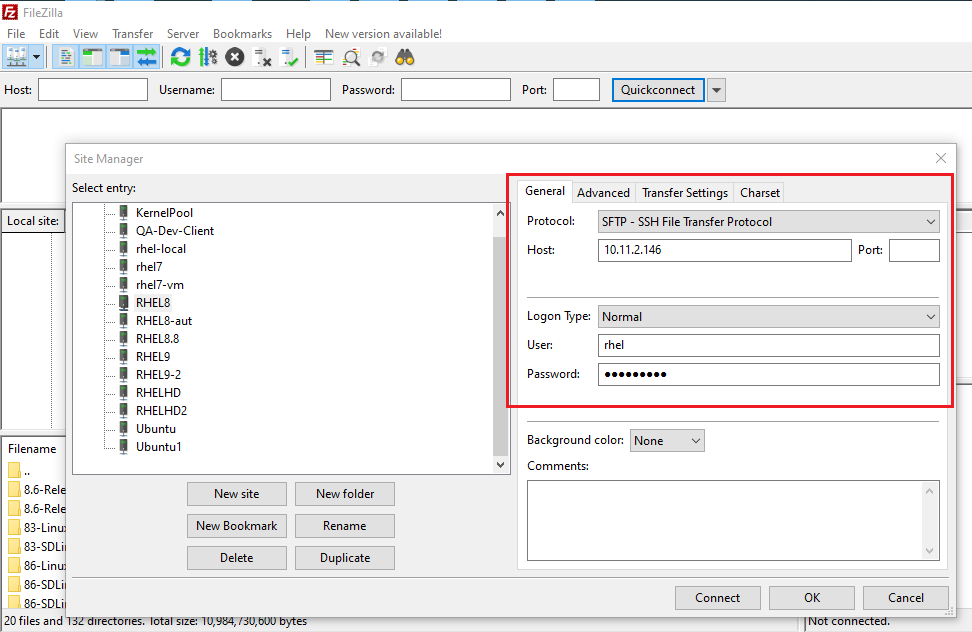
Open your SFTP client and make sure to choose SFTP for the protocol and fill in the credentials needed for your Linux client
Example:
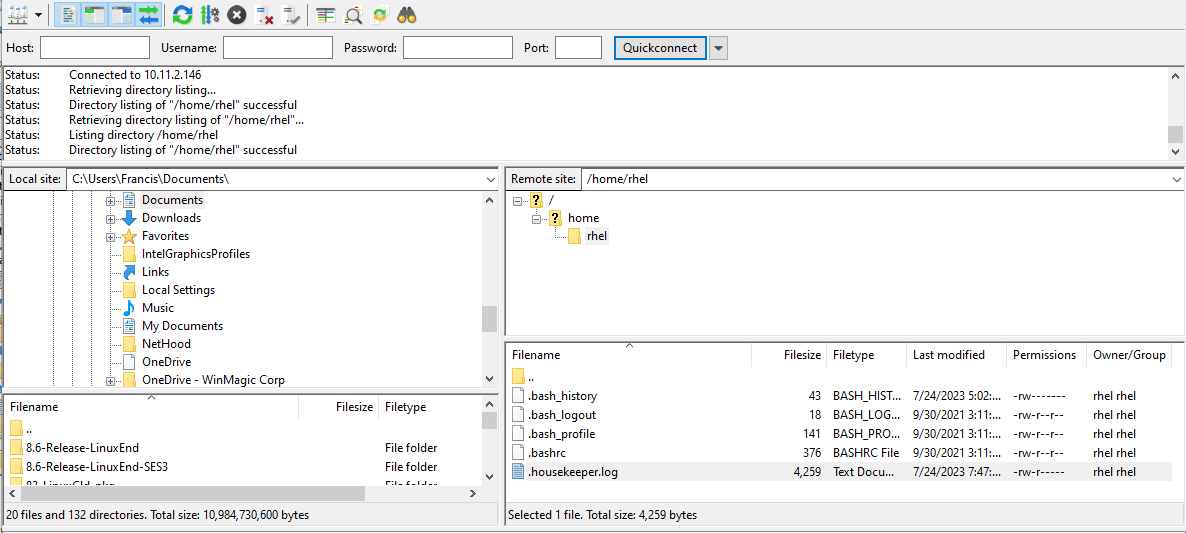
Connect to your Linux client (right panel should display the linux client’s directory when successfully connected).
Example:
Drag and drop the installer package to the linux client (on the right window pane)
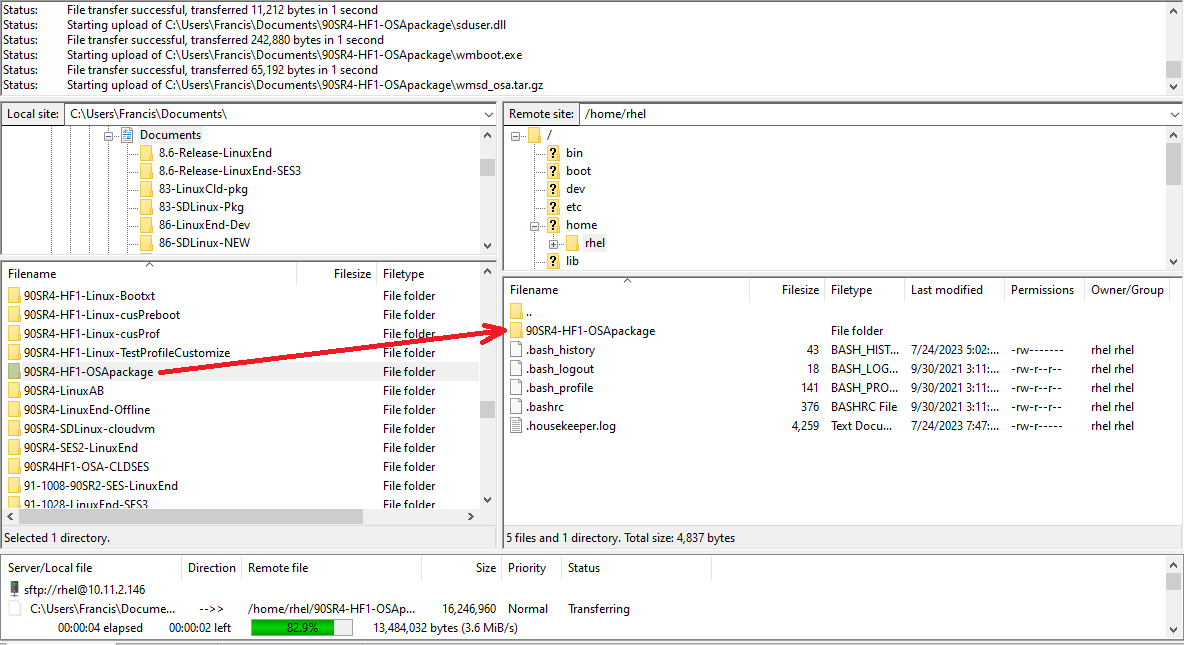
Note: Depending on permissions you may be able to copy files directly to /usr/local/osa (if you are able to you may skip the steps below).
If permissions do not allow it, its best to just copy them to the home directory or whatever directory you have access to copy files to from the SFTP client.
Once transfer has completed, go to the linux client and run the command to copy the files to the /usr/local/osa.
Example:
cp -rf /rhel/home/90SR4-HF1-OSApackage/* /usr/local/osa
Installing OSA
Extract the wmsd_osa.tar.gz or wmsd_osa_x64.tar.gz files depending on the system you are installing.
For 32-bit
tar -xvf wmsd_osa.tar.gz
For 64-bit
tar -xvf wmsd_osa_x64.tar.gz
Run the following command to start installation:
sudo env LD_LIBRARY_PATH=. ./InstallApp install userid=your_username
On the SES server, check that the OSA device has been registered.
Shutdown the client machine and then power it back on
User should now be presented with SecureDoc Preboot screen upon start-up to login
Uninstalling OSA
Go to folder that contain OSA package file and run command:
sudo env LD_LIBRARY_PATH=. ./InstallApp uninstall
Shutdown client machine and turn it on again to confirm BL is no longer displayed.
Note: You can also run the uninstall command with the /f option to force uninstall OSA. This option is useful if one of the pin files are not available i.e. some drives won’t be decrypted
Upgrading OSA
Note: The steps below assume that you have already completed upgrade of your SES server to the latest version
Create a new OSA package with the latest version
Copy the new OSA package to the target client machine for upgrade
Create a new OSA install path for the new version (Example: /usr/local/osa_92)
Example:
mkdir /usr/local/osa_92
Copy the following files from the new OSA package to the new install directory created
PackageSettings.ini
SDConnex.cer
SDProfile.spf
wmsd_osa.tar.gz
wmsd_osa_x64.tar.gz
boot
WmUefi.ini
Example:
cd /home/user/NEW_OSA_PKG/
cp -rf boot PackageSettings.ini SDConnex.cer SDProfile.spf wmsd_osa.tar.gz wmsd_osa_x64.tar.gz WmUefi.ini /usr/local/osa/92_OSA
Extract the wmsd_osa.tar.gz or wmsd_osa_x64.tar.gz files depending on the system you are installing.
Update the permissions of the files
sudo chmod 777 *
Copy the keyfile and encryption key from the old folder install path to the new install path
Example:
cp /usr/local/osa/temp/*.DBK /usr/local/osa_92/
cp /usr/local/osa/temp/*.ENC /usr/local/osa_92/
Run the OSA client upgrade command
sudo env LD_LIBRARY_PATH=. ./InstallApp update
Appendix A: Password Rules
To ensure that users use strong passwords, you specify the rules they must use when changing their password. (Users change passwords using the Control Center.) These rules are stored in the key file.
To set these rules, run SES from the Start menu and choose Tools >> Options >> General; then click Password Rules from the General options. When you are finished changing password rules, click OK. You are returned to the General options screen.
Password Security Policy
The goal of a policy enforced when passwords are created or changed is to prevent certain types of attack on protected devices. Here are some common attacks:
Guess Attack — may be successful if personal information like phone number, license plate number, pet’s name, etc. is used as a password. Such a password may be easily guessed by anyone who has access to this information.
Brute Force Attack — may be successful if the password is too short, allowing an attacker to try all possible combinations in a feasible time.
Dictionary Attack — may be successful if the password is a word of a real language, geographical name, name of a person, etc. Modern information technologies provide capability to find equivalents of such passwords for known authentication mechanisms.
The following rules allow administrator to prevent attacks described above:
Password must be at least 8 characters long (protects against Brute Force Attack). The maximum password length supported is 64 characters.
Password must contain at least one character that is a lower-case letter, upper-case letter, digit, or special character (protects against Brute Force and Dictionary Attacks).
Password hint feature must be disabled (protects against Guess Attack).
Self-Help Password Recovery feature must be disabled (protects against Guess Attack). Configure your password rules and key file options so they enforce this policy.
Password Rules Screen
Note: When the SES administrators make changes to the global password rules, then the existing package(s) password rules will not change. However, when a key file is created and sent down from SES during online installations, the changed global password rules will be applied, not the old password rules of the existing package(s). In case of offline installations, the old installation package rules will apply.
In a scenario where two different Windows SecureDoc installation packages are created, each one with different password rules, then the latest Password rules, (the rules applied to the second or the later installation package in this example) will overwrite the older password rules (first installation package). The new changed Password rules apply to all the new users as well as the existing users when a new key-file is created and sent down from SES
Password Composition
In the Contain at least area, specify the minimum number of characters and type of characters to be used in a password. Click the arrows or type the appropriate values. Note that:
numeric characters are the numbers 0 – 9
non-alphanumeric characters are any character except A - Z, a - z, and 0- 9. Non- alphanumeric characters include #, ?, !, @, and so on.
In the Contain at most area:
Specify the maximum number of repeated characters allowed in a password. A value of 0 means any number of consecutive characters is allowed—for example, “passssssword” would be allowed. A value of 1 means no consecutive characters areallowed—for example, “password” would not be allowed. A value of 2 means no more than two consecutive letters are allowed—for example, the password “passsword” would not be allowed. However, “PASSsword” would be allowed, because the third “s” is a different case.
Specify the maximum number of consecutive characters allowed in common between the old password and a new one. For example, if you specify a maximum of 2 consecutive characters, and the old password was “PASSWORD”, a new password of “WORLDMAP” would not be allowed, because there are three consecutive characters (“WOR”) in the old and new password. However, “WoRLDMAP” would be allowed, because the “o” is a different case.
General Options
Use these options to set up password expiry. Causing passwords to expire after a period of time increases security since it requires users to change their passwords at regular intervals (users tend to choose from a limited set of possible passwords that may be easily guessed by someone familiar with that user’s patterns, or may write down or share their password). Requiring users to change their passwords regularly diminishes these risks.
NOTE: In V9.0, the option that defines the number of days after which the password expires now also applies to the BitLocker PIN/Passphrase. In V9.0 functionality was added to force users to rotate/change their BitLocker PIN/Passphrase on a regular basis (defined here). Note that this ONLY applies if the
Notes:
Password expiry time must be equal to or greater than the amount of time the password must be kept.
You cannot change the password timing after the Key File has been created. If it is necessary to change the password timing, make the change in these global settings, then remove and re-add affected users from devices, to force the creation of new key files for those users. The new key files will be created with the revised timing defined in the global settings.
The Change initial password option is not available in the new SES v7.1. When the SES is upgraded from the older version (e.g. version 6.5 or lower), the change initial password option will be ignored.
To set a minimum number of days for which a password must be kept, enter a value in the Password must be retained for at least field.
Use the Expiry enforcement option to determine what happens when the password expires. Check this option to have key files permanently expire when their password expires. Clear this option to have users, when the password expires, still be able to log on to their devices (they are then prompted to enter a new password).
Password Recovery Options
To prevent users from defining or using password hints, check the Disable Password Hint option.
Set the minimum total (aggregate) number of characters used in answering the self-help authentication questions in the For self-help password recovery... field. Clarification: The number entered here applies as the combined character count of all the answers provided, so for example a setting of (say) 20 characters means that the user must have entered a minimum of 20 characters (in total) when answering all the questions - not 20 characters per individual answer.
Set the minimum number of questions a user must answer for self-help password recovery in the For self-help password recovery... field. NOTE: Due to space constraints on the Self-Help Recovery screen at Pre-Boot, the maximum number of questions that can be posed or displayed is 7. WinMagic recommends 3-5 questions as offering a good degree of security, while not overly taxing the user to remember a large set of personal answers over a long period of time.
Other Options
Set the maximum number of passwords to be saved in the key file’s password history. New passwords are checked against the key history file to prevent any duplicates from being created. For example, if you set the history to 5, any new password cannot have been used in the past 5 times the password was changed.
If you are using token-based key files, enter a value in the After a token-based key file’s password... field. When doing password recovery on a token-based key file, a password-based key file is created and used in place of the token-based key file. This option determines how long the user can use this password-based key file before having to run password recovery again or switch to using a token.
Note: The password for the actual token can only be changed after the token is authenticated and only if the token vendor supports this functionality. Password rule settings apply to all key files created after the settings have been modified.
Appendix B: Installing OSA in Standalone Mode
Important: Standalone mode will install OSA but will skip registration and update to SES. This means you will not have access to any of the recover methods provided by SES like creating recovery data key files and challenge response capability. This mode is typically used for testing and debugging purposes so if you are planning on using this option for your deployment please make sure to talk to your technical support representative to make sure that this option is rig
Run the following command to install OSA in standalone mode.
sudo env LD_LIBRARY_PATH=. ./InstallApp install /s userid=your_username
©Copyright 1997 - 2026 by WinMagic Inc. All rights reserved.
Printed in Canada
Many products, software and technologies are subject to export control for both Canada and the United States of America. WinMagic advises all customers that they are responsible for familiarizing themselves with these regulations. Exports and re-exports of WinMagic Inc. products are subject to Canadian and US export controls administered by the Canadian Border Services Agency (CBSA) and the Commerce Department’s Bureau of Industry and Security (BIS). For more information, visit WinMagic’s web site or the web site of the appropriate agency.
WinMagic, SecureDoc, SecureDoc Enterprise Server, Compartmental SecureDoc, SecureDoc PDA, SecureDoc Personal Edition, SecureDoc RME, SecureDoc Removable Media Encryption, SecureDoc Media Viewer, SecureDoc Express, SecureDoc for Mac, MySecureDoc, MySecureDoc Personal Edition Plus, MySecureDoc Media, PBConnex, SecureDoc Central Database, and SecureDoc Cloud Lite are trademarks and registered trademarks of WinMagic Inc., registered in the US and other countries. All other registered and unregistered trademarks herein are the sole property of their respective owners. © 2026 WinMagic Inc. All rights reserved.
Acknowledgements
This product includes cryptographic software written by Antoon Bosselaers, Hans Dobbertin, Bart Preneel, Eric Young ([email protected]) and Joan Daemen and Vincent Rijmen, creators of the Rijndael AES algorithm.
This product includes software developed by the OpenSSL Project for use in the OpenSSL Toolkit (http://www.OpenSSL.org/).
WinMagic would like to thank these developers for their software contributions.
Contacting WinMagic
WinMagic 11-80 Galaxy Blvd. Mississauga, Ontario, M9W 4Y8 Toll free: 1-888-879-5879 Phone: (905) 502-7000 Fax: (905) 502-7001 | Sales: Marketing: Human Resources: Technical Support: For information: For billing inquiries: |

11-80 Galaxy Blvd., Mississauga ON M9W 4Y8
Tel: (905) 502-7000 | Fax: (905) 502-7001
Web: www.winmagic.com | Email: [email protected]
WinMagic provides the world’s most secure, manageable and easy-to–use data encryption solutions. Compatible with all editions of Microsoft Windows Vista, 7, and 10 as well as Mac and Linux platforms, WinMagic’s SecureDoc protects sensitive data stored on portable media such as laptops and removable media including USB thumb drives and CD/DVDs. Thousands of the most security conscious enterprises and government organizations around the world depend on SecureDoc to minimize business risks, meet privacy and regulatory compliance requirements, and protect valuable information assets against unauthorized access. With a full complement of professional and customer services, WinMagic supports over three million SecureDoc users in approximately 43 countries. For more information, please visit www.winmagic.com, call 1-888-879-5879 or e-mail us at [email protected].
SecureDoc, SecureDoc Enterprise Server, Compartmental SecureDoc, SecureDoc PDA, SecureDoc Personal Edition, SecureDoc RME, SecureDoc Removable Media Encryption, MySecureDoc, MySecureDoc Personal Edition Plus, MySecureDoc Media, and SecureDoc Central Database are trademarks of WinMagic Inc. Other products mentioned here in may be trademarks and / or registered trademarks of their respective owner.
© Copyright 2026 WinMagic Inc. All rights reserved. This document is for informational purpose only. WinMagic Inc. makes NO WARRANTIES, expressed or implied, in this document. All specification stated herein are subject to change without notice.