SecureDoc For Linux
Data Recovery Guide
v9.2
©Copyright 1997 - 2024 by WinMagic Inc. All rights reserved.
Printed in Canada
Many products, software and technologies are subject to export control for both Canada and the United States of America. WinMagic advises all customers that they are responsible for familiarizing themselves with these regulations. Exports and re-exports of WinMagic Inc. products are subject to Canadian and US export controls administered by the Canadian Border Services Agency (CBSA) and the Commerce Department’s Bureau of Industry and Security (BIS). For more information, visit WinMagic’s web site or the web site of the appropriate agency.
WinMagic, SecureDoc, SecureDoc Enterprise Server, Compartmental SecureDoc, SecureDoc PDA, SecureDoc Personal Edition, SecureDoc RME, SecureDoc Removable Media Encryption, SecureDoc Media Viewer, SecureDoc Express, SecureDoc for Mac, MySecureDoc, MySecureDoc Personal Edition Plus, MySecureDoc Media, PBConnex, SecureDoc Central Database, and SecureDoc Cloud Lite are trademarks and registered trademarks of WinMagic Inc., registered in the US and other countries. All other registered and unregistered trademarks herein are the sole property of their respective owners. © 2024 WinMagic Inc. All rights reserved.
Acknowledgements
This product includes cryptographic software written by Antoon Bosselaers, Hans Dobbertin, Bart Preneel, Eric Young ([email protected]) and Joan Daemen and Vincent Rijmen, creators of the Rijndael AES algorithm.
This product includes software developed by the OpenSSL Project for use in the OpenSSL Toolkit (http://www.OpenSSL.org/).
WinMagic would like to thank these developers for their software contributions.
Contacting WinMagic
WinMagic 11-80 Galaxy Blvd.| Toronto, ON | M9W 4Y8 | Canada Toll free: 1-888-879-5879 Phone: (905) 502-7000 Fax: (905) 502-7001 | Sales: Marketing: Human Resources: Technical Support: For information: For billing inquiries: |
Contents
Creating the SDLinux Recovery Data
Recovery On SES Console
Double click on the target device
On the ‘Edit device information’ window, under ‘Associated Disks’ select one of the disks and click on ‘Create Linux Recovery Data’.
OR
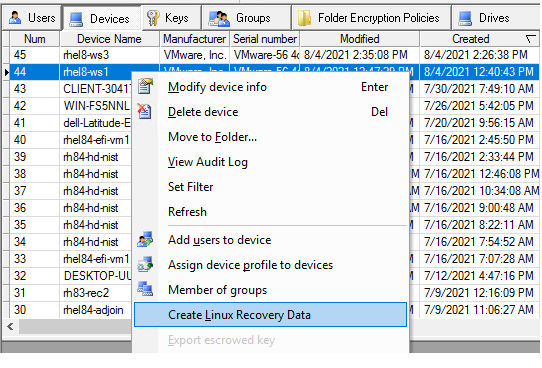
You can also right click on the target device and select ‘Create Linux Recovery Data’
On the ‘Export FDE Recovery Info’ window, click on ‘Browse’ to select a path/folder where to save the recovery files.
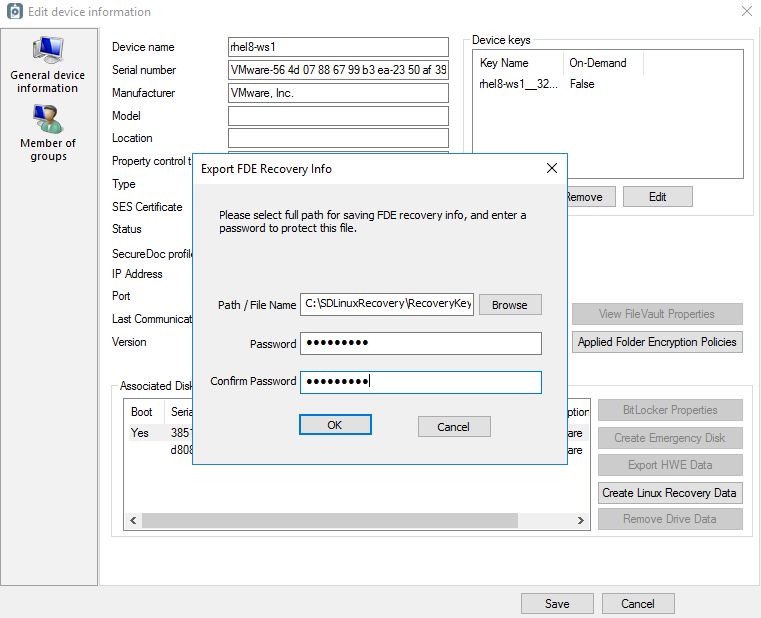
Enter the password for the recovery key and click ok.
You should see the prompt below to confirm the recovery files have been created.

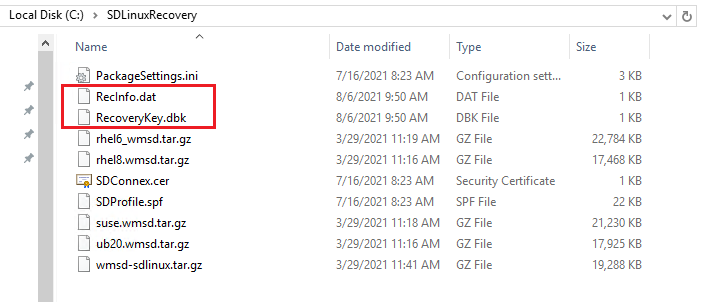
Navigate to the path where you saved the recovery files and confirm that all files are created. Make sure especially that both RecInfo.dat and RecoveryKey.dbk are present on the path.
Recovery On SES Web
Navigate to the Devices tab and select the target device
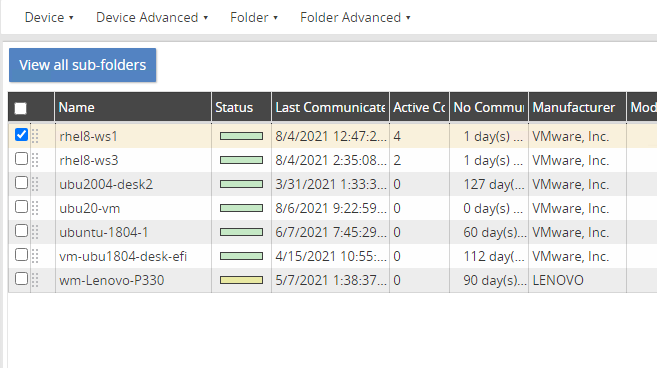
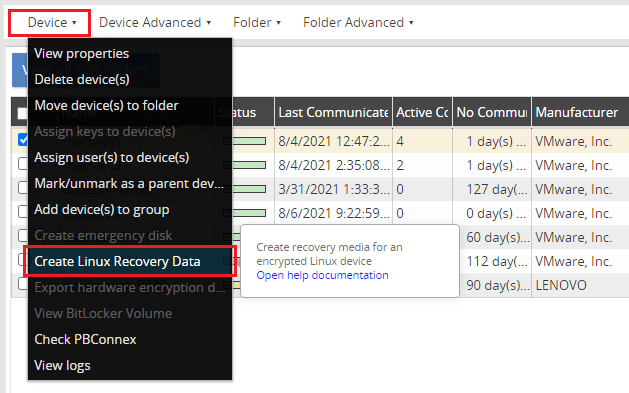
Click the ‘Device’ menu and click on ‘Create Linux Recovery Data’
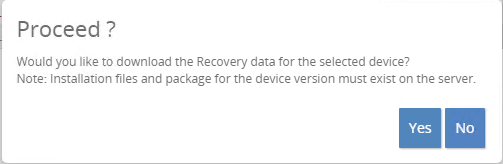
Click ‘Yes’ on the prompt to proceed created Recovery data for the device
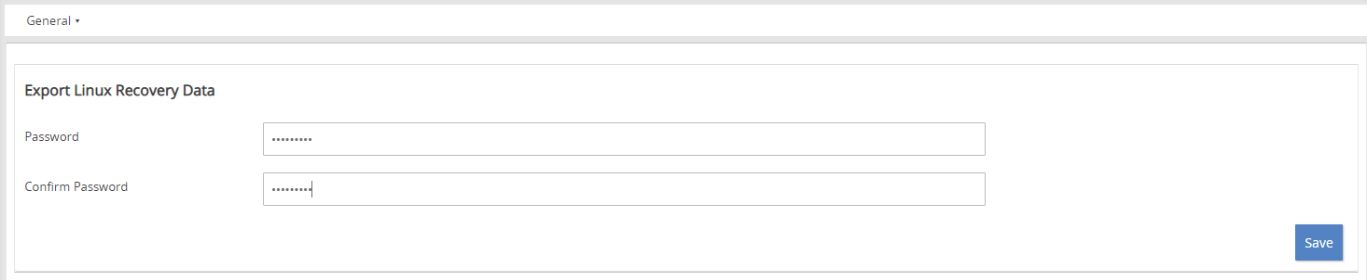
On the ‘Export Linux Recovery Data’, enter the password for the recovery key and click ‘Save’
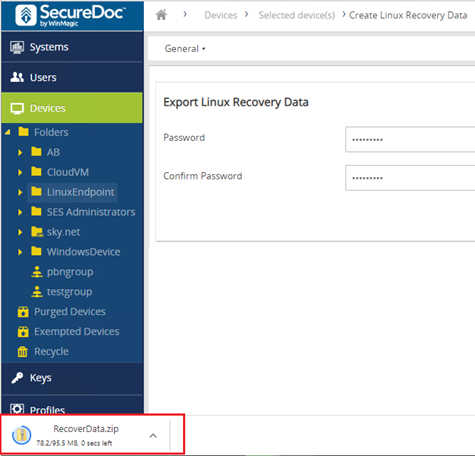
Depending on the browser you are using you should see a prompt a download start for the ‘RecoveryData.zip’ file.
When creating the recovery data the files created are similar to that of creating an SDLinux installation package with the exception of the RecInfo.dat and RecoveryKey.dbk files.
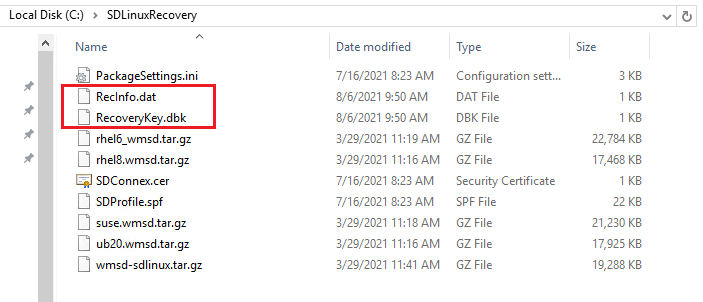
RecInfo.dat – The recovery disk information
RecoveryKey.dbk – The recovery keyfile (used in tandem with the RecInfo.dat) for unlocking the disk.
wmsd-sdlinux.tar.gz – Compressed tar file containing the recovery script files used for recovering on Ubuntu (14.04, 16.04, 18.04), RHEL 7.x and CentOS 7.x operating systems
rhel6_wmsd.tar.gz – Compressed tar file containing the recovery script files used for recovering on (Legacy) RHEL 6.x operating systems ONLY
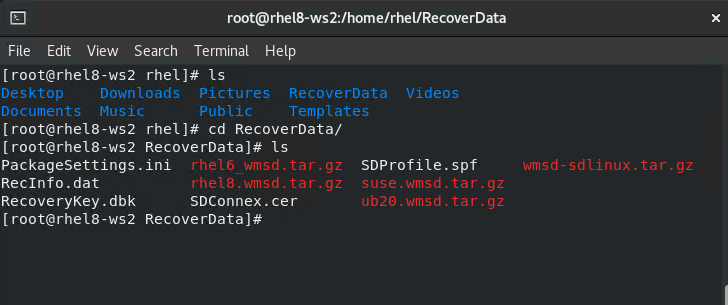
rhel8.wmsd.tar.gz – Compressed tar file containing the recovery script files used for recovering on RHEL 8.x operating systems ONLY
ub20.wmsd.tar.gz – Compressed tar file containing the recovery script files used for recovering on Ubuntu 20.x operating systems ONLY
suse.wmsd.tar.gz – Compressed tar file containing the recovery script files used for recovery on SUSE 15.x operating systems ONLY
SDProfile.spf – file containing profile settings, media encryption, etc…
PackageSettings.ini – Configuration file.
SDConnex.cer – SDConnex certificate.
Recovering Data from an Encrypted System with a Live USB
This applies for cases when:
The users OS disk becomes inaccessible (i.e. kernel panics, corruption…) and would like to be able to unlock the encrypted disk and recover the data on the system.
Limitation:
Does not apply to encrypted systems that have been crypto erased
Does not apply to partially encrypted systems
Requirements:
Client 1: The client to recover – The encrypted system that is to be unlocked and recovered
USB 1: USB drive containing a bootable Ubuntu ISO
USB 2: USB drive containing the Recovery files to copy to the system
Note: Ubuntu Live USB is used here as the recovery process requires some pre-requisite software packages to be installed in order to run. Unfortunately the RedHat Recovery media shell does not allow for any additional installs (does not have yum in order to install pre-requisite package)
Here are the steps on how to recover an encrypted disk with a Live USB:
Note: Make sure to back-up your system prior to performing the client upgrade.
Plug-in the Ubuntu live USB to the target system being recovered
Once booted to the Live USB, choose “Try Ubuntu”
Ensure that you are connected to an internet connection either via wifi or wired connection once booted to the live OS.
Open terminal and sudo to switch as root
Plug-in the second usb drive containing the Recovery files
Run ‘lsblk’ command to view the current partitions and mounted usb
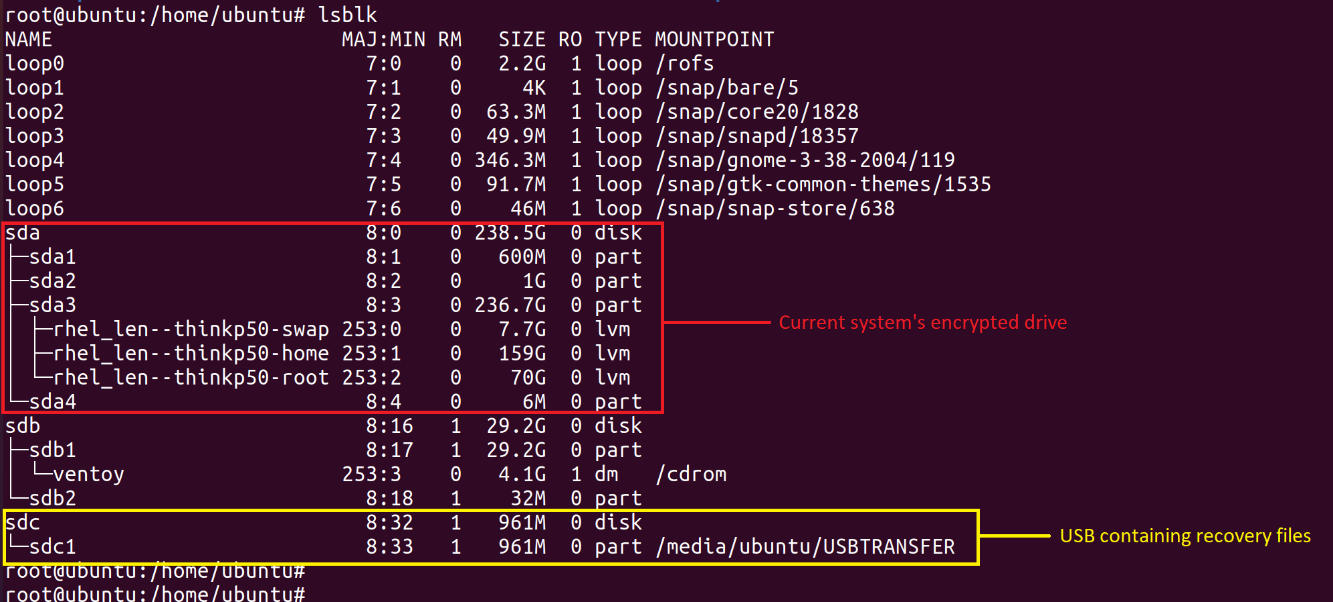
Copy the Recovery data files to the client machine (For info on how to create the recovery data See - Creating the SDLinux Recovery Data):
cp -rf /media/ubuntu/USBTRANSFER/LinuxRecovery /home/ubuntu
Navigate to the LinuxRecovery folder that you copied to your system and extract the appropriate binary installer file (In this example, the Live USB used is from an Ubuntu 20.04 ISO so the binary files used here is the ub20.wmsd.tar.gz file)
cd /home/ubuntu/LinuxRecovery
tar -xvf ub20.wmsd.tar.gz
Copy the RecoveryKey.dbk and RecInfo.dat files to the extracted /winmagic folder

Run the following commands to enable installation of pre-requisite packages required by the recovery script:
add-apt-repository universe
apt-get update
Navigate to the extracted winmagic folder and run the recovery command:
cd /winmagic
./sdrecover.sh --keyfile=<recovery_file_path> --recfile=<RecInfo_file_path>
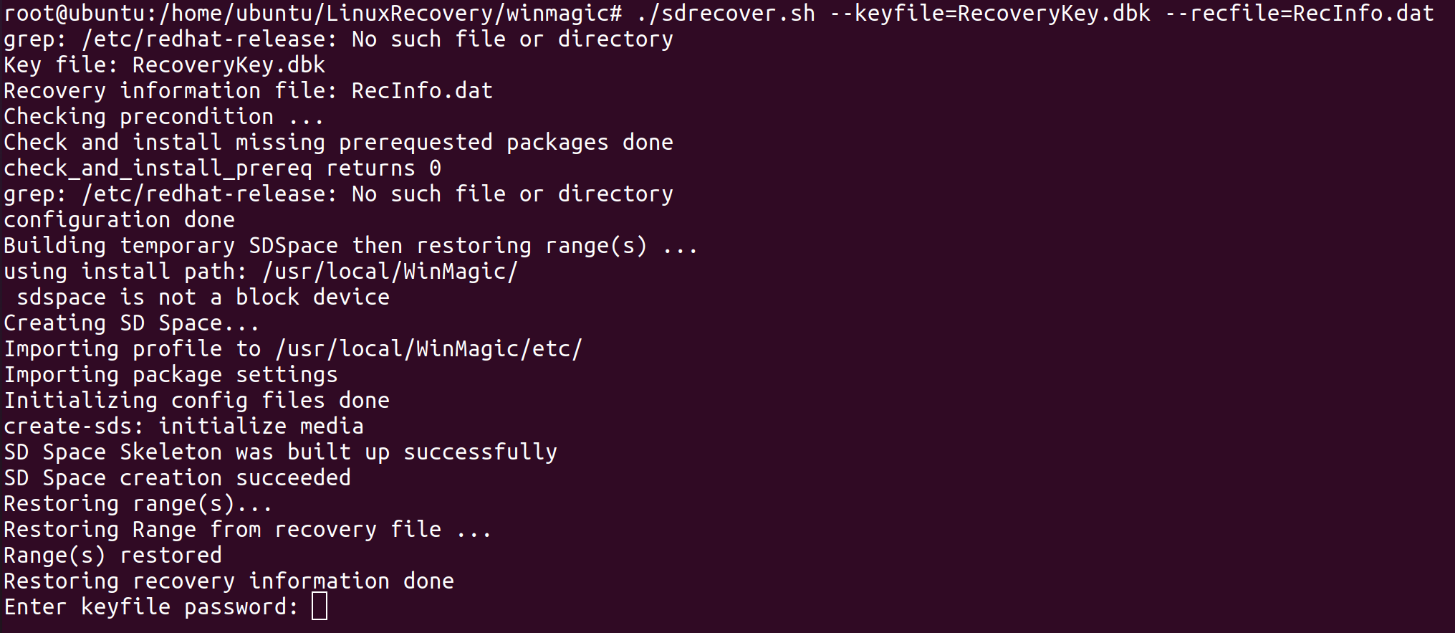
Type the keyfile password set on the recovery key and press enter
At the end of the unlocking process, you should see a display that it has succeeded as well as the number of devices that have been unlocked.

Running ‘lsblk’ command again will now display each of the encrypted partitions unlocked
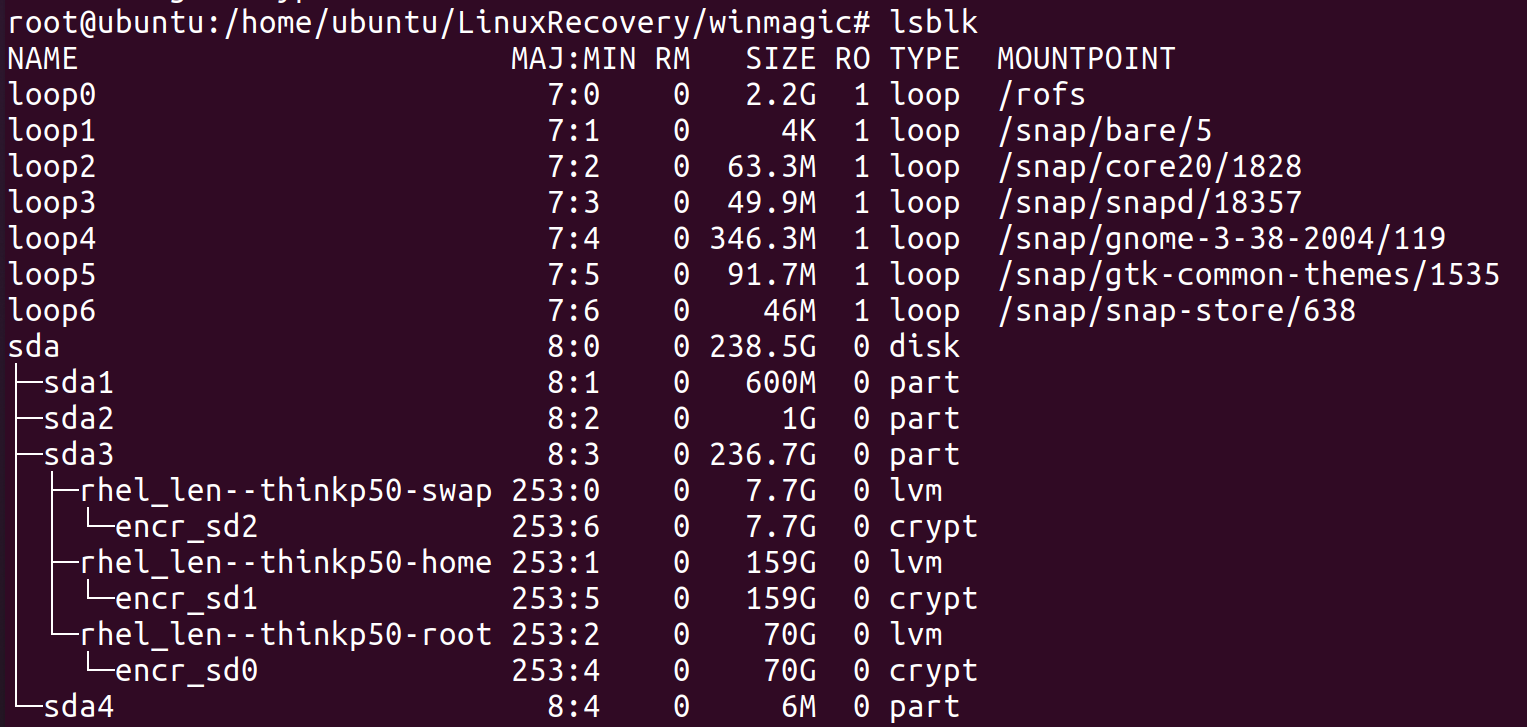
The partitions above will now need to be mounted in order to copy the files or perform any modifications on them.
Create temporary mount points for each one and mount the target partitions/volumes to them

Now that the unlocked partitions are mounted, you can now copy data on these to a back-up or modify files in them as needed.
Recovering Data from an Encrypted System on a non-Encrypted System
This applies for cases when:
The users OS disk becomes inaccessible (i.e. kernel panics, corruption…) and would like to be able to unlock the encrypted disk and recover the data on the system.
Limitation:
Does not apply to encrypted systems that have been crypto erased
For multiple encrypted disks, the boot disk has to be included/attached together with other non-boot/data disks for recovery to work.
Requirements:
Client 1: The client to recover – The encrypted system that is to be unlocked and recovered
Client 2: The recovery client – The un-encrypted system that is going to be used to perform the recovery procedure (Note: While its preferred to use the same Linux OS version as the disk you are unlocking, it is not a hard requirement).
Here are the steps on how to recover an encrypted disk on an un-encrypted system:
Note: Make sure to back-up your system prior to performing the client upgrade.
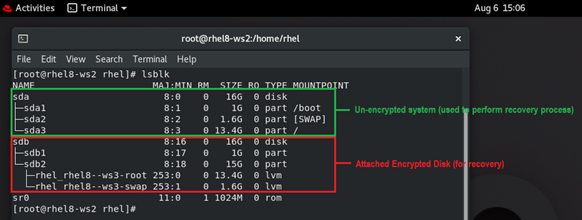
Detach the encrypted disk from its client (Client 1) and attach the disk to the un-encrypted client (Client 2).
Run the ‘lsblk’ to confirm that the encrypted disk is visible on the current system
Copy the Recovery data files to the client machine (For info on how to create the recovery data See - Creating the SDLinux Recovery Data)
Extract the appropriate package that contains the recovery script files to be used for execution. To know what the correct package you should be extracting see – The Recovery Data Files for more info.
Example:
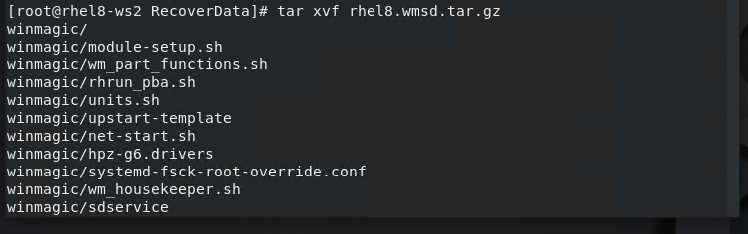
A folder called ‘winmagic’ will now become available after extracting

Copy the RecInfo.dat and RecoveryKey.dbk files into the ‘winmagic’ folder

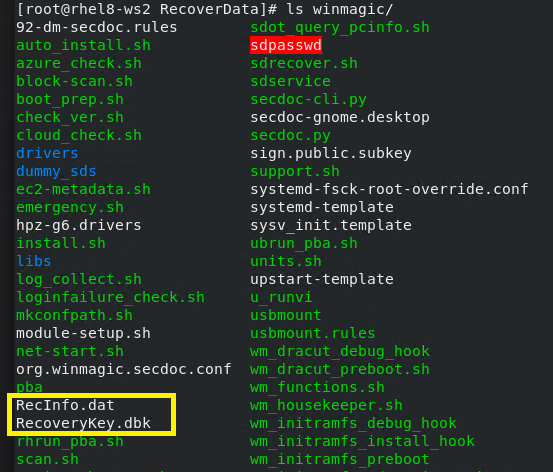
Navigate inside the winmagic folder and type the following commands to start the recovery process:
sudo ./sdrecover.sh --keyfile=<recovery_file_path> --recfile=<RecInfo_file_path>
Note: Since we copied the recovery files to the winmagic folder, there is no need to enter the full path.
Example:

Type your root password and press enter to continue executing the script
Once the script is executed you should now be prompted to enter the keyfile password. The keyfile password is the password you set on SES when creating the Recovery data. 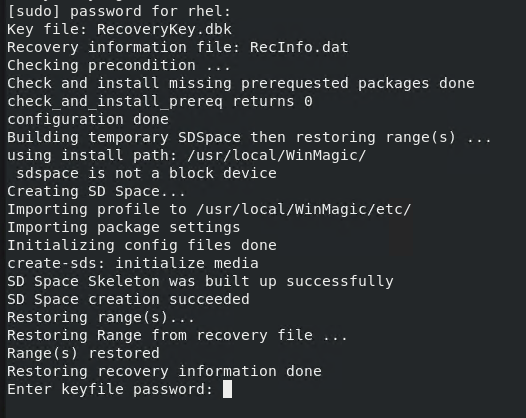
Once you’ve entered the correct keyfile password, you should see a confirmation prompt for successfully unlocking the disks.
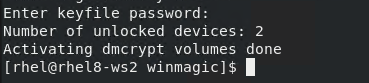
Run the ‘lsblk’ command once more to confirm that the disks have been indeed unlocked
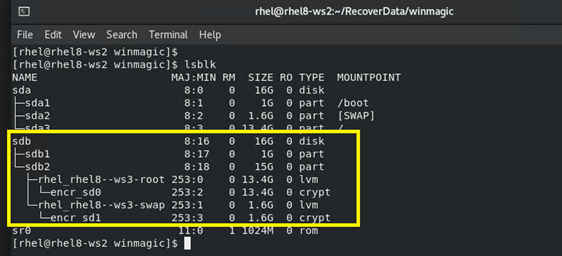
Once the disks have been unlocked, the volumes will need to be mounted to the system in order to start copying over the data from them.
Run ‘mkdir /recover_root’ command to create a mount point for the root partition (for this example specifically ‘encr_sd0’ )
Run the command ‘mount /dev/mapper/encr_sd0 /recover_root’ to mount the unlocked volume to the created directory.
Example:
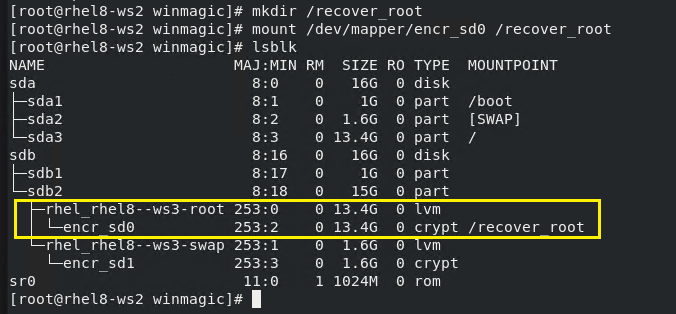
Now that the unlocked volume is now mounted you can start to copy or backup the data from the encrypted volume.
Repeat steps 11-13 for each encrypted volume you wish to copy or backup data from.
Unlocking and adding an encrypted disk from one system to another encrypted system
This applies for cases when:
Users are migrating to a new system (i.e. Moving to a new system with a new Linux operating system) by detaching their encrypted data disk and attaching it to the new (encrypted) system
The users OS disk becomes inaccessible (i.e. kernel panics, corruption…) but would like to continue using the existing data disk and attach it to a new system.
Users are attempting to recover data on an encrypted system by attaching the encrypted disk to a different system and then unlocking the disk using the recovery keys (steps 1-9 below) and copying the data over to the new system.
Limitation:
Does not apply to encrypted systems that have been crypto erased
For multiple encrypted disks, the boot disk has to be included/attached together with other non-boot/data disks for recovery to work.
For LVM systems, recovery of disks/systems with identical volume group names are not supported since the LVM backend will not allow a system to contain identical VG names. You will need to rename either the VG names on the host client or on the client to be recovered prior to starting recovery.
Requirements:
Client 1: The client to recover – The encrypted system that is to be unlocked and recovered. If client is an LVM system and has an identical volume group name to the recovery client, then run the vgrename command first on the client priort to detaching it.
Client 2: The recovery client – The encrypted system that is used to perform the recovery procedure or used as the new system to permanently unlock the disks.
Here are the steps on attaching an encrypted disk to another system, unlocking it using the recovery keys and adding/updating the encryption keys on SDspace:
Note: Make sure to back-up your system prior to performing the client upgrade.
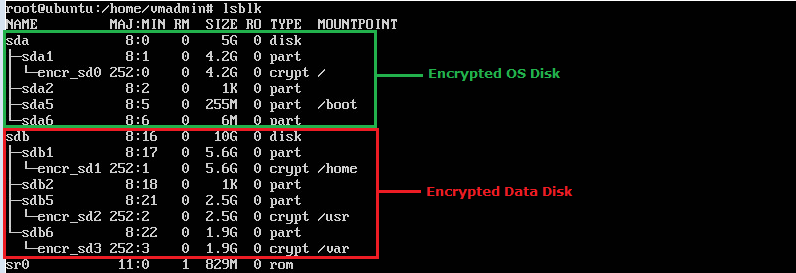
Review your current instance that has been deployed with an older version of SDLinux.
As seen below, the OS disk (/dev/sda) is configured separately from the Data disk (/dev/sdb) and are both encrypted.
Power off your Linux client and detach the Data disk from it.
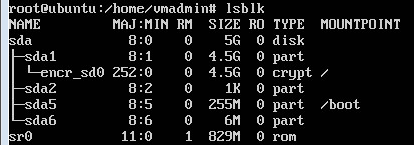
Set-up a new Linux system with a single disk containing the operating system and deploy the latest version of SDLinux on it as seen below.
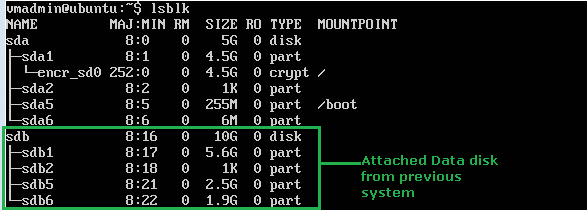
Attach the Data disk drive from the old Linux system to the new Linux system.
On LVM:
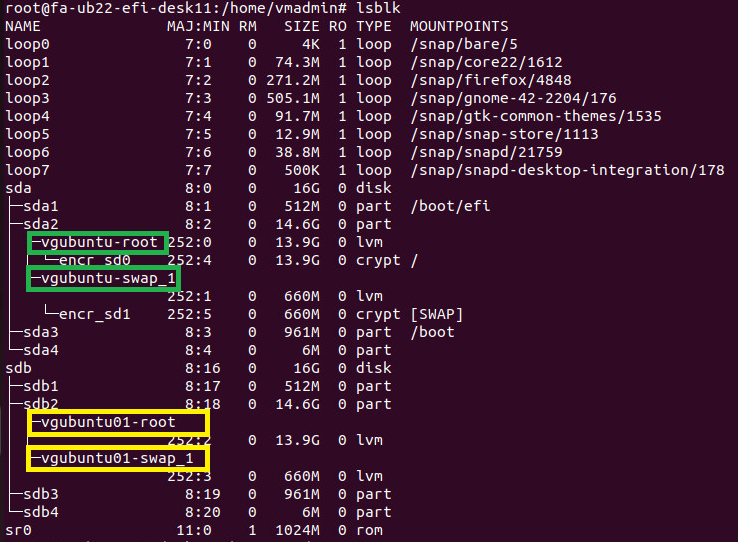
As seen above the vg names should not be identical between the disks
On SES, export the recovery info from both Linux systems. Copy the exported files to the Linux system. Keep in mind the passwords that you have set for each recovery info.
Recovery info extracted from SES:
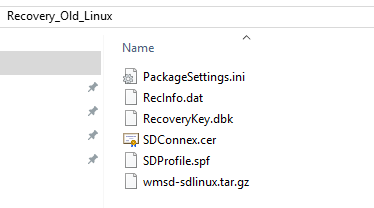
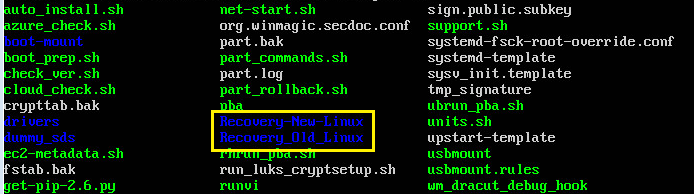
Copy the recovery files (folder) to the winmagic folder of your package.
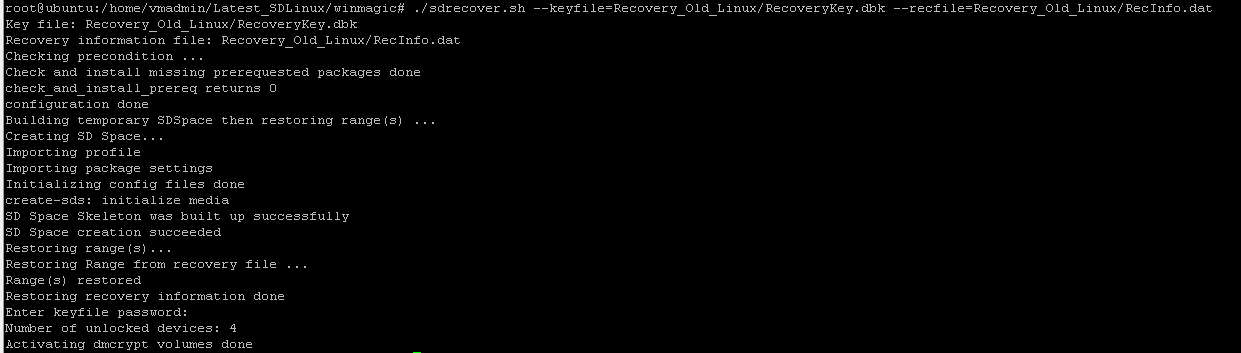
Since our new Linux system does not have the appropriate information on SDspace yet to unlock the encrypted attached drive, we will need to run the sdrecover.sh script to unlock the attached drive using the recovery info from the old linux system. To do that use the following command:
sudo ./sdrecover.sh --keyfile=<recovery_file_path> --recfile=<RecInfo_file_path>
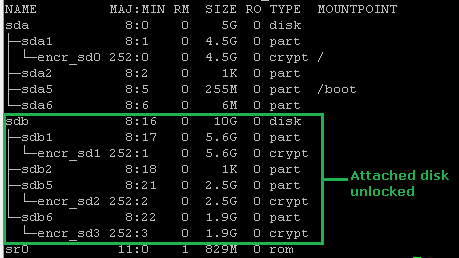
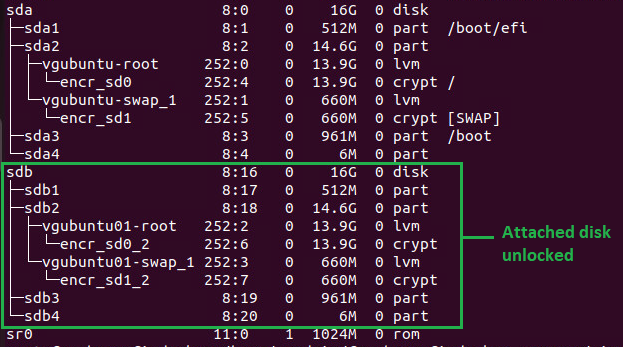
Run the lsblk command to view the unlocked disks:
On LVM:
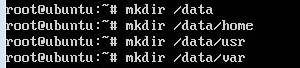
To access the partitions from the attached disk we will need to create new directories on our system which will serve as the new volume mount points for each of the partitions (i.e. encr_sd1, encr_sd2, encr_sd3). Use the mkdir command to create new directories.
Manually mount the encrypted partitions to the respective directories that you have created by using the ‘mount /dev/mapper/encr_sd(n) /name_of_directory’ command.
For this example the command would be:
mount /dev/mapper/encr_sd1 /data
On LVM’s it would be something like:
mount /dev/mapper/encr_sd1_2 /data
At this point you are now able to access the data from the attached disk.
To fully integrate the attached disk into the new system, we will need the unlocked volumes to be automatically mounted on every system start-up to the new mount points created. To do that we’ll need to add the partitions into /etc/fstab.
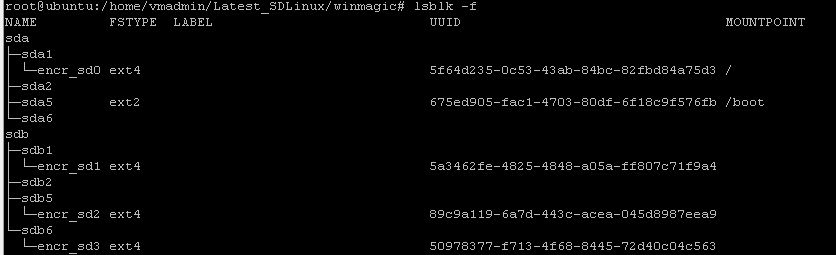
First run the lsblk -f command and take note of the UUID for each partition that will be mounted.
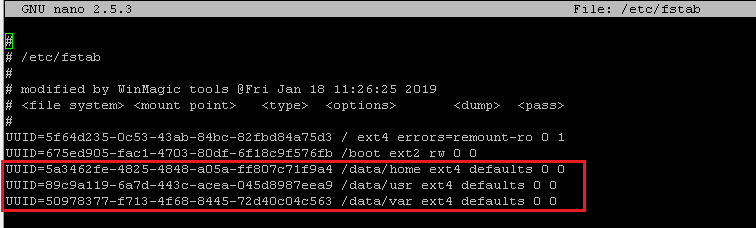
Modify the /etc/fstab file and add the UUID for each partition on the data disk and its associated new mount point.
After the /etc/fstab file has been updated its time to recover the SDspace information from the old Linux system for the attached data disk to the new Linux system. To do this we run the following command:
sudo ./sdot recover -f <path_to_sdspace> -r <path_to_recovery_info> -w /etc/fstab –o
Essentially what the sdot recover command does is combine Range objects or in other words they are combining the sdspace information of the old Linux system into the new Linux system.

After running the sdot recover command you will essentially be able to unlock the attached drive automatically on start-up, however at this point your two disk drives are being unlocked by two different keys. The OS disk drive is unlocked by the encryption key generated by the most latest version of SDLinux and the attached data disk drive is unlocked by the old encryption key from the old Linux system. This is where Re-key capability enters.
Re-key essentially enables your system to be managed by the same encryption key. In this case we are running re-key so the attached data disk drive can now be unlocked using the same key as the OS disk drive.
Preparations for Re-Key:
Go to your SES server once more and create the recovery data for the current system system (see Creating Recovery Data). The keyfile generated here will be our <new_keyfile>. Make sure to remember the password for this new keyfile.
The keyfile from recovery data we used for initially unlocking the attached disk will be the <old_keyfile>
To identify the <sds_path>, run the command:
cat /usr/lib/sdot/.sdsdevice
Once you have all the need information, you can now run the reKey command below:
sudo ./sdot reKey -o <old_keyfile> -n <new_keyfile> -p <password_of_old_key> -q <password_of_new_key> -f <sds path>

Once re-key has been completed and reboot your system, the disks will now be unlocked by the same key and attached data disk will now be mounted automatically and is accessible.
11-80 Galaxy Blvd., Toronto, ON, Canada M9W 4Y8
Tel: (905) 502-7000 | Fax: (905) 502-7001
Web: www.winmagic.com | Email: [email protected]
WinMagic provides the world’s most secure, manageable and easy-to–use data encryption solutions. Compatible with all editions of Microsoft Windows Vista, 7, and 10 as well as Mac and Linux platforms, WinMagic’s SecureDoc protects sensitive data stored on portable media such as laptops and removable media including USB thumb drives and CD/DVDs. Thousands of the most security conscious enterprises and government organizations around the world depend on SecureDoc to minimize business risks, meet privacy and regulatory compliance requirements, and protect valuable information assets against unauthorized access. With a full complement of professional and customer services, WinMagic supports over three million SecureDoc users in approximately 43 countries. For more information, please visit www.winmagic.com, call 1-888-879-5879 or e-mail us at [email protected].
SecureDoc, SecureDoc Enterprise Server, Compartmental SecureDoc, SecureDoc PDA, SecureDoc Personal Edition, SecureDoc RME, SecureDoc Removable Media Encryption, MySecureDoc, MySecureDoc Personal Edition Plus, MySecureDoc Media, and SecureDoc Central Database are trademarks of WinMagic Inc. Other products mentioned here in may be trademarks and / or registered trademarks of their respective owner.
© Copyright 2025 WinMagic Inc. All rights reserved. This document is for informational purpose only. WinMagic Inc. makes NO WARRANTIES, expressed or implied, in this document. All specification stated herein are subject to change without notice.