HP Confidential
Desktop, Notebook, and Workstation PCs - Upgrade to the Latest HP CSM and HP Drive Encryption to Prevent Boot Problems
NOTICE: This document is CONFIDENTIAL. DO NOT CIRCULATE IT TO PERSONS OUTSIDE THE COMPANY. It is a means for HP to communicate unique product service support information to HP personnel. You may discuss the contents in general terms with a customer without making reference to the document itself or reading it verbatim.
________________________________________
DESCRIPTION
The computer may exhibit one or more of the following symptoms after encrypting the drive with HP Drive Encryption (WinMagic):
Computer displays a BCD error with status 0xc000000f or 0x00000098
ECCode Error when the computer powers on
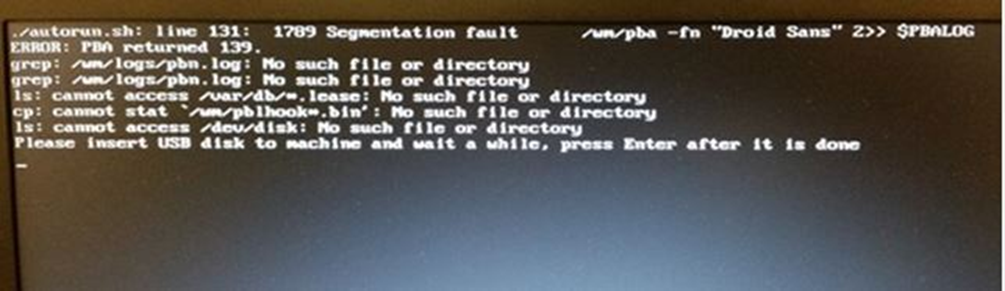
Linux-looking screen when the computer powers on
Figure 1: BCD Error
Status 0xc000000f
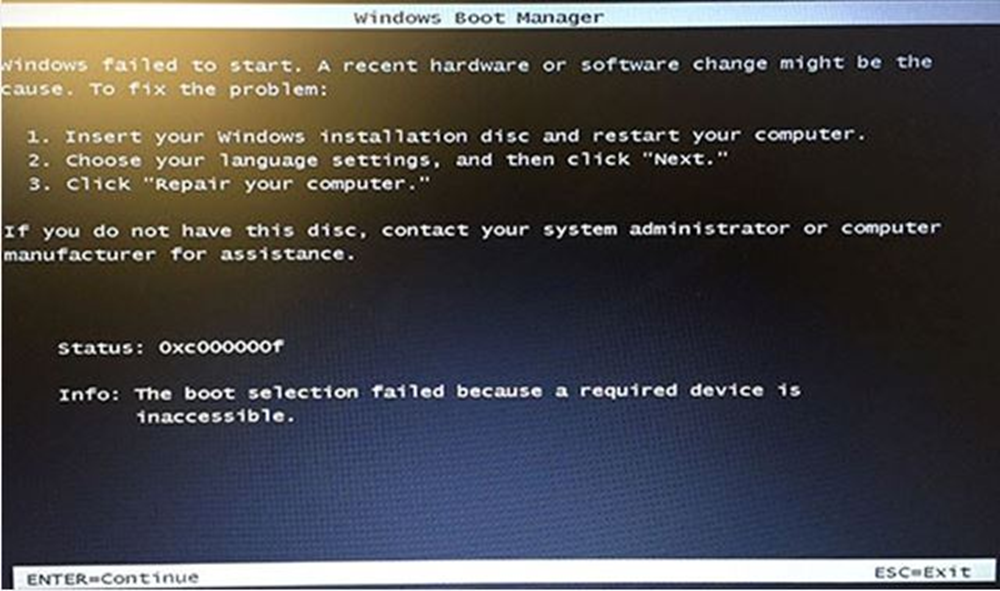
Figure 2: BCD Error
Status: 0xc0000098
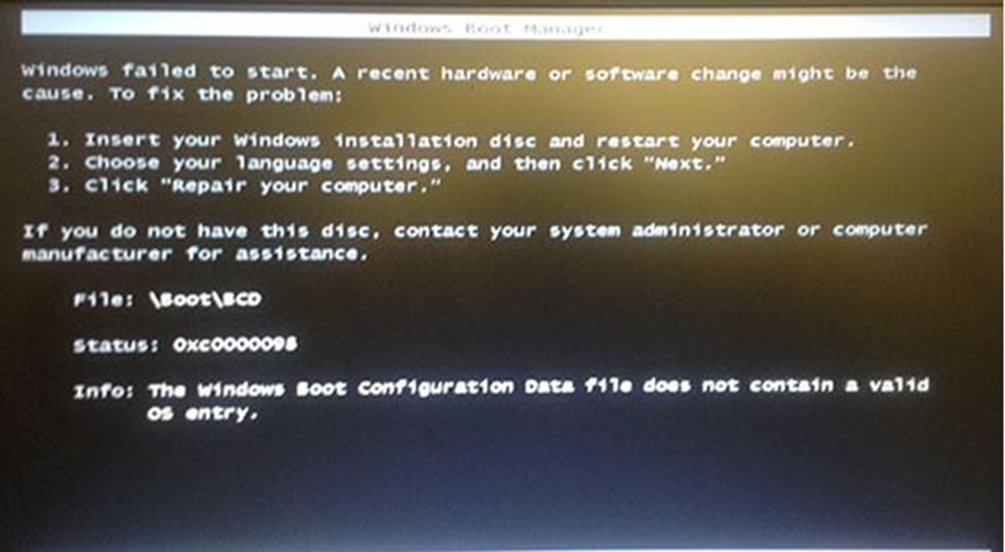
Figure 3: ecCode not found!

Figure 4: PBA error message
SCOPE
Information in this document applies to the following:
Computers:
HP Notebook PCs
HP Desktop PCs
HP Workstations
Operating Systems:
Microsoft Windows 7 Professional (64-bit)
Microsoft Windows 8 Pro
Microsoft Windows 8.1 Pro
Software:
HP Drive Encryption with hard drive already encrypted
RESOLUTION
For the BCD errors 0xc000000f and 0x00000098 in the DESCRIPTION, this can often be corrected by booting a WinPE drive or attaching the drive to another computer and looking for a backup BCD file on the system. If a BCD.Backup.0001 file is on the system, rename the current BCD file (which does not have an extension) to BCD.BAD, and rename the file BCD.Backup.0001 to BCD without an extension. The BCD file is typically located in the following folder, "C:\Boot" (Assuming the system partition is on the C:\ drive). If the drive is connected to another machine, verify the unencrypted partition's location on the drive before making changes.
NOTE: If you do not have the tools necessary to complete the following procedure, contact HP technical support for the SDWinPEx64.ISO tool and instructions on how to use it to install on a USB Flash Drive.
1. Connect the USB flash drive to the computer.
2. Power on the computer and immediately press F9.
3. Select Boot from USB flash drive.
4. Once the computer has booted from the USB flash drive, browse to the main drive's first partition on the computer (usually C: or D: ).
5. Go into Administrative command prompt.
6. Enter Dir /ah to enable hidden files and system files.
7. Go to the boot folder on the computer's first partition.
NOTE: This drive should be unencrypted.
8. Open the partition with the boot folder. Then open the Boot folder.
Figure 5: BCD Folder
9. Look for the file BCD.Backup.0001 in the Boot folder.
Figure 6: BCD. Backup.0001
NOTE: If the boot partition is not visible, connect the encrypted drive to another computer as a secondary drive. The files and folders usually will then be available. Once this is done, complete the procedure as detailed below.
10. Rename the BCD.Backup.0001 to BCD.
11. If a file is already named BCD, then rename the pre-existing BCD file to BCD.BAD, and the BCD. Backup.0001 to BCD.
NOTE: Ignore any other BCD files in the folder
Figure 7: BCD without an extension.
12. If the hard drive was connected to a secondary computer, reconnect it to the original computer and power on the computer.
NOTE: If errors occur when powering on the computer, more steps will be required to link the SD Space and the MBR. At this point you will need to contact HP Technical support for assistance to obtain the SDWinPE ISO and SDWMGRecovery utility.
13. If the computer powers on properly, back up the computer's data and update HP Client Security manager and HP Drive Encryption to the latest versions using the following links:
NOTE: HP strongly recommends installing the following upgrades/updates to prevent the issue from recurring.
WARNING: HP's standard warranty does not warrant customer data as it is your responsibility to ensure you have a good backup of your important data.
HP recommends strongly that you backup you critical data if you don't have a backup first, and then perform the upgrades below.
SoftPaq Description | Release Notes | Download SoftPaq |
HP Client Security Manager | SP68157 release notes | SP68157 file download |
HP Drive Encryption Software | SP71113 release notes | SP71113 file download |
NOTE: A more recent version of this software may be available. Check for newer versions at
http://www8.hp.com/us/en/drivers.html.
If this does not resolve the issue, contact HP Service for more support.
SERVICE ACTION
Provide the customer the instructions in the RESOLUTION.
If a customer contacts HP about the issue in the DESCRIPTION, and has already completed the steps in the RESOLUTION, provide them with the instructions below.
NOTE: If the computer exhibits a BCD error, refer to Method 1 (below) to build the USB flash drive
Method 1: Use the ISO image on the USB flash drive
Ensure the following items are available before starting the procedure below:
- A secondary computer to burn the file from
NOTE: Ensure this computer has internet access and a writeable optical drive
- The SDWinPEx64.ISO file on a USB drive
Create a bootable USB key with the SDWinPEx64.ISO file.
NOTE: Contact HP Support to get the SDWinPEx64.ISO file.
1. Connect a USB drive 512 MB or larger to a computer.
NOTE: All data on the USB drive will be overwritten during this process. Back up all data before continuing with this process.
2. Run imageusb.exe from the ImageUSB folder.
3. Select Write to UFD under "Step 2 Select which action to be performed on the selected USB Flash Drives (UFDs):".
4. Locate the image to write. In this case, "WinMagic created with imageusb.bin".
5. Click Write.
After creating the bootable USB key, connect the USB drive to the computer exhibiting the issues in the DESCRIPTION, then complete the following procedure:
1. Connect the USB drive to the computer exhibiting the issue in the DESCRIPTION.
2. Power on the computer, and immediately press F9 to bring up the boot menu.
3. Select USB device.
4. Press Enter when "Press any key to boot from external device" is displayed.
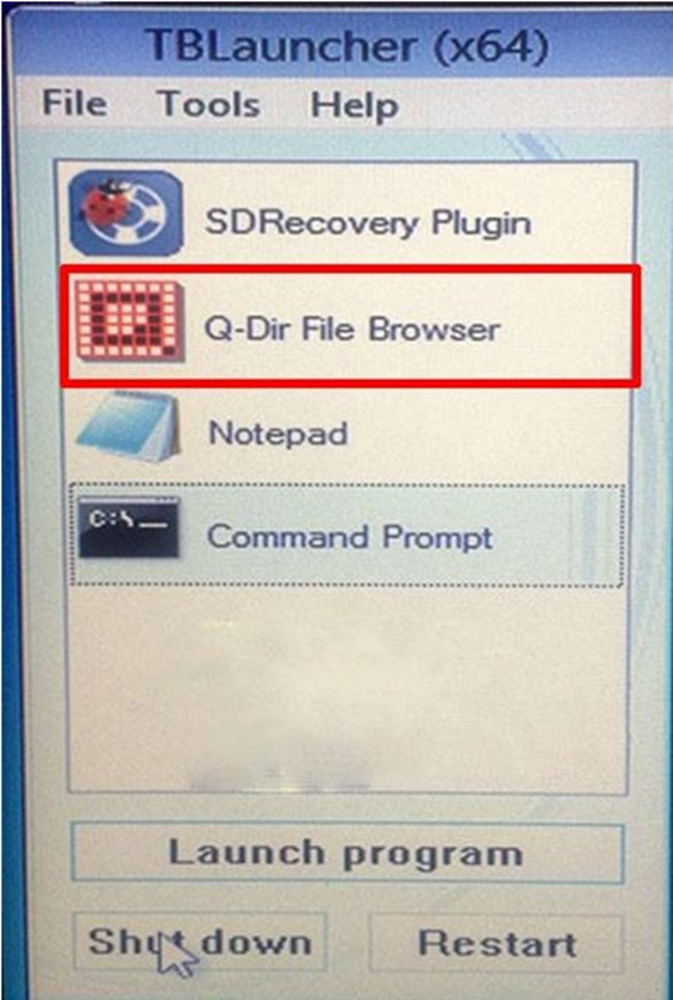
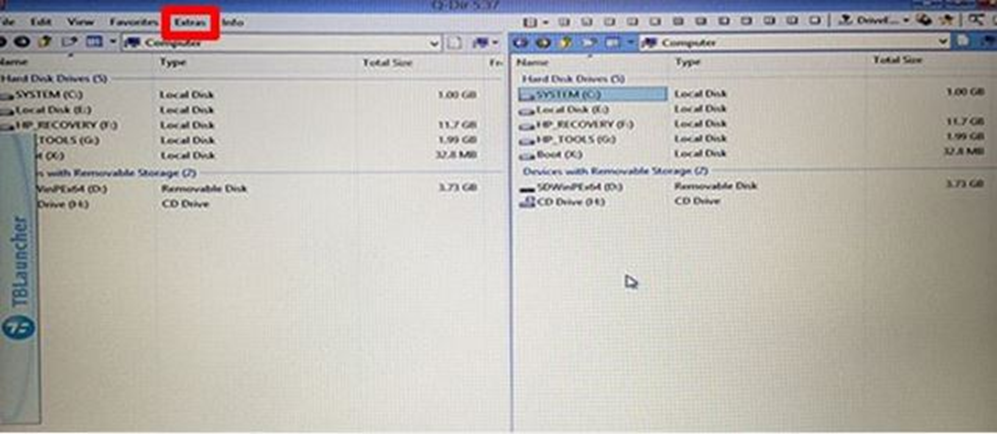
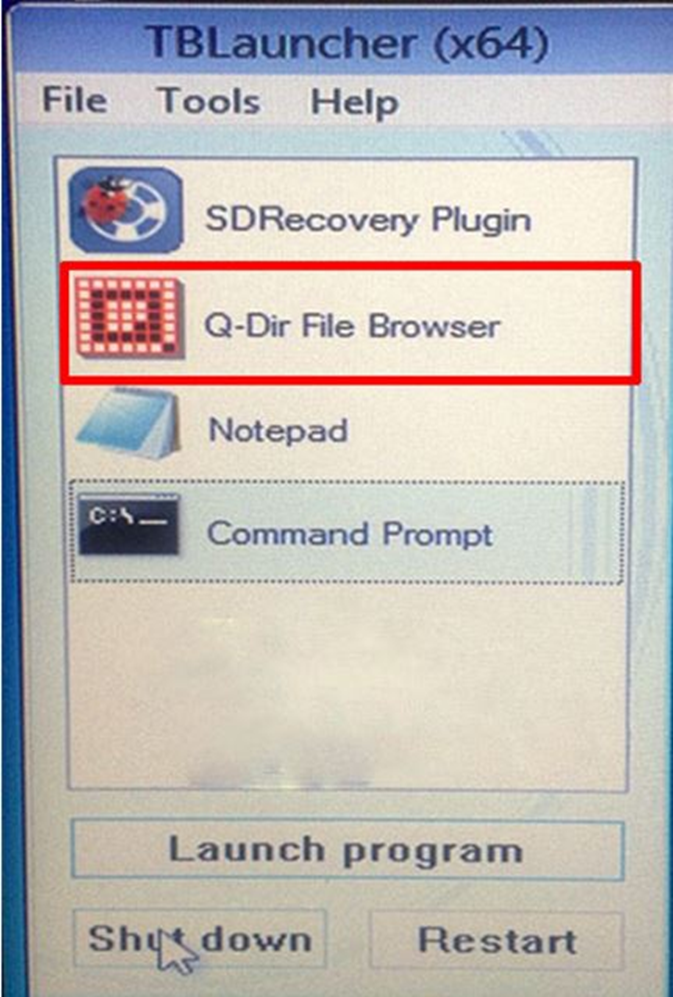
5. Select Q-Dir File browser
Figure 8: Q-Dir File browser
6. Click Extras, Options.
Figure 9: Select Extras
7. Select
Show hidden files & folders.
Figure 10: Select Show hidden files & folders
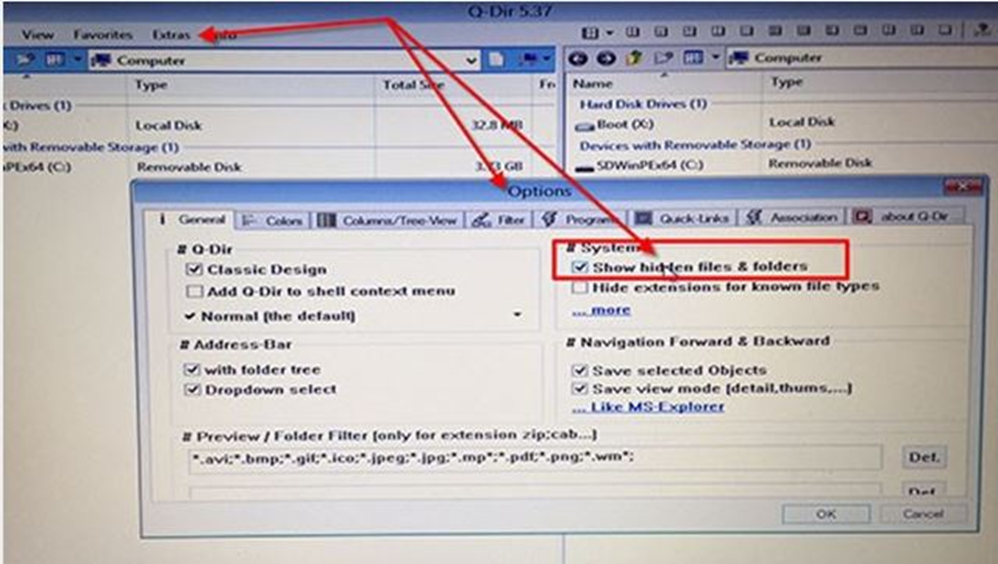
8. Click OK.
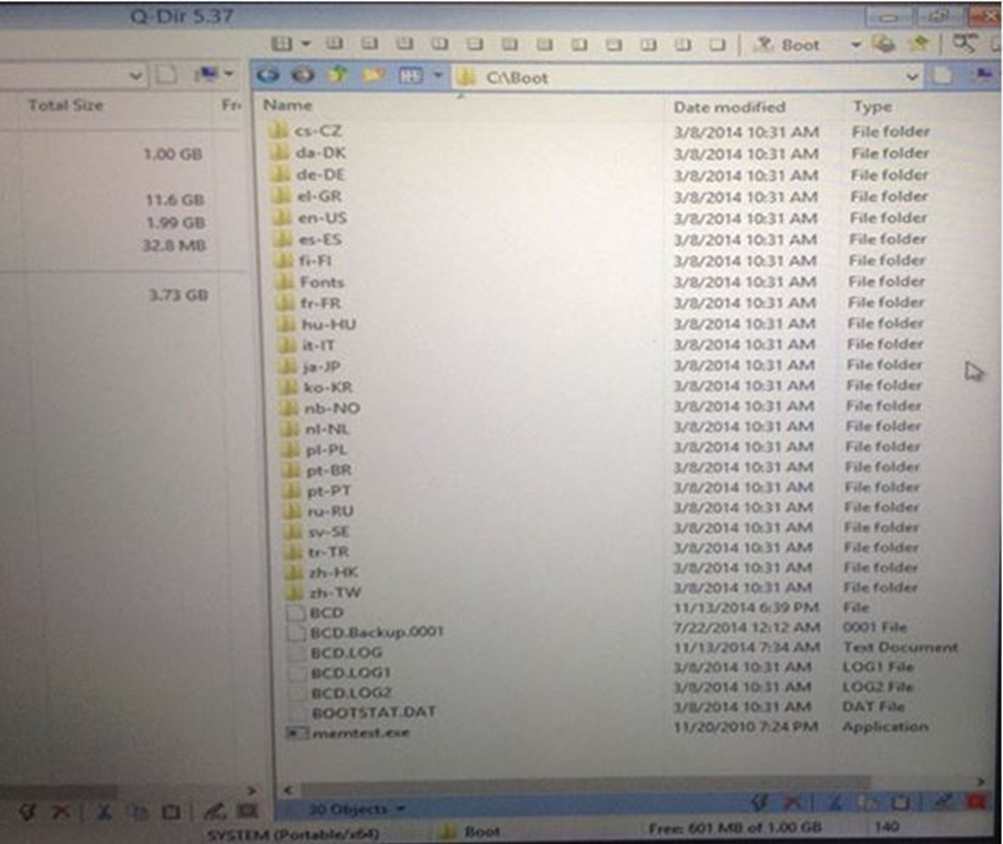
9. On the right side of the Q-Dir 5.37 window, under Hard Disk Drives, locate the system drive (Typically the C: drive).
Figure 11: Q-Dir 5.37 Main window
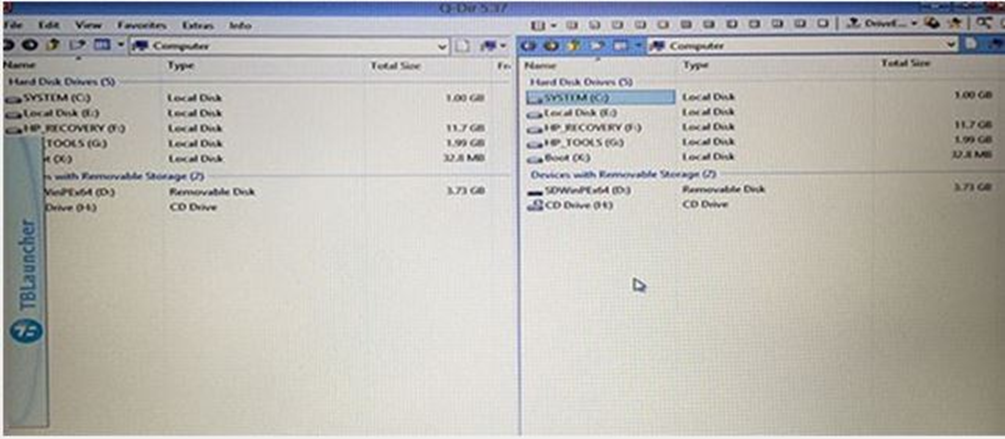
10. Double-click the SYSTEM drive.
Figure 12: SYSTEM drive

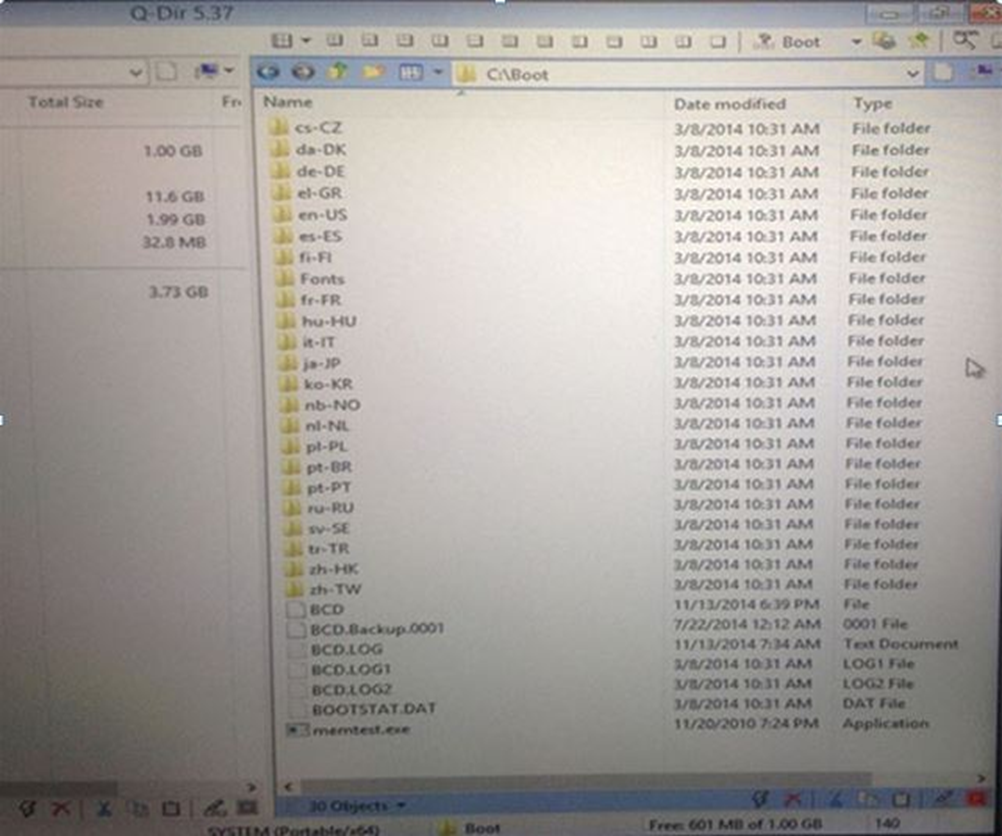
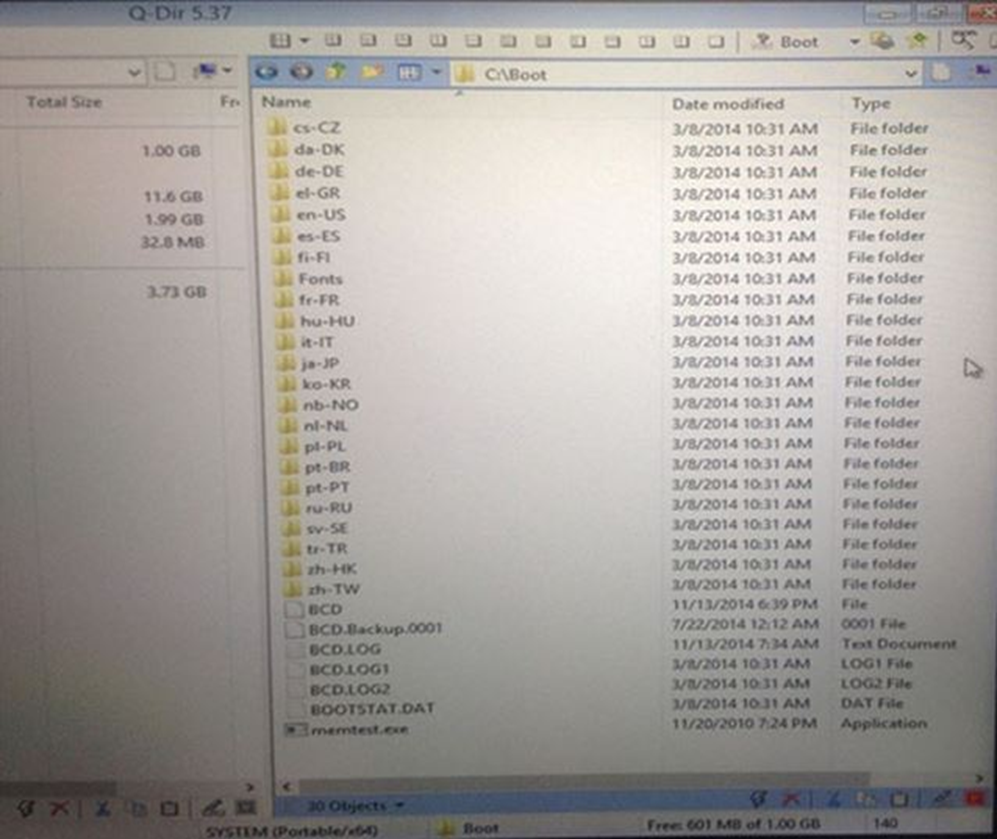
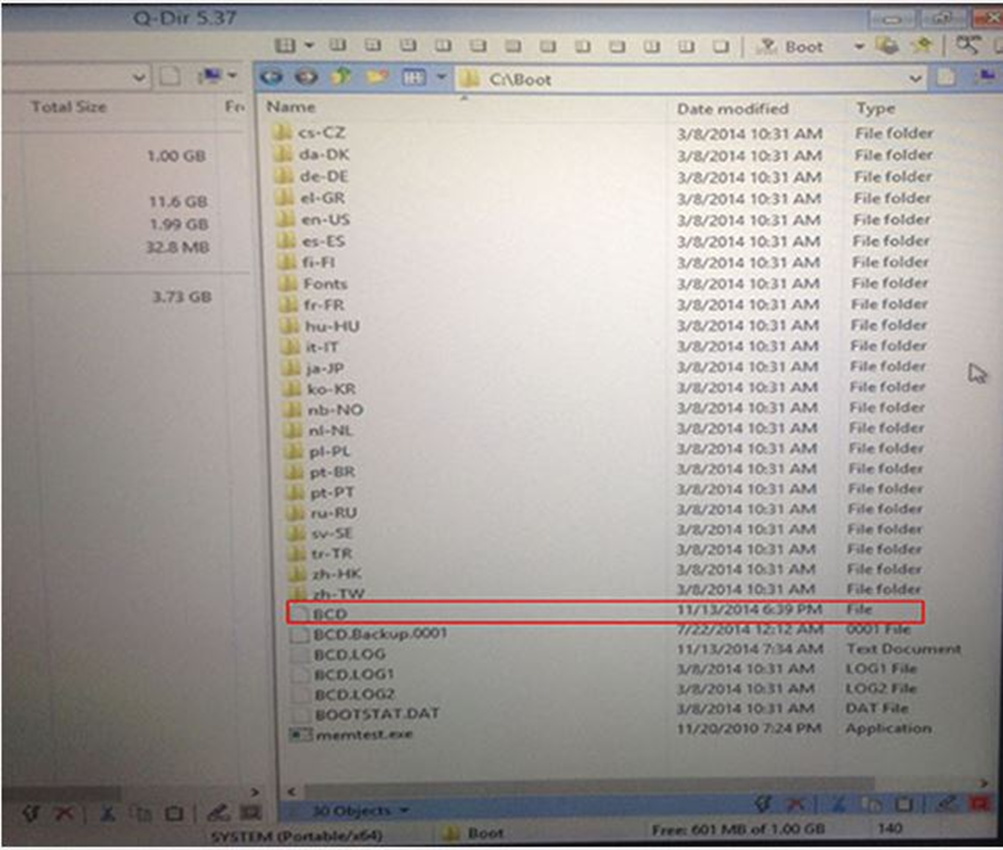
11. Double-click the Boot folder.
Figure 13: Boot folder location
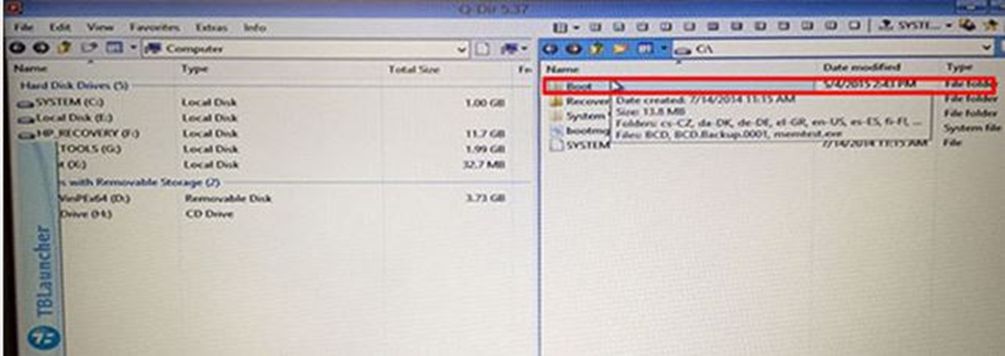
Figure 14: Boot folder
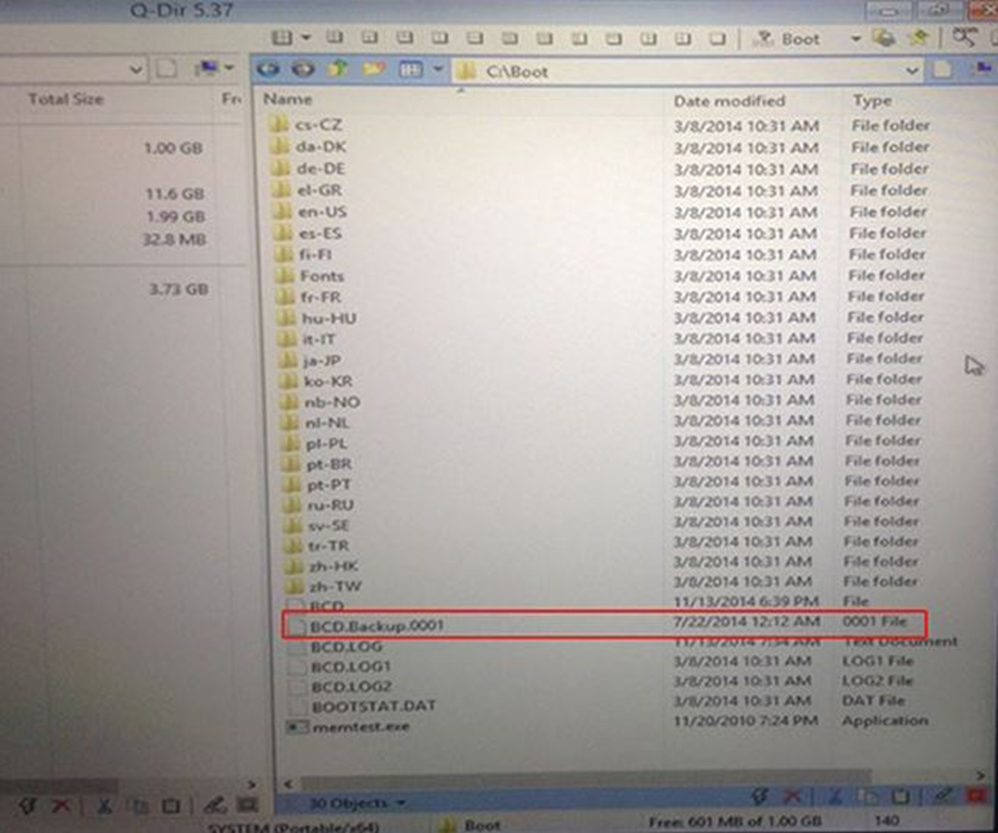
12. If a file named BCD.Backup.0001 is there, this indicates that Windows repair has been run on the drive and attempted to back up the existing BCD on it.
Figure 15: BCD.Backup.0001
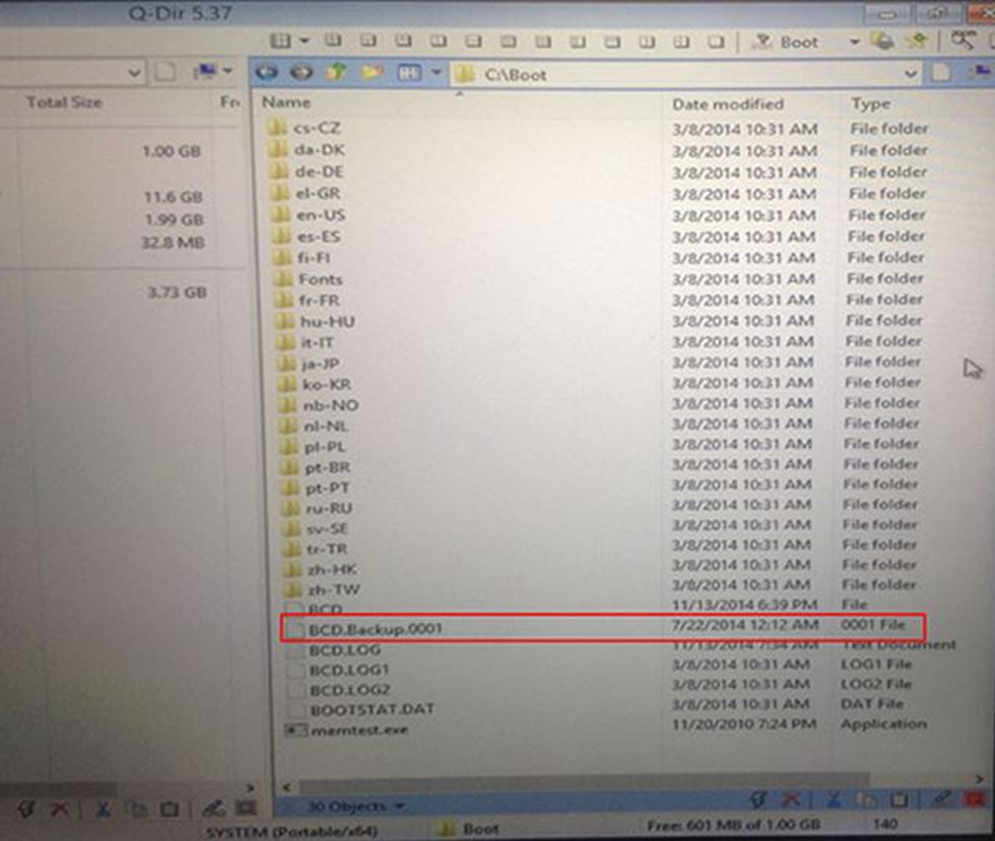
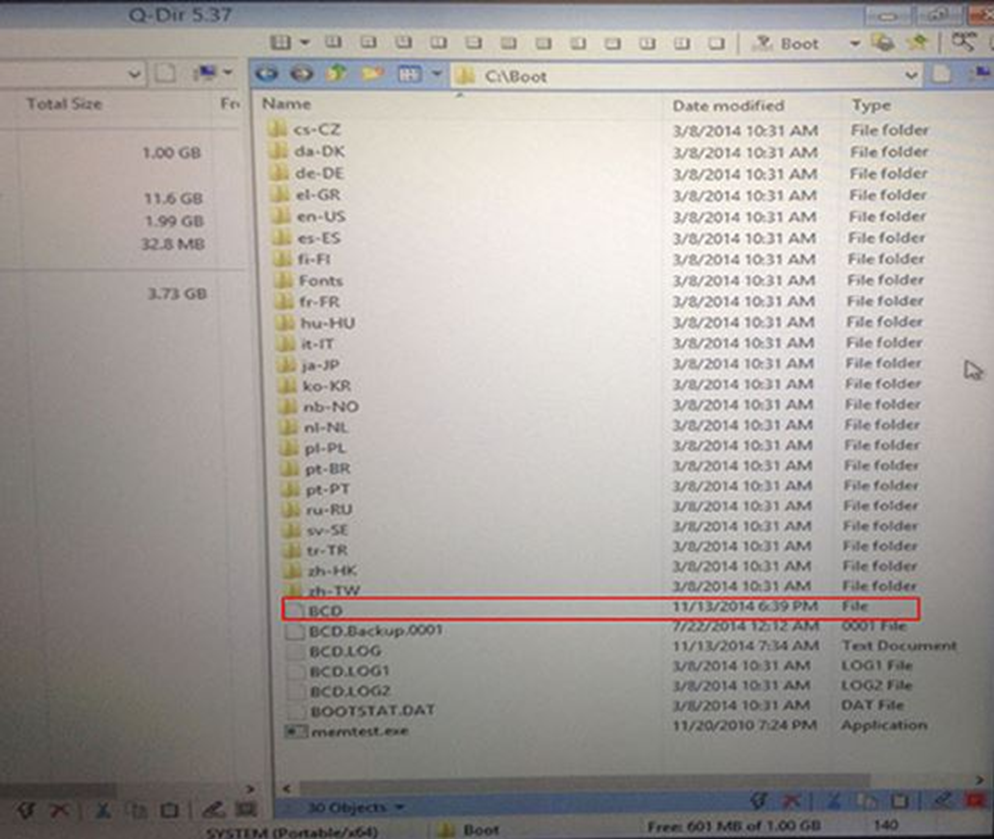
Figure 16: BCD
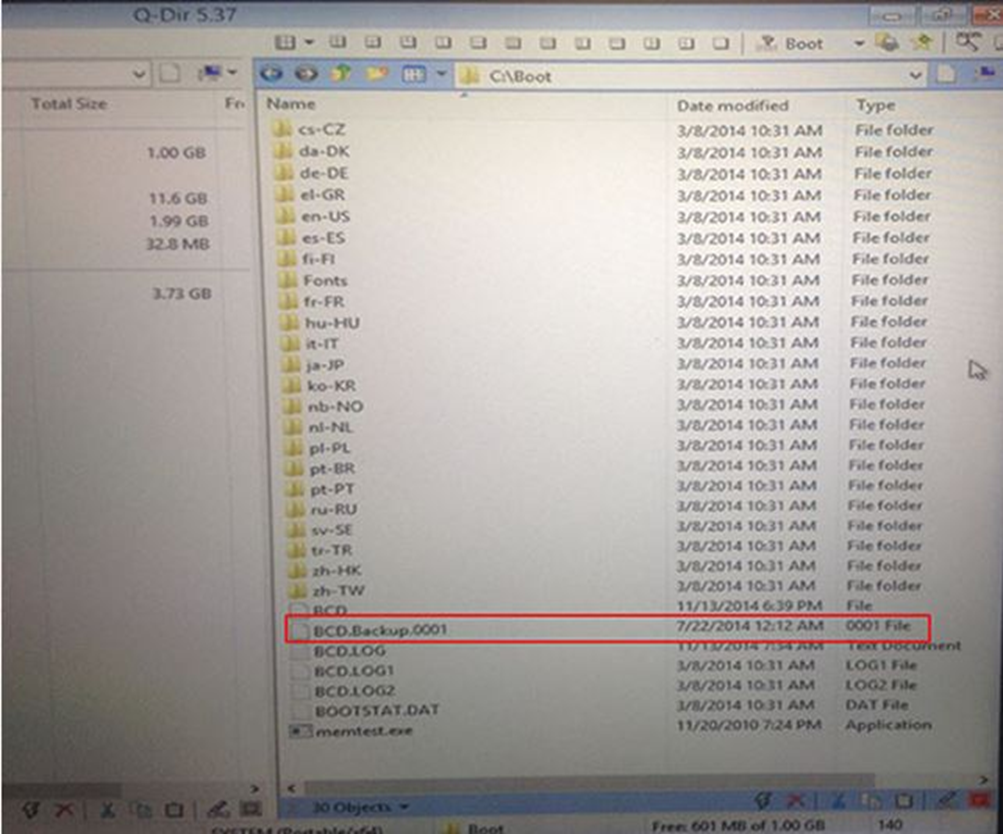
13. Rename the BCD file (without an extension) BCD.BAD, and rename the BCD.Backup.0001 file to BCD without an extension.
NOTE: This effectively restores the original BCD back.
14. Close the Q-Dir Window, then select Shut Down in the TBLauncher (x64) window.
15. Power on the computer. If the computer loads successfully, download and install the following updated versions of HP Client Security Manager and HP Drive Encryption Software. If the computer does not load successfully, continue on to Step 16:
WARNING: HP's standard warranty does not warrant customer data as it is your responsibility to ensure you have a good backup of your important data. HP recommends strongly that you backup you critical data if you don't have a backup first, and then perform the upgrades below.
SoftPaq Description | Release Notes | Download SoftPaq |
HP Client Security Manager | SP68157 release notes | SP68157 file download |
HP Drive Encryption Software | SP71113 release notes | SP71113 file download |
NOTE: A more recent version of this software may be available. Check for newer versions at http://www8.hp.com/us/en/drivers.html .
16. Repeat steps 1-5.
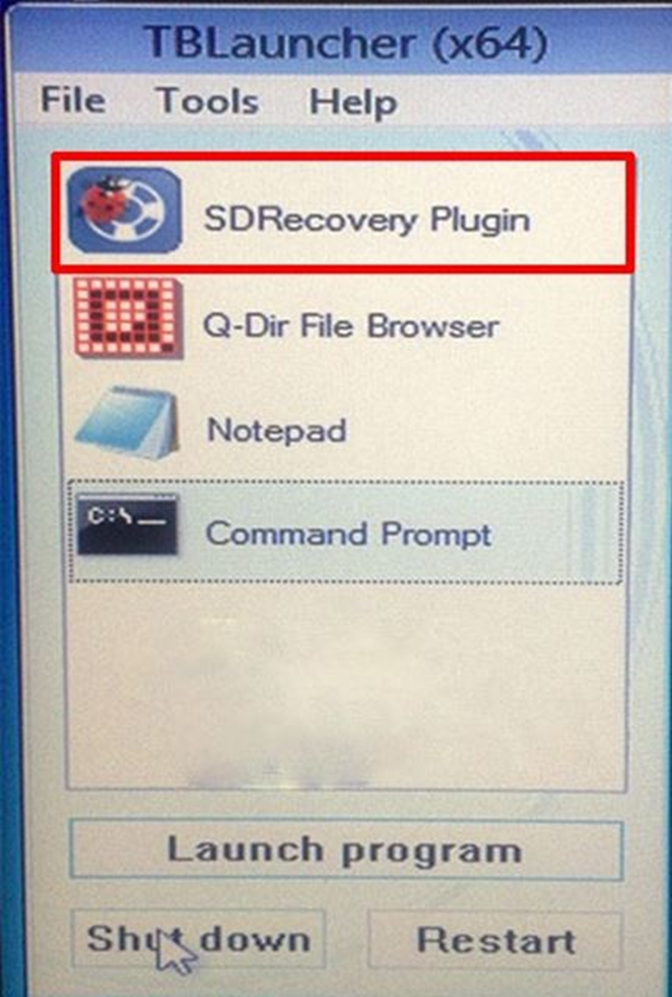
17. In the TBLauncher (x64) window, select SDRecovery Plugin.
Figure 17: SDRecovery Plugin
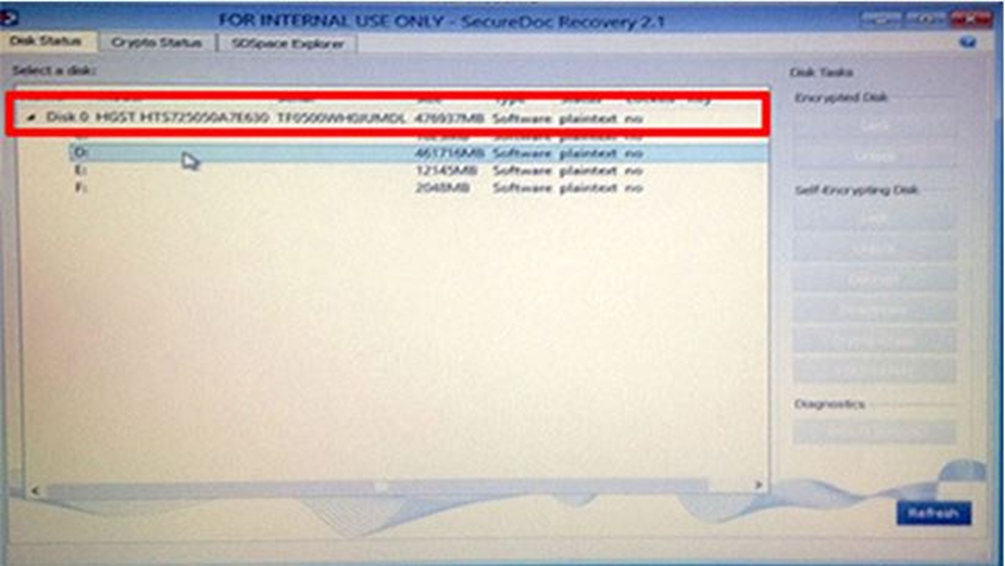
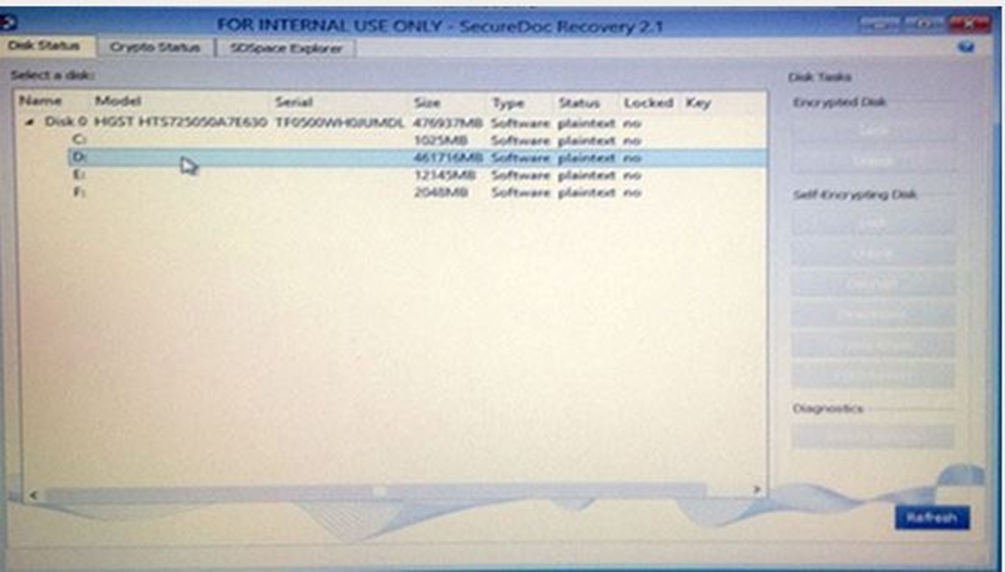
18. Click the arrow next to Disk 0 to expand it.
Figure 18: Expand Disk 0

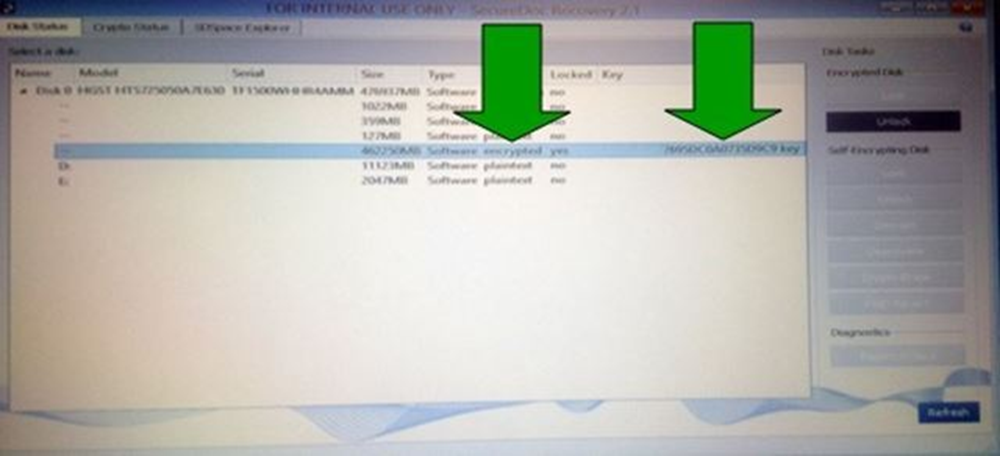
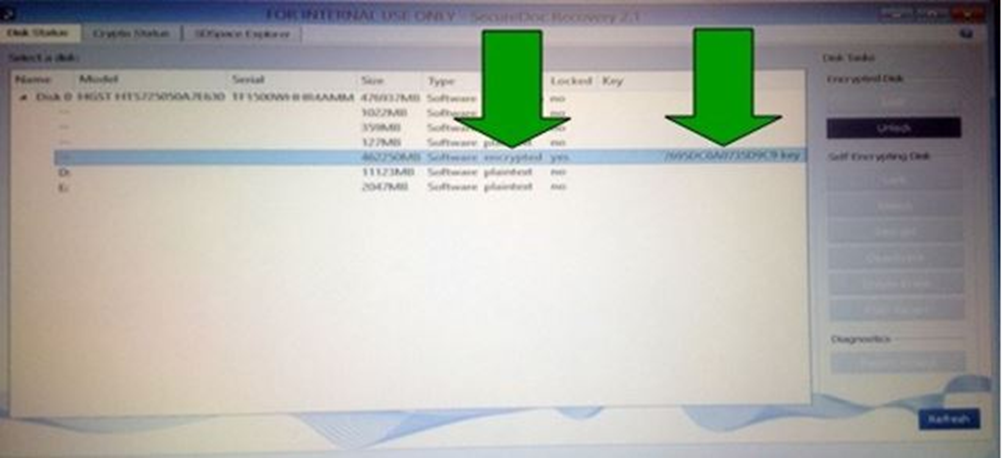
19. Check the key column. If the status is listed as "encrypted" and a key is displayed, proceed to Step 20.
Figure 19: SD Recovery when linked to MBR
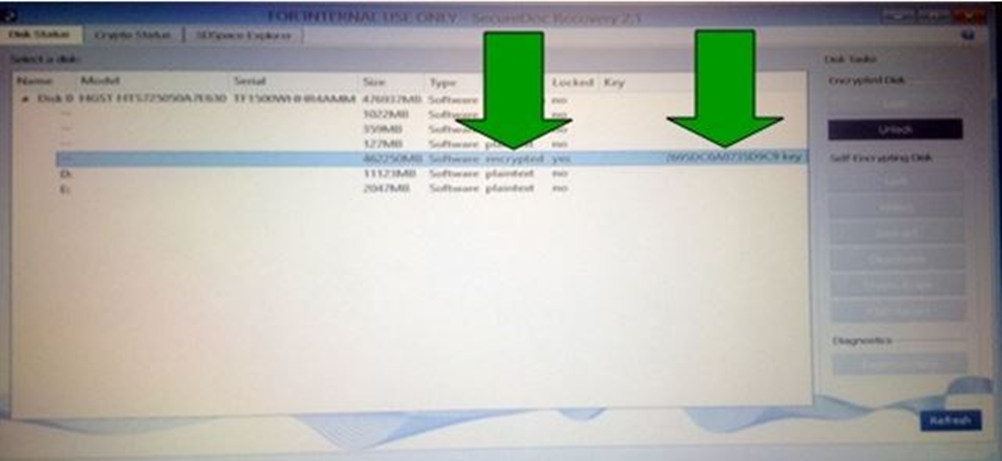
Figure 20: SD Recovery when not linked to MBR
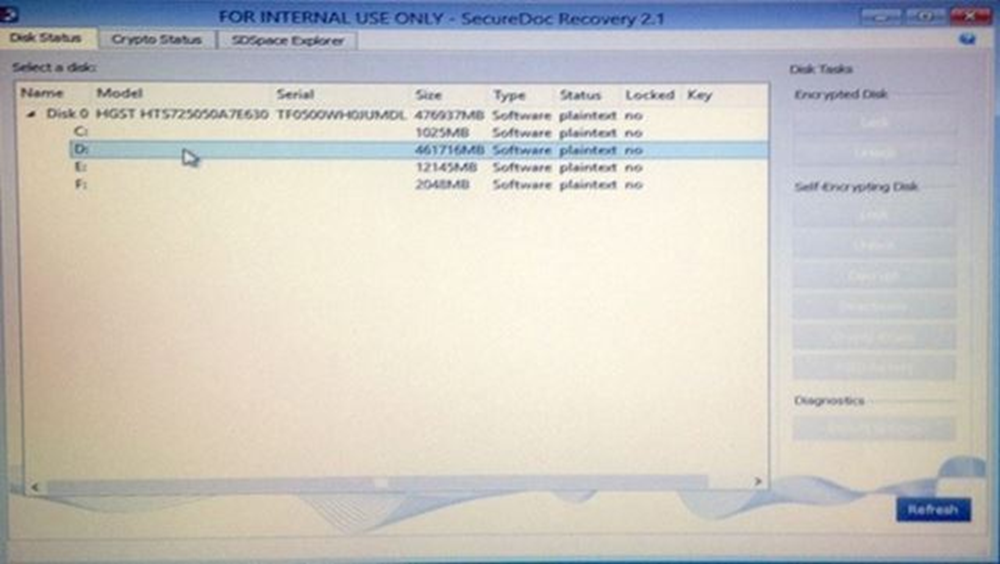
NOTE: If the status displays something besides "encrypted" and the key is missing, run SDWMGRecovery.exe to link to the Master Boot Record (MBR).
20. Select the encrypted partition.
Figure 21: Select the appropriate partition
21. Restart the computer.
The computer has been recovered.
To prevent this issue from recurring, complete the following procedure to install updated versions of HP Client Security Manager and HP Drive Encryption Software:
1. Back up the computer's data.
2. Download and install the following two upgrades to prevent this issue from recurring:
WARNING: HP's standard warranty does not warrant customer data as it is your responsibility to ensure you have a good backup of your important data. HP recommends strongly that you backup you critical data if you don't have a backup first, and then perform the upgrades below.
SoftPaq Description | Release Notes | Download SoftPaq |
HP Client Security Manager | SP68157 release notes | SP68157 file download |
HP Drive Encryption Software | SP71113 release notes | SP71113 file download |
NOTE: A more recent version of this software may be available. Check for newer versions at http://www8.hp.com/us/en/drivers.html .
3. After completing the upgrades, restart the computer.
Method 2: Slave the drive or use a CD/Flash Drive
If the drive letter is not displayed to complete step 17, another method is required to recover the computer.
Ensure the following items are available before completing the steps below:
A thumb drive with SDWMGRecovery installed
A secondary Windows computer
A blank optical disc drive
Complete the following procedure:
1. Slave the drive to another Windows computer.
2. Power on the computer.
3. Rename the BCD as mentioned in Method 1 or 2 if this has not be completed already.
4. Enable hidden files and folders, and locate the BCD file in the first partition of encrypted drive.
Figure 22: BCD File
5. If a file named BCD.Backup.0001 is there, this indicates that Windows repair has been run on the drive and attempted to back up the existing BCD on it.
Figure 23: BCD.Backup.0001

Figure 24: BCD
6. Rename the BCD file (without an extension) BCD.BAD, and rename the BCD.Backup.0001 file to BCD without an extension.
NOTE: This effectively restores the original BCD back.
7. Connect the thumb drive to the secondary computer.
8. Locate the WMG file.
Figure 25: Locate the WMG file
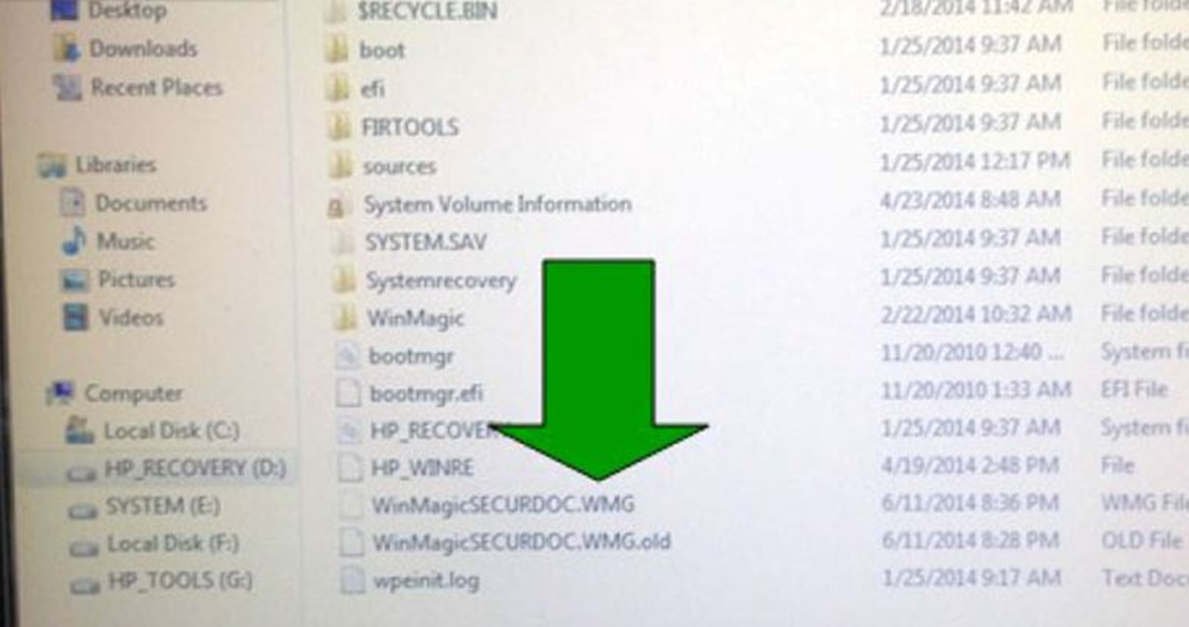
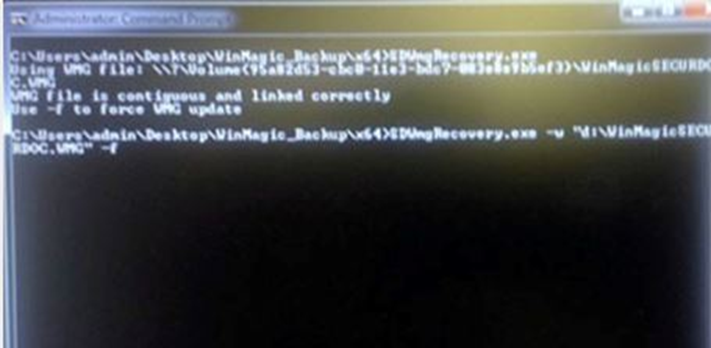
9. Run SDWMGRecovery.exe.
NOTE: if the WMG file is not automatically located, enter the following syntax into command prompt to repair the SDSpace and re-link the MBR:
SDWmgRecovery -w "g:\WinMagicSECURDOC.WMG " - f (Assuming G:\WinMagicSECURDOC.WMG is the location of the WMG file).
NOTE: Pay very close attention to the name of the WMG file. In some systems the name maybe slightly different but the extension will not change and should be .WMG. Typically the WMG file is located on the HP recovery partition on a factory image.
NOTE: If the WMG file can not be found, make sure the BCD file was corrected first, and reboot and try again.
10. Open the USB drive, and run SDWMGRecovery.exe with no switches to see what it reports.
11. If this is successful, safely remove the drive by stopping it first, and put it back in the original computer.
Figure 26: WMG file contiguous and linked correctly
12. Restart the computer.
13. After successfully restarting the computer, it is extremely important that you back up the computer's data, and upgrade the computer to the latest version of HP Client Security Manager and HP Drive Encryption to prevent it from occurring again.
14. To prevent this issue from recurring, complete the following procedure to install updated versions of HP Client Security Manager and HP Drive Encryption Software:
15. Back up the computer's data.
16. Download and install the following two upgrades to prevent this issue from recurring:
WARNING: HP's standard warranty does not warrant customer data as it is your responsibility to ensure you have a good backup of your important data. HP recommends strongly that you backup you critical data if you don't have a backup first, and then perform the upgrades below.
SoftPaq Description | Release Notes | Download SoftPaq |
HP Client Security Manager | SP68157 release notes | SP68157 file download |
HP Drive Encryption Software | SP71113 release notes | SP71113 file download |
NOTE: A more recent version of this software may be available. Check for newer versions at http://www8.hp.com/us/en/drivers.html .
17. After completing the upgrades, restart the computer.
Backup Plan
1. Connect the USB drive to the computer exhibiting the issue in the DESCRIPTION.
2. Power on the computer, and immediately press F9 to bring up the boot menu.
3. Select USB device.
4. Press Enter when "Press any key to boot from external device" is displayed.
5. Select SDRecovery Plugin.
6. Click the arrow next to Disk 0 to expand it.
Figure 27: Expand Disk 0
7. Check the key column. If the status is listed as "encrypted" and a key is displayed, proceed to Step 20.
Figure 27: SD Recovery when linked to MBR

Figure 28: SD Recovery when not linked to MBR or call HP support if the issue is not resolved.
NOTE: If the status displays something besides "encrypted" and the key is missing, run SDWMGRecovery.exe to link to the Master Boot Record (MBR).
8. Select the encrypted partition.
Figure 29: Select the appropriate partition
9. Enter the drive encryption password, or go to the Keyfile tab to import a recovery key. Click "Ok".
NOTE: Do not click " Apply".
Figure 30: Enter password
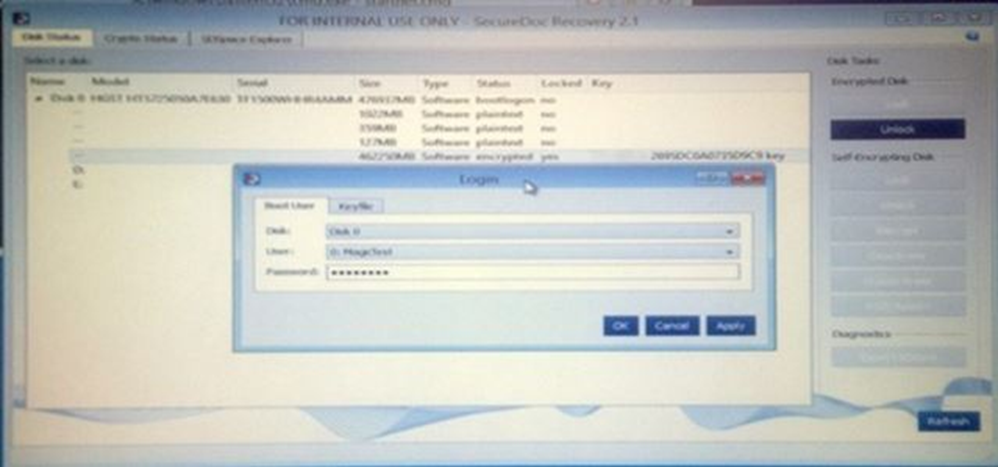
10. Enter the drive encryption password, or go to the Keyfile tab to import a recovery key. Click "Ok".
NOTE: Do not click "Apply".
Figure 31: The media was unlocked successfully

11. Click Ok.
12. Minimize the SD
Recovery window.
13. In the TBLauncher (x64) window, select Q-Dir File Browser, then select Launch Program.
Figure 32: Q-Dir File Browser
14. Select the drive on the right side of the Q-Dir window with the target data or folders.
15. Right-click the folder(s), then select Send To….
16. Select the drive to copy the data to.
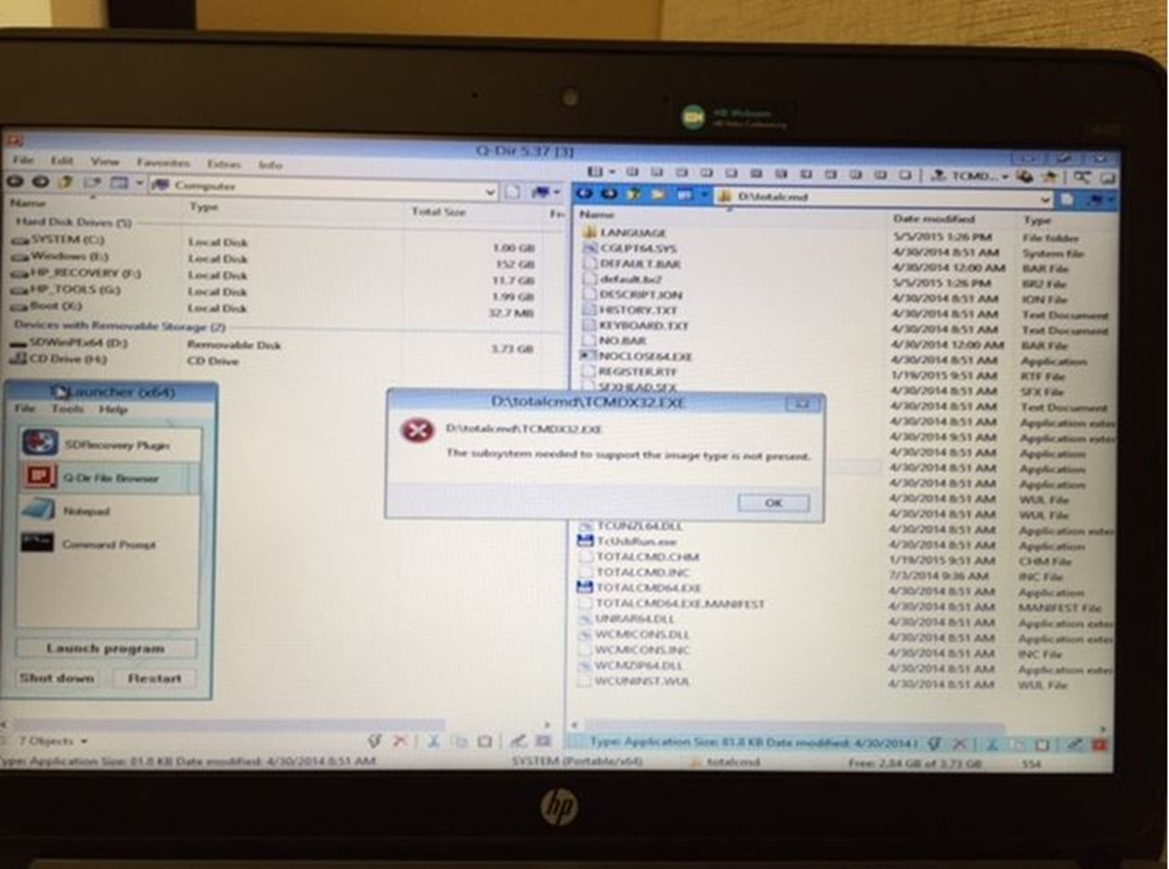
NOTE: Data retrieval tools such as TotalCommander will also work. If this strategy is used, check the software version matches the operating system version (I.e. Windows x64 requires TotalCommander x64, and Windows x32 requires TotalCommander x32)." If the incorrect version is used, the computer may display, "The subsystem needed to support the image type is not present".
Figure 33: Error