How to handle endpoint devices that have Block SID already enabled during SecureDoc Installation
Recent changes in computer hardware/BIOS default settings indicate that various computer manufacturers are implementing Block SID functionality by default in the BIOS configurations of these devices. This has nominally been done to ensure such devices are more secure against certain kinds of attacks that can take over a user's unmanaged Self-Encrypting Drive, for example during a ransomware attack.
Concern for SecureDoc: Having Block SID already enabled can impede the SecureDoc Client Installer from installing Pre-Boot into Self Encrypting Drives (SEDs) such as Opal, Ruby, or TCG Enterprise Drives and thus prevent SecureDoc from managing the SED.
Work-Around:
The SecureDoc Installer is now able to detect if Block SID has been enabled, and will perform the following steps:
1 - The SecureDoc Installer, having detected that Block SID is enabled, will display the Install-process Message shown further down in this article.
2 - It will make a request to the BIOS to disable Block SID. This will only take effect AFTER the next warm or cold start of the device.
3 - Another message will appear. A "Fly in" message that slides out from the right edge of the Windows desktop, similar to the "Fly-in" message shown further down in this article.
The user will then need to warm or cold start the device. During the boot up process a BIOS-level prompt may appear, similar to the one shown in the image in Case 1, below:
The steps to be followed during this boot up process are covered in Case 1 and Case 2, below.
Case 1: Where the SecureDoc Installer request succeeds, the presence of the user at the device is required to authorize the BIOS to make this change
Note: Phrasing of this prompt may vary according to device manufacturer, but the following is a representative example: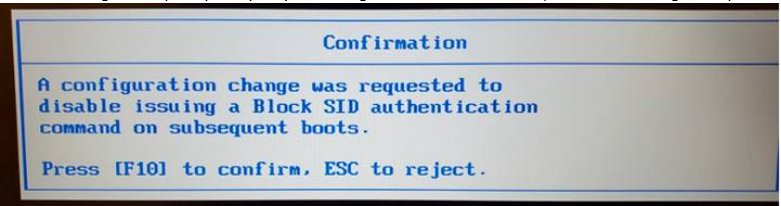
The user must accept/confirm whichever option will disable Block SID for the device make/model in question. This prompt does not time-out.
Case 2: Where the SecureDoc Installer request does not succeed (a possibility for the BIOS of some device makes/models) then no prompt will appear. In such a case, the user must manually access the device's BIOS settings and either disable Block SID or enable SID Authentication, then save those settings and restart the device.
In either of the above cases, upon the device starting up following the disablement of Block SID, or following the enablement of SID Authentication (either by confirming the prompt as directed in Case 1, or manually by changing the BIOS in Case 2), the device will now be able to restart the SecureDoc Installation process (which may take time to load) and successfully install SecureDoc Pre-Boot.
Note: Some device makes/models may not have an option in the BIOS to either disable Block SID or enable SID Authentication. If that is true, please contact the computer manufacturer for your device make/model for additional support.
Example: Install-process Message
SecureDoc installation cannot proceed when BlockSID (may be called SID on your device) is in effect, so it must be disabled.
A BIOS-level option will appear after the device has been rebooted; Choose the option in that prompt that will disable BlockSID.
Example: "Fly in" Message
A BlockSID disable request was sent to the BIOS. During reboot, if the prompt appears then accept/confirm that Block SID will be disabled.
If no BIOS prompt appears after the device reboots, manually disable BlockSID in the BIOS to complete the SecureDoc installation.