Description:
To allow client devices installed with older versions of Windows (and that already have the SecureDoc client software deployed on them) to be upgraded to Windows 10 – without having to decrypt before the upgrade -- the Windows 10 installation media (ISO, or USB) must be modified to have SD kernel modules injected.
In this way, the SecureDoc Filter Driver will be in-place, providing disk decryption capabilities during the upgrade process.
Pre-requisites:
- Windows 10 ISO installation media
- Windows ADK from windows 10 kits
- SDPETools: Request download through Support Team
Syntax:
C:\Temp\SDPETool>SDPETool.exe /?
WinMagic (R) WinPE & RE tool. Version 1.0.1.
Copyright (C) 2013 WinMagic Inc.
SDPETool: unexpected argument "/?"
Usage: SDPETool [-h] [-l <logfile>] [-d <Level>] [-a <integer>] [-e <winxp | win7>] [-p <x86 | amd64>] [-w <wim file path>] [-t <sys | PE>] [-m Mount folder] [-i <integer>]
-h Display help
-l, --logfile=<logfile> Log file path
-d, --debug=<Level> Debug level...
-a, --action=<integer> Action: 1:Integration 2: De-integration
-e, --edition=<winxp | win7> WinPE & RE for xp or newer...
-p, --platform=<x86 | amd64> Platform of WinPE & RE
-w, --wimfile=<wim file path> Path to wim file
-t, --target=<sys | PE> WinPE & RE or normal windows system
-m, --mount=Mount folder Needed for RAM disk based system, like PE & RE
-i, --index=<integer> Image index to WIM
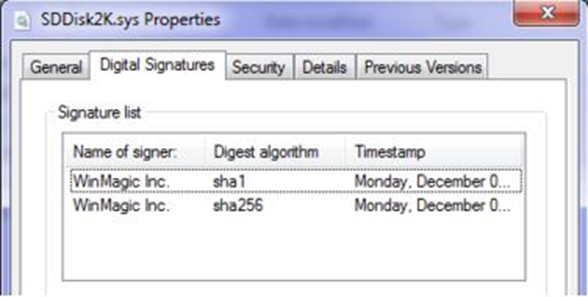
SD kernel modules: for X64 & X86 respectively (Note: driver binary must be dual signed with SHA1 & SHA256 ...)
* SDDisk2k.sys & chkdxp.dat (checksum)
* SDDToki.sys & chkdtk.dat (checksum)
Steps to inject SD kernel modules into windows 10 ISO installation media: (e.g. 64bit windows 10 ISO media)
- Create the following local folders: c:\temp\src ; c:\temp\moun ; c:\temp\winremount ; C:\Temp\SDPETool
- Copy the setup sources from the DVD or a mounted ISO to "C:\temp\src": (extract from ISO Windows 10 media)
- Copy SDPETools into folder "C:\Temp\SDPETool".
- Update SD kernel modules into "C:\Temp\SDPETools\AMD64"
- Run "Deployment and Imaging Tools Environment" from Windows 10 ADK with an account having administrator rights.

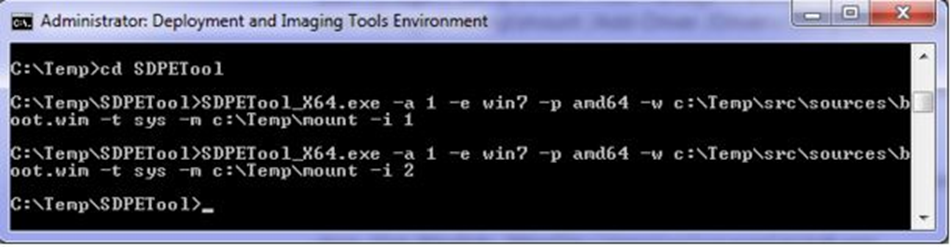
- Using SDPETool, Insert kernel driver into boot.wim:
C:\Temp\SDPETool>SDPETool_X64.exe -a 1 -e win7 -p amd64 -w c:\Temp\src\sources\boot.wim -t sys -m c:\Temp\mount -i 1
C:\Temp\SDPETool>SDPETool_X64.exe -a 1 -e win7 -p amd64 -w c:\Temp\src\sources\boot.wim -t sys -m c:\Temp\mount -i 2
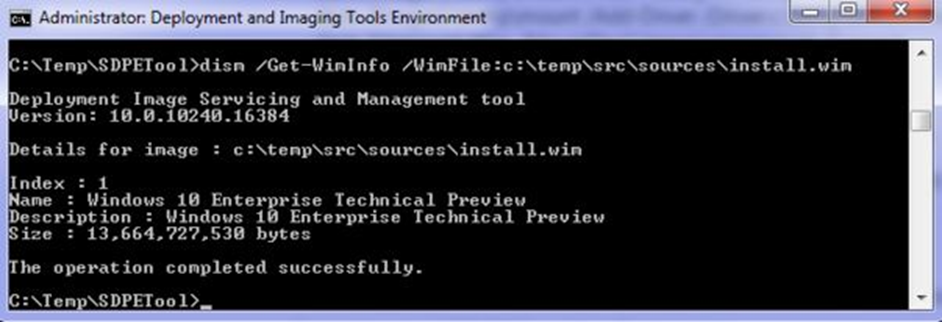
- Obtain the image index from the Install.wim information by running the following command, and then check every index to see how many indexes have to be updated.
dism /Get-WimInfo /WimFile:c:\temp\src\sources\install.wim
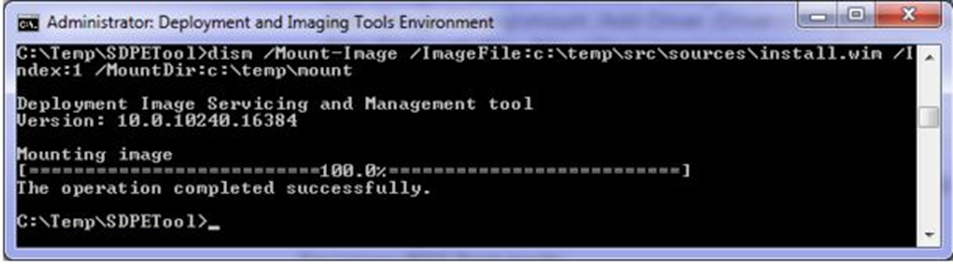
- Mount install.wim to a temporary folder:
dism /Mount-Image /ImageFile:c:\temp\src\sources\install.wim /Index:1 /MountDir:c:\temp\mount
- Using SDPETool Insert kernel driver into winre.wim:
C:\Temp\SDPETool>SDPETool_X64.exe -a 1 -e win7 -p amd64 -w c:\Temp\mount\Windows\System32\Recovery\winre.wim -t PE -m c:\Temp\winremount -i 1

Note: If there are multiple indexes found in install.wim, update them one by one, following same steps
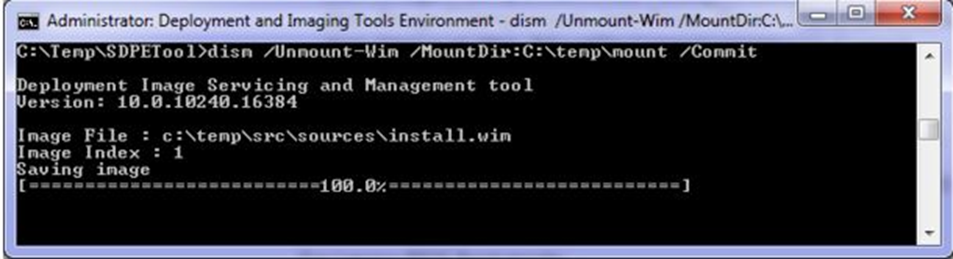
Commit change to install.wim by un-mounting (It takes a while since the OS image is pretty big!!)
dism /Unmount-Wim /MountDir:C:\temp\mount /Commit
- Using SDPETool Insert kernel driver into install.wim: (It takes a while since the OS image is pretty big!!)
C:\Temp\SDPETool>SDPETool_X64.exe -a 1 -e win7 -p amd64 -w c:\Temp\src\sources\install.wim -t sys -m c:\Temp\mount -i 1

Note: If there are multiple indexes found in install.wim, update them one by one, following same command above
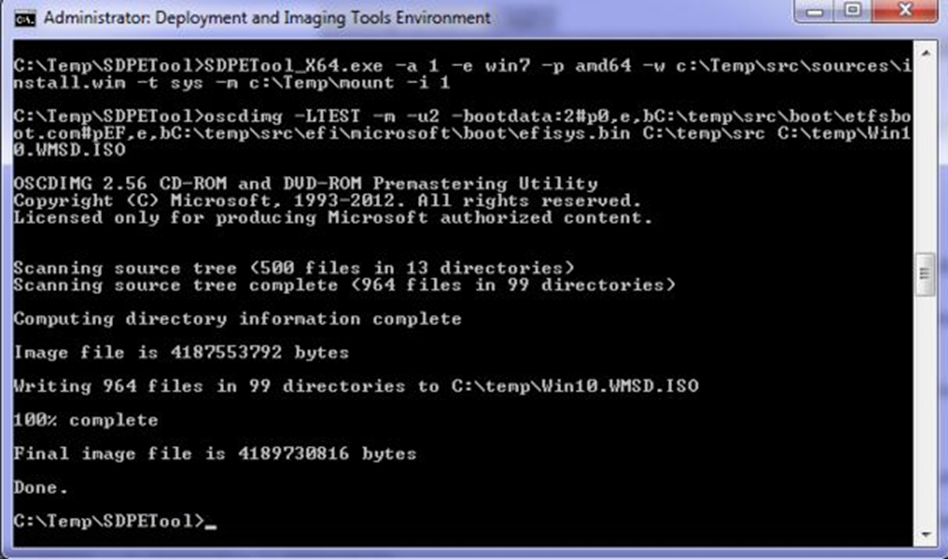
Using oscdimg.exe tool to create an ISO image of modified OS
For Legacy BIOS Boot mode:
- oscdimg -LWMSD -m -u2 -bC:\temp\src\boot\etfsboot.com C:\temp\src C:\temp\Win10.WMSD.ISO
For Legacy and UEFI BIOS multiple Boot mode:
- oscdimg -LWMSD -m -u2 -bootdata:2#p0,e,bC:\temp\src\boot\etfsboot.com#pEF,e,bC:\temp\src\efi\microsoft\boot\efisys.bin C:\temp\src C:\temp\Win10.WMSD.ISO
Note: DVD media is labeled as "WMSD", change as you need!!
All done!!
Summary:
SD kernel modules need to be injected into three instance of WIM, if not considering the extra image exists under "boot.wim" & "install.wim"
* boot.wim
* WinRE.wim (Note: It's actually embedded under install.wim)
* Install.wim
Another injection method (Best for Enterprise or OEM to have their own imaging process ...)
- Restart from media, and install Windows 10 from media to a disk
- Press Ctrl+Shift+F3 to enter audit mode during the Out-of-box experience (OOBE) process.
- Manually inject SD kernel modules
- Reseal the system by using the sysprep - generalize - shutdown options.
- Capture the generalized image (mark as SD integrated ...)
Internal Reference:
- https://confluence.winmagic.local:8443/pages/viewpage.action?pageId=27394792
- Public article: KB 1518 Procedural Support for Windows 10 In-Place Upgraded to Threshold 2