This article provides further details regarding error message which can occur with a previously activated E-Drive and what steps that can be taken to allow user to successfully install SecureDoc Client software.
Product version affected:
All SD versions
Environment:
Windows 8 and 10
Devices shipped with SED drives
NOTE:
a. Windows 7 does not support e-drive technology
b. The e-drive feature is not available in Lenovo or HP business models.
Scenario encountered:
When a user is installing SecureDoc on an “E-Drive Activated device, it’s likely the user will encounter the following error during the installation process:
Example:
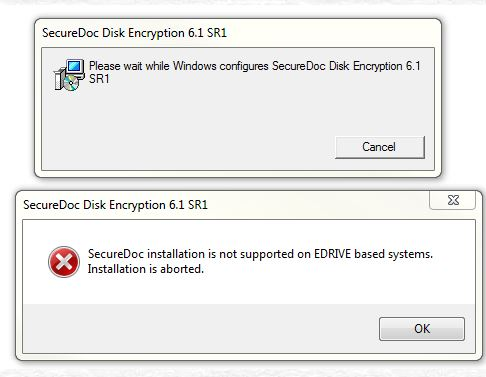
“SD installation is not supported on EDRIVE based systems. Installation is aborted”
Probable Cause:
The hardware vendor may shipped these e-drive activated devices with Windows 8.x or 10 pre-installed on SED/OPAL drives. If the device came initially with Windows 8 and was reimaged with Windows 7 OS, then the drive is still e-drive activated and locked.
Windows 8 and 10 may also recognize certain types of SED drives to be eDrive capable when installing and automatically activates the hardware encryption built into the drive. This is seen often occur with Crucial and Micron SED drives, as well as certain models of Samsung and Sandisk SED drives.
Verification Steps:
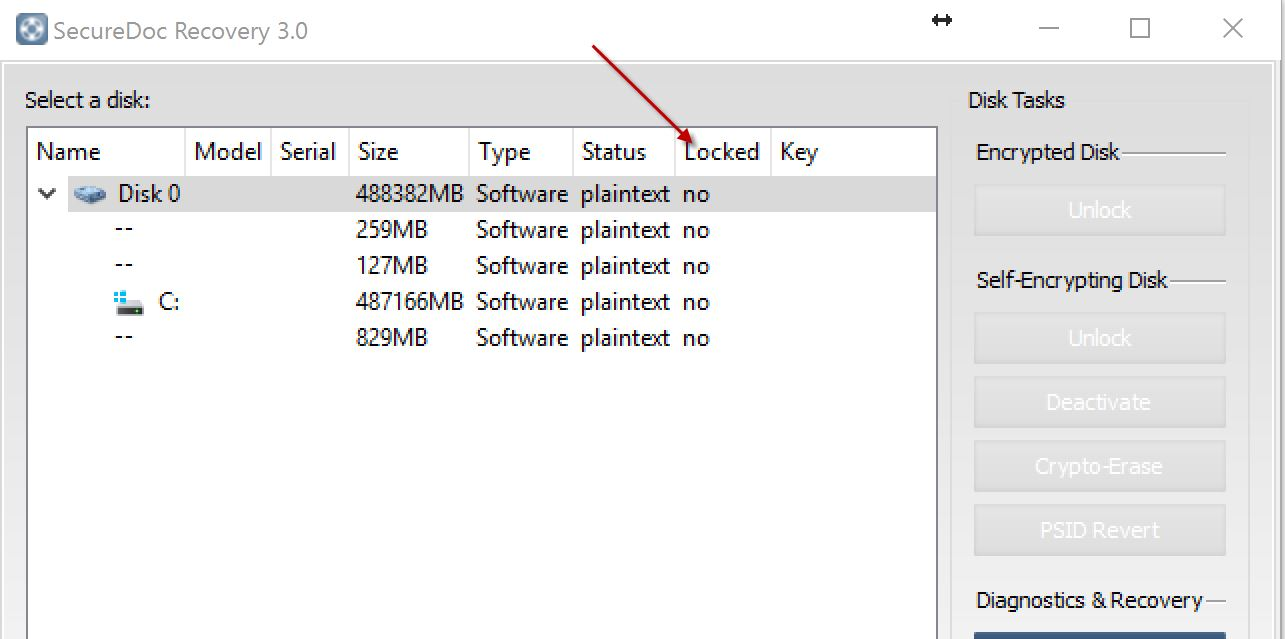
Verify if the drive is locked or not using our SDRecovery.exe tool (in Windows) or using WinPE tool.
Make sure to do a full back up of the hard drive before attempting cryptoerase or PSID revert.
Use Samsung Magician Tools and the 32-byte characters that is labeled on the drive to do PSID revert on Samsung SED hard drives.
For other brand of hard drives, please use the vendor's specific tool or the WinPE tool to do PSID revert or Cryptoerase the drives.
Set the BIOS to legacy mode and SATA controller to AHCI.
Reimage the hard drive with new Windows OS
Re-run the SD installation with Administrative rights.
Note: Please contact customer support to obtain the latest WinPE tool.
Proposed Solution:
To prevent an Opal 2 SED drive from being placed into eDrive mode, one of the following steps can be performed which will prevent the Windows 8.1 / Windows 10 installer from automatically placing the drive into this mode.
This article is written specifically when addressing issue for a single device:
Note: If you need to address the same issue where this involved multiple devices (e.g. mass deployment) then please refer to KB article 1646 – How to Disable E-Drives
Note: This is only if the drive is not already in eDrive mode. If the drive has been imaged or installed by another method without specifying these parameters, a reimage with these will not remove the drive from eDrive / Single User Mode.
If you are using Windows 8 or 10 setup DVD / USB, you need to set a registry entry to prevent Win8/Win8.1 from enabling eDrive:
Unzip the attached reg file to the Windows setup USB (if using DVD put the reg file onto a different USB drive)
Boot Win 8 / 10 setup DVD / USB
Press shift-F10 to launch command prompt. In other words, when you boot the Win8 or Windows 10 setup, press shift-F10 to load a command prompt, then set this registry entry BEFORE continuing with Win8 or Win10 setup.
Navigate to the location of the reg file in step 1
Type block_eDrive_auto_enable.reg and hit enter
If prompted choose yes to import the registry file
Close the command prompt and continue with Win8 / 8.1 setup as you normally would
NOTE: This registry setting is not permanently applied to the setup DVD/USB. The next time you use this same setup DVD/USB you will need to apply the registry setting again.
If you are using an image from another machine, ensure that the image being applied was created with the TCGSecurityActivationDisabled option disabled
To ensure this is set properly you can import the attached reg file to the original machine before taking the image
