Why am I unable to sign in to SecureDoc Preboot screen while offline?
Issue:
The following issue is observed when user attempts to sign in to SecureDoc Preboot while offline, in which one of the following error occurs:
- 0x8136 User not found or, 0xa0 Password is incorrect.
e.g.

Environment Scenario:
Customer must be using PBConnex Autoboot or PBConnex Authentication while on the Network. The profile must have the following setting enabled:
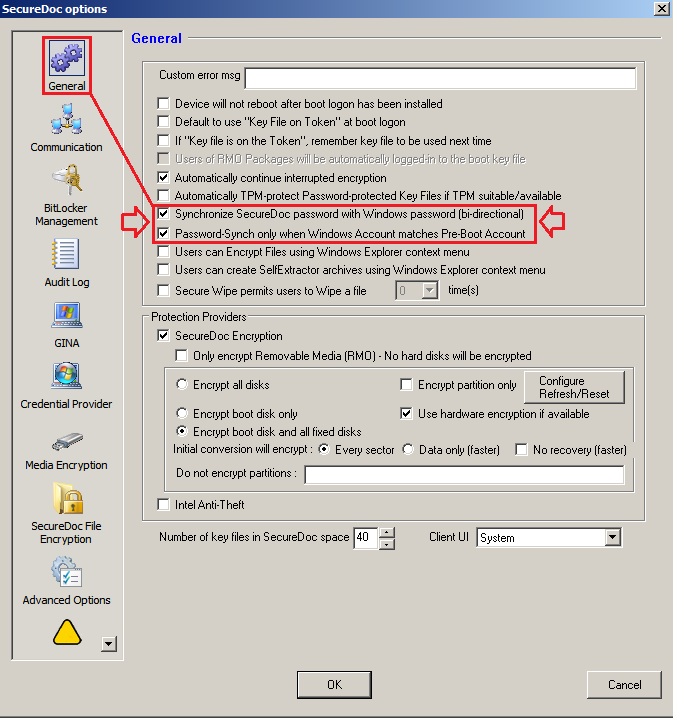
Under General Section:
- Synchronize SecureDoc Password with Windows password (bi-directional)
- Password-Sync only when Windows Account matches Pre-boot Account
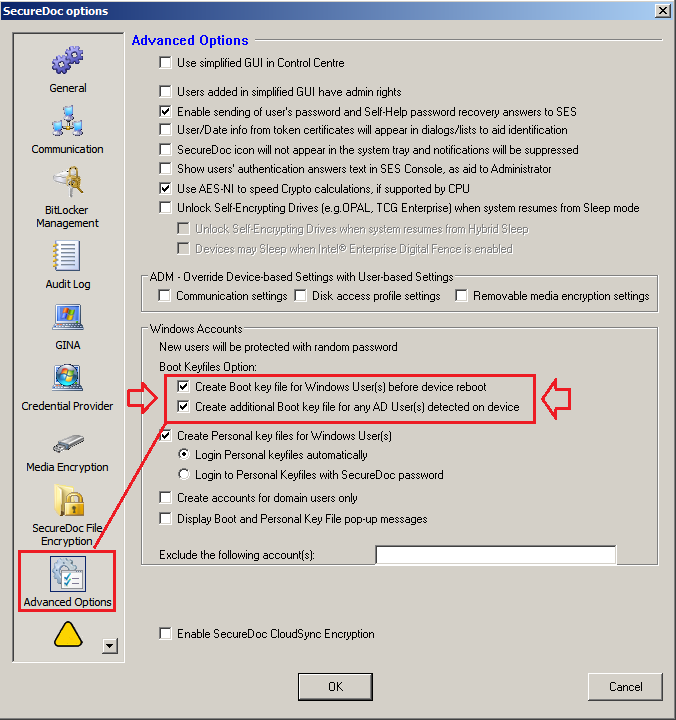
Under Advanced Options Section:
- Create Boot key file for windows User(s) before device reboot
- Create additional Boot Key for any AD User(s) detected on device.
Probable Cause: The password synchronization process is a client-side process. When a password is synchronized, the SecureDoc client will make a request for the key file of the user in question from the SES Server. When this occurs, it will trigger the SecureDoc Password Synchronization DLL to become unregistered. This results in password synchronization not taking place, and the request for a key file will not happen. This also affects the SecureDoc Windows Account feature, which creates boot key files for Windows Users. When a new user signs into a device, the request for a key file is not made to the server.
How to Diagnose and confirm issue exist:
You can further verify for the existence of specific registry key values or properties within the Windows registry in which if they are missing, then this will prevent SecureDoc Password Synchronization feature from working.
Here are the steps to verify:
From Windows start menu, launch Windows Registry Editor.
- regedit.exe
Search to confirm the existence of the following Keys and Properties:
Under HKEY_LOCAL_MACHINE\SYSTEM\CurrentControlSet\Control\Lsa
- Look for Notification Packages under the above location
Under HKEY_LOCAL_MACHINE\SYSTEM\CurrentControlSet\Control\NetworkProvider\Order
- Look for ProviderOrder under the above location:
Under HKEY_LOCAL_MACHINE\SYSTEM\CurrentControlSet\services\
- Look for SDPswdSynchronizer under the above location.
- Under SDPswdSynchronizer , look for NetworkProvider.
- Under NetworkProvider look for the following properties.
"Group" string
"Class" DWORD
"Name" string
"ProviderPath" string
Note: In the event you were able to confirm any of these values are missing then, it would confirm that SecureDoc Password Synchronization feature is not working.
Propose Resolution:
Solution 1:
To fix the issue:
- we need to re-push the profile to the device and then restart.
- The device will need to be online and able to communicate with the SES.
From Within SES:
- Click All Folder.
- Under all folders, click on the Devices tab on the right-hand side.
- Locate the device and select it.
- Right click on the device and select Assign Device Profile to Devices.
- Select the desired profile with Password Synchronization enabled and click OK.
From the Client endpoint device:
- Right click on the SecureDoc Icon in the taskbar.
- Select Communicate with Server.
- Once you receive a message that the device has communicated successfully, restart the device.
- It is recommended to power off the device if this is an SED.
- When the device boots, the sign in to Windows should force the password synchronization.
Solution 2:
If the device is offline, and unable to communicate with the server, you will need to execute the following command from an elevated command prompt:
- regsvr32.exe SDPswdSynchronizer.dll
This will force the registration of the SecureDoc Password Synchronizer.
Solution 3:
If the above solutions do not work, it’s recommended to whitelist SDPswdSynchronizer.dll in your Antivirus and retry solutions 1 or 2 again.
Additional information:
If the above does not work, further escalation may be required.
In preparation for this, you will need to enable additional degug logging activities for your endpoint device:
- You can complete these steps by reviewing KB 1558 - Enabling Debug Log During Testing
- You will need to set Logging activities to 5.
- It’s recommended to enable SDConnex trace logs from within your SES Server.
You can complete these steps by reviewing KB 1593 - How to Collect SDConnex and ADSync Logs
- You will also want to export a copy of the registry locations mentioned based from information reviewed under How to Diagnose and confirm issue exist
Internal References (Internal do not copy to KB):
Salesforce: https://na80.salesforce.com/5001a00000jeukS