Guideline Information for 802.1x Setup Configuration
Purpose Objective
The primary objective of this document is to provide preliminary information which may help provide a better understanding of the interaction with SecureDoc when setting up 802.1x configuration. Depending on the type of authentication method used, there will be specific setup requirements needed to help in rollout implementation process for 802.1.x
Introduction Info:
During the process of EAP authentication, there is an initial process negotiation which takes place to determine what type of EAP authentication method it will use to establish
What is observed regarding EAP authentications steps:
1. host connects to network device.
2. network device sends an EAP Request to host.
3. a reply is received with an EAP Response sent to network device.
4. Network device encapsulates the EAP Response it received from host into a RADIUS Access-Request (using the EAP-Message RADIUS attribute) then passes this back to ACS.
5. ACS extracts EAP Response from RADIUS packet and creates a new EAP Request, encapsulates it into a RADIUS Access-Challenge (again, using the EAP-Message RADIUS attribute), and sends it to network device.
6. The Network device extracts the EAP Request & sends it to host.
The host and ACS then indirectly exchanges EAP messages (transported over RADIUS and passed through the network device). The initial set of EAP messages exchanged starts a negotiation process on the specific EAP method it will used to perform the authentication. (in this case EAP-TLS)
In the case for logs received - The EAP messages exchanged - authentication is attempted then then passed back to ACS which uses an identity store to validate the user's credentials.
It's at this stage which seems to be failing as we're seeing Radius ISE is complaining and providing the following reason code as a response:
PEAP Configuration
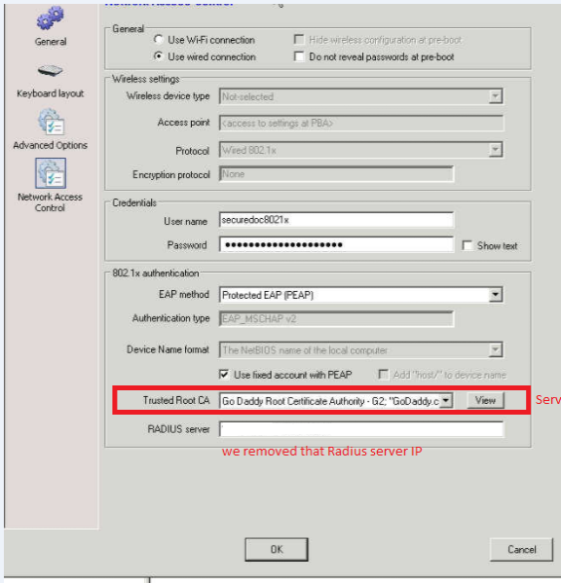
Trusted Root CA
This is the Certificate which was used to issue a Radius server certificate.
Radius Server
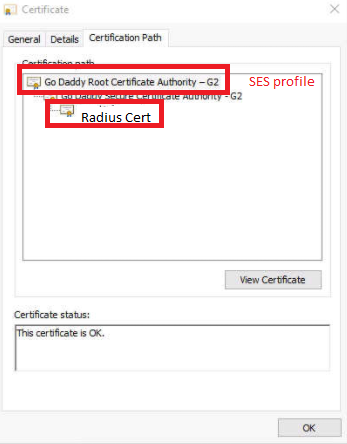
The Radius Certificate issued by the RootCA should match what was selected in the profile.
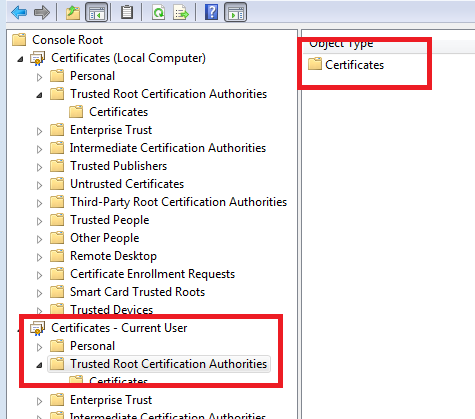
Root CA
The Root Ca should be visible and exportable by User on device (sitting in Trusted Root Ca)
If user was able to successfully able to import the CA, then within the userdata folder, the RootCAThumbprint will populate within SecureDoc.ini with matching info:
Example from securedoc.ini:
RootCAThumbprint=1400000028c35bd45060de497f2cdc5294d2039af57de3e30000000000000000000000000000000000000000000000000000000000000000000000000000000000000000 |
In this example, we see the serial number 28c35bd45060de497f2cdc5294d2039af57de3e3 which we should also be able to check and compare in the Trusted Certificate Store and see that this matches with same serial number of Root CA.
If we are able to access Trusted Root CA (from Device) and export the certificate, then within SecureDoc.ini, it will contain a populated entry for PBN_WirelessRootCACertificate:
PBN_WirelessRootCACertificate=30820xxxxxxxxxxxxxxxxxxxxxxxxxxxxxxxxxxxxxxxxxxxxxxxxxxxxxxxxxxxxxxxxxxxxxxxxxxxxxxxxxxxxxxxxxxxxxxxxxxxxxxxxxxxxxxxxxxxxxxxxxxxxxxxxxxxxxxxxxxxxxxxxxxxxxxxxxxxxxxxxxxxxxxxxxxxxxxxxxxxxxx |
If this information is present, then user should be able to also check Radius logs to confirm if device is reaching the server and either passing validation or failing.
EAP-TLS Configuration
TLS configuration:
- Does rely on Device Certificates
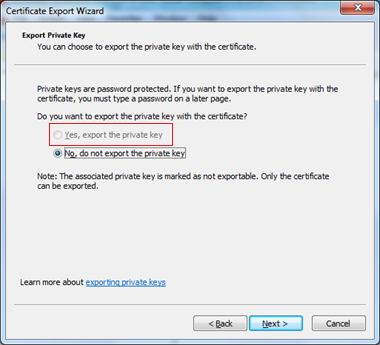
The device Certificate must have sufficient permissions to be able to make them exportable with Private Key.
If user was able to successfully import the device certificate, then within the userdata folder, the following entries will populate within SecureDoc.ini:
PBN_WirelessRootCACertificate | PBN_DeviceCertificate | PBN_DevicePrivateKey
Example from securedoc.ini:
PBN_WirelessRootCACertificate=308206843082056ca003020102020a141001c9000000000002300d06092a864886f70d01010b05003027312530230603550403131c626f756c6465726d65646963616c63656e74657220526f6f74204341301e170d3133313231333136333635325a170d3233313231333136343635325a30653113301 |
PBN_DeviceCertificate=308206ed308205d5a003020102020a6104253b0000000003b2300d06092a864886f70d01010b0500306531133011060a0992268993f22c6401191603636f6d31243022060a0992268993f22c6401191614426f756c6465724d65646963616c43656e746572312830260603550403131f426f756c6465724d65646963616c43656e7465722049737375696e67204341301e170d3137303330313137343733365a170d3230303232393137343733365a300030820 |
PBN_DevicePrivateKey=534b4d57010000008510000090060000c3c963b18ca6dc36981deea51bac8d258cb31b5208ad950b63aa8d8a6f587b90a9c8ca7ca26711c79987cfa85487da7175da60976240d01d7f311c777466ef47bbcb24eca46cf602e0ac766cab2ff1fec28bdefe11e47c9a5a4a4628f449f7450cdad006f3420641f768d968c447d18dcc4db1f102cb4d8b128ed344bac6658527a8ec406d5171f99d2834b68a0f17c67ba20158da04cdd5947d93ab0ba33d1ecb435b940dcc33c671e1a571eda5b2ae7e4501685ed346e0628cbee2b7c9e99290d44fcd2e64351022a5934f6634d6b983c2c7bad5e467dbee23a6487d31787 |
Wired 802.1x Best Practice Guide Scenario
- Wired 802.1x test environment setup
- Server setup a new environment
https://technet.microsoft.com/library/dd348468(ws.10).aspx
- Use an existing environment
- Domain name: Test.local
- AD server: WMQADC01.test.local (10.11.2.12).
- Certificate server: WMQAADCS.test.local (10.11.2.15).
- Radius server: EO800SRV.test.local (10.11.1.62).
- Radius client: Dell 2824 switch (10.11.1.39).
- 802.1x managed ports: port 2 – port 8.
- User/pwd: admin/Password1
- Change authentication method
- Use an existing environment
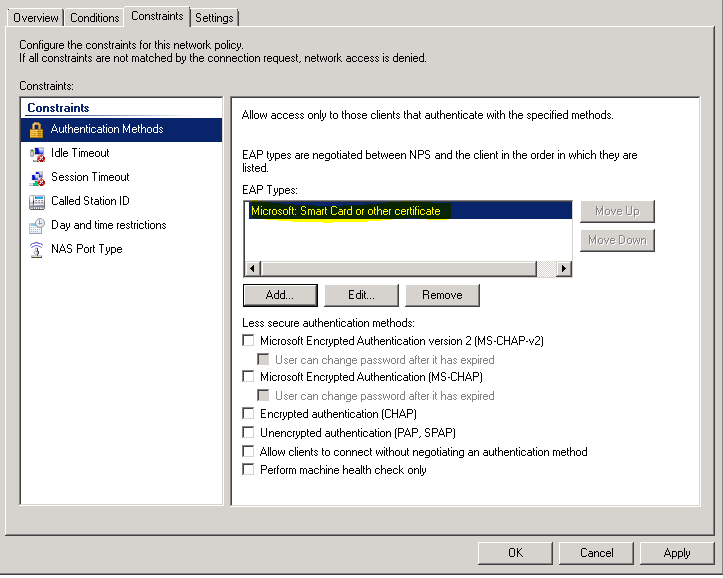
- In Radius server, open Network Policy Server.
- Expand NPS -> Policies -> Network Policies.
- Double click on the currently used network policy.
- Click on Constraints tab and select Authentication Methods, select EAP types:
- Microsoft Protected EAP for PEAP.
- Microsoft Smart Card or other certificate for EAP-TLS.
- Prepare the 802.1x client device
- Join the client to AD.
- Turn on Wired AutoConfig:
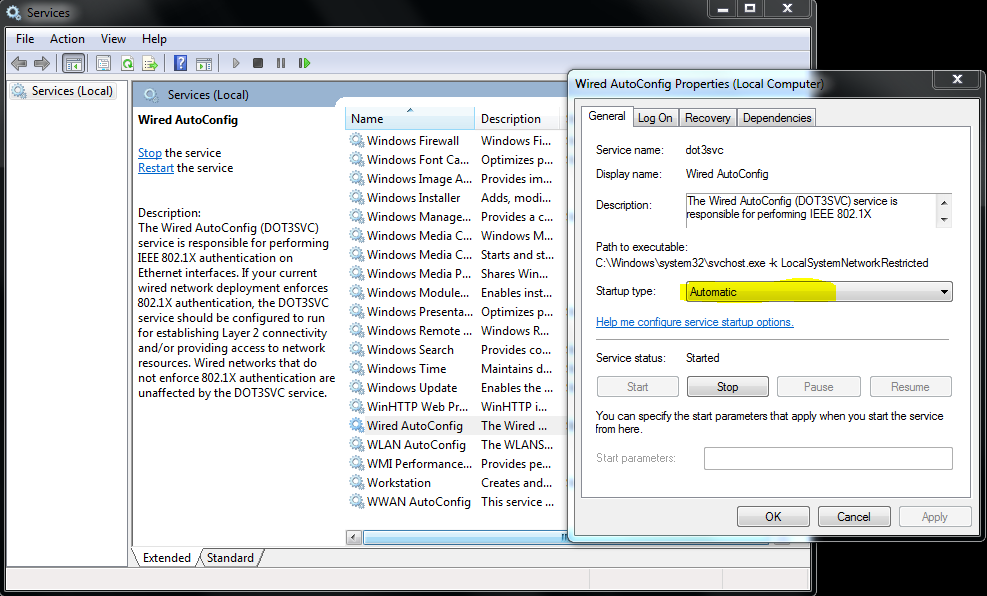
- Open Services.
- Find Wired AutoConfig and double click on it.
- Change Startup type from Manual to Automatic.
- Reboot the device.
- Confirm Wired AutoConfig is running after rebooting.
- Setup proper authentication method:
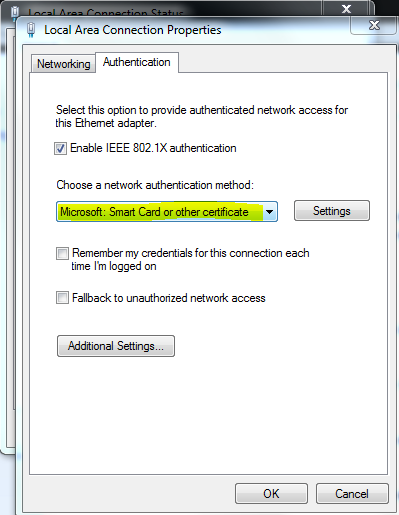
- Open Control Panel -> Network and Internet -> Network and Sharing Center -> Change Adapter Settings.
- Double click on the Ethernet adapter.
- Click on Property button and then Authentication tab.
- Choose proper authentication method.
- Microsoft Protected EAP for PEAP.
- Microsoft Smart Card or other certificate for EAP-TLS.
- Connect the device to 802.1x managed port and make sure it is connected to the network.
- Setup SES server and config 802.1x profile
- Join the system that will be used for SES server to AD.
- Install SES and setup SES server and SDConnex.
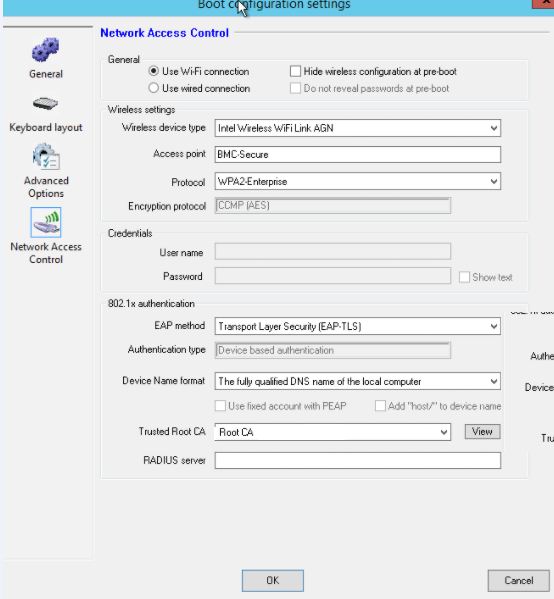
- Create a profile. Besides other necessary settings, go to Boot Configuration -> Network Access Control to setup the following for 802.1x connection:
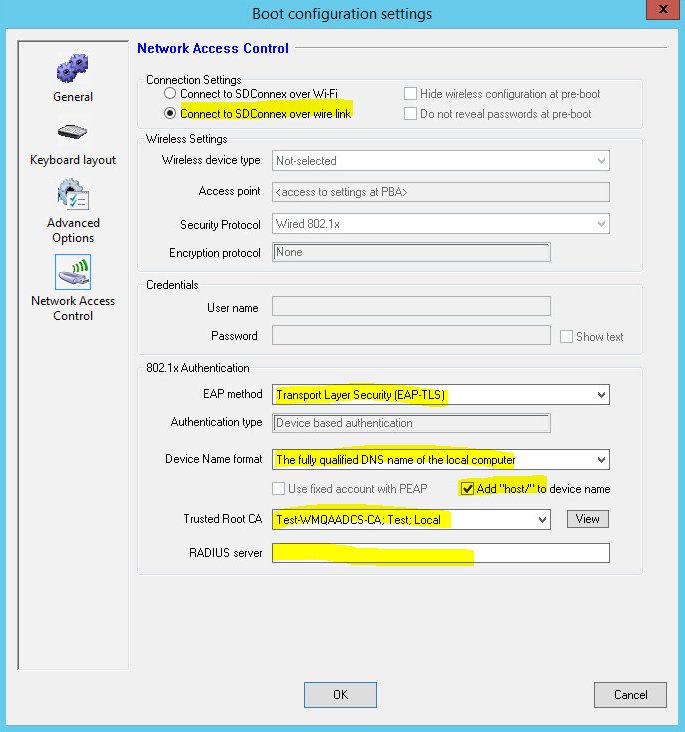
- Select Connect to SDConnex over wire link for Connection Settings.
- Select correct EAP method according to the environment setting.
- If EAP-TLS is selected, select The fully qualified DNS name of the local computer for Device Name format. And check Add “host/” to device name option on.
- Select the certificate server for Trusted Root CA (Test-WMQAADCS-CA; Test; Local when using existing 802.1x environment)
- Leave blank for RADIUS server
- Things to be checked
- Network connection at PBA
- SecureDoc.ini file has the following keywords:
- PBN_DeviceCertificate, which contains the serial number of the device certificate
- PBN_DevicePrivateKey
- PBN_DeviceThumbprint