Issue:
This article illustrates the steps to download and create the SecureDoc Recovery tool for Mac utility, and how to use it to gain access to a Mac device that may not be booting correctly into the Mac OS (or for any other reason where recovery may be necessary).
Note:
This article is in reference to client still using SecureDoc for Mac using previous versions of SD prior to FileVault 2 management. In real terms, there should be almost no such devices still in use as at the time of this update - April 2017, so this article may soon be removed from the Knowledge Base.
Below are the steps to be followed:
1. Download SD recovery tool from http://downloads.winmagic.info/Others/Tools/SDMacRecovery.zip
2. Copy the folder to a Mac device and extract the file "sdemdsk.dmg"
3. Launch the Terminal app on the Mac and execute the commands shown in the screen shot below to create a bootable removable media
4. Un-mount the removable media drive and use the "dd" command in Terminal to create a bootable removable media drive use the screen shot below for more info
*After the removable media is created, insert the removable media into the device exhibiting issues and then press and hold the "ALT" or "option" key and you should see an option called SecureDoc Recovery Tool.
Select that option and boot into it.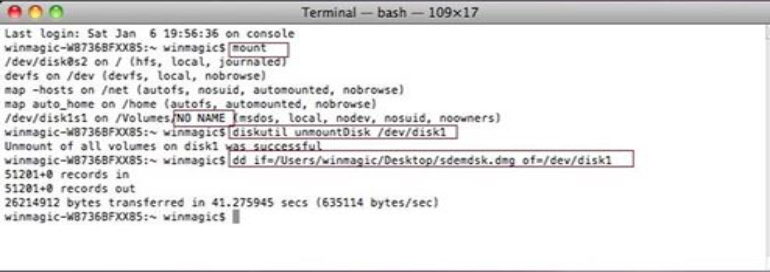
SecureDoc Recovery Tool
Following is the list of available features that will be presented with the SD Recovery tool:
Recovering a Hardware encrypted drive
-Unlock Internal SED
-Manage Internal SED
Recovering a Software encrypted drive
-Import DBK File (hidden)
-Repair SDS/SDBoot
SecureDoc Logon
-Call EFI Shell
-Run OS Picker
-Restart
-Shutdown
-Show Log
Recovering a Hardware encrypted drive
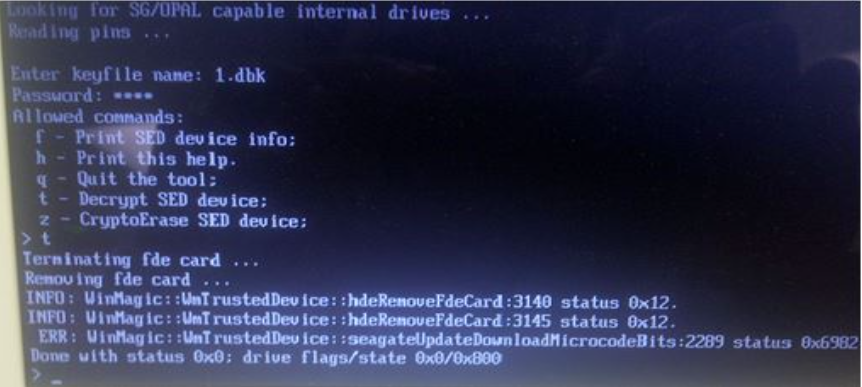
Option 1: Unlock Internal SED (Self-Encrypting Drive)
The feature is accessible only if an internal disk is a SED and it is locked.
After choosing this feature, the user will be prompted for a keyfile name and a password if password protected recovery file is used (recovery file generated by SES). Unlocking would have happened automatically if the Emergency Disk (ED) was created locally.
Option 2: Manage Internal SED
The feature is accessible only if an internal disk is an SED . After choosing this feature the user will be able to:
- get help on all available commands
- get SED device info and current state
- decrypt SED device
- cryptoerase SED device
Use "decrypt” and "Crypro-erase” actions only in case of emergency.
"Decrypt” is useful as a way to remove hardware protection when running SecureDoc Uninstall is impossible for some reason.
Warning: "Cryptoerase” will wipe the contents of the disk
If you encounter problems:
Sometimes when running this tool on an SED, you may see the spinning wheel (animated wait icon) fafter choosing the option 'Manage Internal SED'. The workaround for this is as follows:
- Choose 'Call EFI Shell'
- Look for the HFS partition of the USB:
- Type in fs1:, fs2:, fs3:, etc….until you find the one which lists the file below
- Type in 'wmsinst.efi i'
- You will be requested to enter the keyfile (hardware pin)
- If successfully authenticated, you will have options to decrypt SED or CryptoErase